Hamilton Beach 76461 Use And Care - Page 3
How to Use Your Can Opener
 |
View all Hamilton Beach 76461 manuals
Add to My Manuals
Save this manual to your list of manuals |
Page 3 highlights
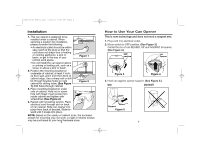
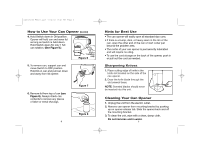
840105800 ENv05.qxd 12/4/02 9:47 AM Page 4 Installation 1. This can opener is designed to be installed under a cabinet. When selecting a location for installation, please consider the following: • An electrical outlet should be within easy reach of the plug so that the cord does not drape over a heating or cooking appliance, a sink or basin, or get in the way of your normal work space. Figure 1 • Do not install the can opener above a cooking or heating unit, such as a stove, or above a sink or basin. 2. Position the mounting bracket on underside of cabinet, at least 4 inches from wall, and 1 inch from front of cabinet edge. Use a sharp nail or drill bit through bracket holes to mark cabinet for drilling holes. (See Figure 1.) Drill holes through cabinet. Figure 2 3. Place mounting bracket on under side of cabinet. Hold nut in screw hole with finger. Insert screw from inside cabinet and tighten with screwdriver. (See Figure 2.) 4. Repeat with remaining screws. Place electrical cord through slot on back of can opener. Slide can opener into place from back of bracket. Slide forward until it snaps into place. NOTE: Based on the variety of cabinet sizes, the enclosed screws for mounting may not work. Longer or shorter screws may be purchased at your local hardware store. 4 How to Use Your Can Opener This is new technology and does not need a magnet arm. 1. Plug cord into electrical outlet. 2. Move switch to OFF position. (See Figure 3.) Center the rim of can BEHIND, UP and AGAINST lid opener. (See Figure 4.) OFF position Lid Opener Figure 3 Figure 4 3. Hold can against opener support. (See Figure 5.) DO: DO NOT: Support Figure 5 5
-
 1
1 -
 2
2 -
 3
3 -
 4
4 -
 5
5 -
 6
6 -
 7
7 -
 8
8 -
 9
9 -
10
 |
 |
