Harman Kardon AVR 320 Owners Manual
Harman Kardon AVR 320 Manual
 |
View all Harman Kardon AVR 320 manuals
Add to My Manuals
Save this manual to your list of manuals |
Harman Kardon AVR 320 manual content summary:
- Harman Kardon AVR 320 | Owners Manual - Page 1
AVR 320 Audio/Video Receiver OWNER'S MANUAL ®® Power for the Digital Revolution.® - Harman Kardon AVR 320 | Owners Manual - Page 2
Selectors 42 Function List 44 Setup Code Tables 54 Troubleshooting Guide 54 Processor Reset 55 Technical Specifications Typographical Conventions In order to help you use this manual with the remote control, front panel controls and rear panel connections, certain conventions have been used - Harman Kardon AVR 320 | Owners Manual - Page 3
for direct connection to digital recorders, and the front panel coaxial digital jacks may be switched to outputs for use with portable recorders - a Harman Kardon exclusive. Two video recording outputs, preamp-out jacks, and a color-coded eight-channel input make the AVR 320 virtually future - Harman Kardon AVR 320 | Owners Manual - Page 4
Before Use Your AVR 320 has been designed for use with 120-volt AC current. Connection to a line voltage other than that for which it is intended can create a safety and fire hazard and may damage the unit. If you have any questions about the voltage requirements for your specific model, or about - Harman Kardon AVR 320 | Owners Manual - Page 5
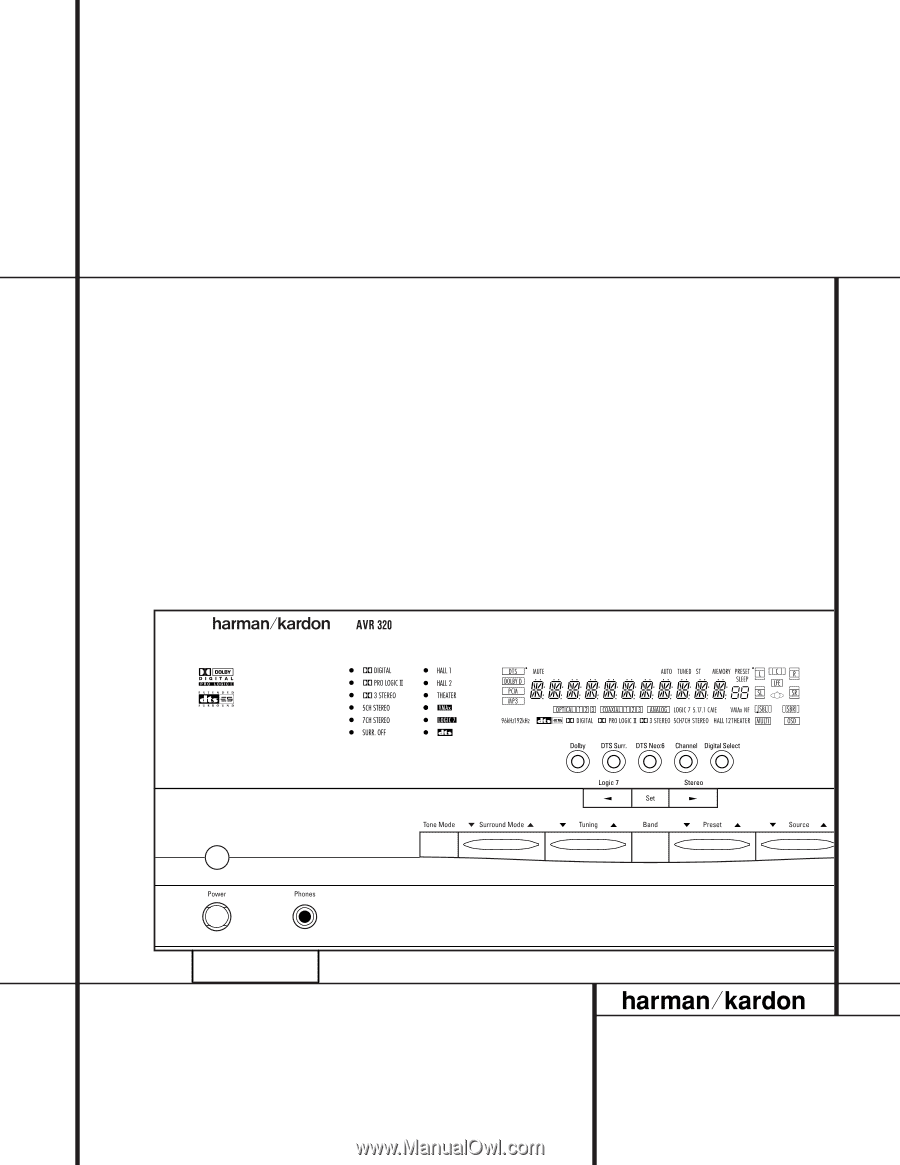
Jacks Bass Control Ò Balance Control Ú Treble Control Û Digital Select Button Ù Channel Select Button ı Volume Control ˆ Input Indicators ˜ Main Information Display ¯ Remote Sensor Window ˘ Surround Mode Indicators 1 Main Power Switch: Press this button to apply power to the AVR 320. When the - Harman Kardon AVR 320 | Owners Manual - Page 6
* Digital Optical 3 Input: Connect the optical digital output of an audio or video product to this jack. When the input is not in use, be certain to keep the plastic cap installed to avoid dust contamination that might degrade future performance. ( Input/Output Status Indicator: This LED indicator - Harman Kardon AVR 320 | Owners Manual - Page 7
Front Panel Controls ˆ Input Indicators: A green LED will light to the left of the input that is currently the input source for the AVR 320. ˜ Main Information Display: This display delivers messages and status indications to help you operate the receiver. (See pages 8 & 9 for a complete explanation - Harman Kardon AVR 320 | Owners Manual - Page 8
Z Mute Indicator A Bitstream Indicators: When the input is a digital source, one of these indicators will light to display the specific type of data signal in use. B Optical Source Indicators: These indicators light to show when an Optical Digital Input has been selected. C Sample Rate Indicators - Harman Kardon AVR 320 | Owners Manual - Page 9
channels being received at the digital input. When the letters flash, the digital input has been interrupted. (See pages 23 & 30 for more information on the Channel Indicators.) R Preset Number/Sleep Timer: When the tuner is in use, these numbers indicate the specific before the AVR 320 goes into - Harman Kardon AVR 320 | Owners Manual - Page 10
AC Accessory Outlet · AC Power Cord a Video 2 Component Video Inputs b Component Video Outputs c DVD Component Video Inputs d Remote IR Output e Remote IR Input f Multiroom IR Input g Video 1 Video Outputs ¡ AM Antenna: Connect the AM loop antenna supplied with the receiver to these terminals. If - Harman Kardon AVR 320 | Owners Manual - Page 11
video outputs of a DVD player to these jacks. d Remote IR Output: This connection permits the IR sensor in the receiver to serve other remote controlled devices. Connect this jack to the "IR IN" jack on Harman Kardon (or other compatible) equipment. e Remote IR Input: If the AVR 320's frontpanel - Harman Kardon AVR 320 | Owners Manual - Page 12
Main Remote Control Functions a Power Off Button b IR Transmitter Window c Program/SPL Indicator d Power On Button e Input Selectors f AVR Selector g AM/FM Tuner Select h 6-Channel/8-Channel Direct Input i Test Button j Sleep Button k Surround Mode Selector l Night Mode m Channel Select Button n - Harman Kardon AVR 320 | Owners Manual - Page 13
factory to operate the AVR 320 and most Harman Kardon CD or DVD players and cassette decks. The remote is also capable of operating a wide variety of other products using the control codes that are part of the remote. Before using the remote with other products, follow the instructions on pages 37 - Harman Kardon AVR 320 | Owners Manual - Page 14
43 Mute: Press this button to momentarily silence the AVR 320 or TV set being controlled, depending on which device has been selected. When the AVR 320 remote is being programmed to operate another device, this button is pressed with the Input Selector Button e to begin the programming process. (See - Harman Kardon AVR 320 | Owners Manual - Page 15
AVR 320's Multiroom IR Input f. When it is used in the same room as the AVR 320, it will control the func- tions of the AVR 320 or any compatible Harman Kardon products in that room. When it is used in a separate room via a sensor connected to the Multiroom IR Input f, the buttons for power, input - Harman Kardon AVR 320 | Owners Manual - Page 16
video game, a digital satellite receiver, HDTV tuner or digital cable set-top box or the output of a compatible computer sound card to the Optical and Coaxial Digital Inputs 31 32 *Ó. 4. Connect the coaxial or optical Digital Audio Outputs ⁄ on the rear panel of the AVR 320 to the matching digital - Harman Kardon AVR 320 | Owners Manual - Page 17
Link The remote room IR receiver should be connected to the AVR 320 via standard coaxial cable. Plug the IR connection cable into the Multiroom IR Input Jack f on the AVR 320's rear panel. If other Harman Kardon compatible source equipment is part of the main room installation, the Remote IR Output - Harman Kardon AVR 320 | Owners Manual - Page 18
audio, video and system connections tweeter in the center-channel speaker. Depending on the specifics of your room acoustics At least 2 feet When the AVR 320 is used in 5.1-channel operation, the preferred location for spot. You should also follow the instructions of the subwoofer's manufacturer, or - Harman Kardon AVR 320 | Owners Manual - Page 19
ADJUST CHANNEL ADJUST MULTI-ROOM ADVANCED EXIT Figure 1 The semi-OSD system is also available, allowing you to make adjustments directly, by pressing the appropriate buttons on the front panel or remote control for the specific parameter to be adjusted. For example, to change the digital input for - Harman Kardon AVR 320 | Owners Manual - Page 20
lower third of the video display connected to the AVR 320. Press the Set Button p to enter the new digital input assignment. An exclusive Harman Kardon feature is the ability to switch the front panel coaxial digital audio jack from its normal use as an input to an output connection so that portable - Harman Kardon AVR 320 | Owners Manual - Page 21
choose one of the submodes. Note that the list of specific sub-modes in some categories will vary according to whether 5.1 or 6.1/7.1 operation is chosen. In addition, some of the modes available in the AVR 320 will not appear unless a digital source is selected and playing the correct bitstream. To - Harman Kardon AVR 320 | Owners Manual - Page 22
speakers, the AVR 320 will not make the LARGE option available for the center speaker. This is due to the requirements of Logic 7 processing, and does not indicate a problem with your receiver. When NONE is selected, no signals will be sent to the center-channel output. The receiver will operate in - Harman Kardon AVR 320 | Owners Manual - Page 23
System Configuration • If a subwoofer is connected to the AVR 320, you have the option to have the front left/right "main" speakers reproduce bass frequencies at all times, and have the subwoofer operate only when the AVR 320 is being used with a digital source that contains a dedicated Low - Harman Kardon AVR 320 | Owners Manual - Page 24
, make certain that the Balance Control Ò is set to the center "12 o'clock" position. Using EzSet Harman Kardon's exclusive EzSet remote makes it possible to quickly and accurately set the AVR 320's output levels without the use of a sound pressure meter, although manual adjustment is also available - Harman Kardon AVR 320 | Owners Manual - Page 25
does NOT match the position indicated in the display, turn the AVR 320 off using the Main Power Switch 1 and check the speaker wiring or connections to external power amplifiers to make certain that each speaker is connected to the correct output terminal. After checking for speaker placement, let - Harman Kardon AVR 320 | Owners Manual - Page 26
DIGITAL Available only with digital input sources encoded with Dolby Digital data. It provides up to five separate main audio channels and a special dedicated Low-Frequency Effects channel Logic 7 Music Logic 7 Enhance Exclusive to Harman Kardon for AV receivers, Logic 7 is an advanced mode that - Harman Kardon AVR 320 | Owners Manual - Page 27
Delay time not adjustable When only the two front-channel loudspeakers are used, Harman's patented VMAx mode delivers a three-dimensional sound space at both the front and back of a room. Depending on whether the AVR has been configured for either 5.1 or 6.1/7.1 operation, one of these modes, - Harman Kardon AVR 320 | Owners Manual - Page 28
source is selected, the video signal for that input will be routed to the Video Monitor Output Jack ¤ and will be viewable on a TV monitor connected to the AVR 320. Volume Control • Adjust the volume to a comfortable level using the front panel Volume Control ı or remote Volume Up/Down 40 buttons - Harman Kardon AVR 320 | Owners Manual - Page 29
the player's owner's manual. Selecting a Digital Source To utilize either digital mode, you must have properly connected a digital source to the AVR 320. Connect the digital outputs from DVD players, HDTV receivers, satellite systems or CD players to the Optical or Coaxial Inputs 31 32 *Ó. In - Harman Kardon AVR 320 | Owners Manual - Page 30
during MP3 playback. In addition to the bitstream indicators, the AVR 320 features a set of unique channel-input indicators that tell you how many channels of digital information are being received and/or whether the digital signal is interrupted. (See Figure 8.) Figure 8 These indicators are the - Harman Kardon AVR 320 | Owners Manual - Page 31
, check with the device's owner's manual or contact the manufacturer's technical support area. • If your computer or sound card's digital output is not capable of direct connection to the AVR, you may use an optional, external transcoder, such as those available from Harman Kardon to convert the USB - Harman Kardon AVR 320 | Owners Manual - Page 32
to an output using the IN/OUT SETUP menu as described below and on page 20. Front Panel Connections In addition to the rear panel digital outputs, the AVR 320 offers Harman Kardon's exclusive configurable front panel output jack feature. For easy connection of portable devices, you may 32 OPERATION - Harman Kardon AVR 320 | Owners Manual - Page 33
instructions in the steps shown earlier. 6-Channel/8-Channel Direct Input The AVR 320 is equipped for future expansion through the use of optional, external adapters for formats that the AVR 320 may not be capable of processing or to allow connection to the output of high-resolution optical audio - Harman Kardon AVR 320 | Owners Manual - Page 34
On Volume Level As is the case with most audio/video receivers, when the AVR 320 is turned on, it will always return to the volume setting in effect when the unit was turned off. However, you may prefer to always have the AVR 320 turn on at a specific setting, regardless of what was last in use when - Harman Kardon AVR 320 | Owners Manual - Page 35
the OSD Button v to exit the menu system. Full-OSD Time-Out Adjustment The FULL OSD menu system is used to simplify the setup and adjustment of the AVR 320, using a series of on-screen menus. The factory default setting for these menus leaves them on the screen for 20 seconds after a period - Harman Kardon AVR 320 | Owners Manual - Page 36
IR Output Jack d on the AVR 320 is connected to an IR Input jack on compatible Harman Kardon audio components such as CD, DVD or cassette players, the transport functions of those machines may also be controlled using the Transport Controls z 28 on either remote control. To turn the system off - Harman Kardon AVR 320 | Owners Manual - Page 37
Programming the Remote The AVR 320 is equipped with a powerful remote control that will control not only the receiver's functions, but also most popular brands of audio and video equipment, including CD players, cassette decks, TV sets, cable boxes, VCRs, satellite receivers and other hometheater - Harman Kardon AVR 320 | Owners Manual - Page 38
red light under the Input Selector will flash on and off once to indicate that the codes have been erased. Macro Programming Macros enable you to easily repeat frequently used combinations of commands with the press of a single button on the AVR 320's remote control. Once programmed, a macro will - Harman Kardon AVR 320 | Owners Manual - Page 39
has for a specific device, find the button number on the Function List and then look in the column for the device you are controlling. For example, button number 45 is the Direct button for the AVR 320, but it is the "Favorite" button for many cable television boxes and satellite receivers. Button - Harman Kardon AVR 320 | Owners Manual - Page 40
to repeat the steps shown above. However, press the same Input Selector in Steps 1 and 3. Channel Control Punch-Through The AVR 320's remote may be programmed to operate so that the channel control function for either the TV, cable or satellite receiver used in your system may be used in conjunction - Harman Kardon AVR 320 | Owners Manual - Page 41
Input Selector e and the Mute Button 43 at the same time until the red light glows under the CBL/SAT e button. Press the VCR e Button, followed by the three-digit code for the specific model you wish to control. Finally, press the CBL/SAT Button e again. Resetting the Remote LED under the Input - Harman Kardon AVR 320 | Owners Manual - Page 42
Select 22 Volume Down Volume Down Input Level Down 23 Channel/Guide Channel Trim Title 24 ⁄ Move/Adjust Up Up 25 Speaker/Menu Speaker Adjust Menu Intro Scan 26 fi Move/Adjust Left Left 27 Set Set Enter 28 fl Right 29 Digital/Exit Digital Input Select Open/Close 30 ¤ Move/Adjust - Harman Kardon AVR 320 | Owners Manual - Page 43
63 Rewind 64 Play 65 Fast Forward 66 Record 67 Stop 68 Pause AVR Function Clear Preset Tune Up Tune Down OSD Preset Tune Down DVD CD Prev Chapter Track Increment Program Disc Skip Disc Skip Slow Rev Dolby Modes DTS Digital Modes DTS Neo:6 Select Logic 7 Select Stereo Mode Select Skip - Skip - Harman Kardon AVR 320 | Owners Manual - Page 44
ELECTROHOME EMERSON FISHER FUNAI FUTURETECH GE GOLDSTAR GRUNDIG HALL MARK HARMAN KARDON HITACHI INFINITY INKEL JBL JC PENNEY JENSEN JVC KAWASHO KEC KENWOOD KLOSS KMC KTV LLOYTRON LODGENET LOGIK LUXMAN LXI MAGNAVOX MARANTZ MATSUI MEMOREX METZ MGA Setup Code Number 103 132 192 001 160 070 164 053 - Harman Kardon AVR 320 | Owners Manual - Page 45
Code Table: TV (Continued) Manufacturer/Brand Setup Code Number MIDLAND MINERVA MITSUBISHI MTC NAD NATIONAL TANDY TATUNG TECHNICS TECHWOOD TEKNIKA TELEFUNKEN TELERENT TERA THOMSON TMK TOSHIBA TOTEVISION UNIVERSAL VIDEO CONCEPTS VIDTECH WARDS YAMAHA YORK YUPITERU ZENITH ZONDA 199 084 001 011 030 - Harman Kardon AVR 320 | Owners Manual - Page 46
: VCR Manufacturer/Brand Setup Code Number AIWA AKAI AMPRO AMSTRAD ANAM ASA AUDIO DYNAMICS BROKSONIC CANDLE CANON CAPEHART CITIZEN CRAIG CURTIS MATHES DAEWOO DAYTRON DBX DUAL DYNATECH ELECTROHOME EMERSON FERGUSON FINLUX FISHER FUNAI GE GO VIDEO GOLDSTAR GRAETZ HARMAN KARDON HITACHI INSTANT REPLAY - Harman Kardon AVR 320 | Owners Manual - Page 47
SOUNDESIGN STS SYLVANIA SYMPHONIC TANDY TASHICO TATUNG TEAC TECHNICS TEKNIKA TELEFUNKEN THOMAS THOMSON THORN TMK TOSHIBA TOTEVISION UNITECH VECTOR RESEARCH VICTOR VIDEO CONCEPTS VIDEOSONIC WARDS YAMAHA ZENITH Setup Code Number 048 159 057 058 147 166 070 074 078 086 114 125 150 167 172 019 026 037 - Harman Kardon AVR 320 | Owners Manual - Page 48
Setup Code Table: CD Manufacturer/Brand ADC ADCOM AIWA AKAI AUDIO TECHNICA AUDIOACCESS AUDIOFILE BSR CALIFORNIA AUDIO CAPETRONIC CARRERA CARVER CASIO CLARINETTE CROWN CURTIS MATHES DENON EMERSON FISHER FRABA FUNAI GE GENEXXA GOLDSTAR HAITAI HARMAN KARDON HITACHI INKEL JC PENNEY JENSEN JVC KENWOOD - Harman Kardon AVR 320 | Owners Manual - Page 49
REALISTIC ROTEL SAE SAMSUNG SANSUI SANYO SCOTT SEARS SHARP SHERWOOD SIGNATURE SONY SOUNDSTREAM STS SYLVANIA SYMPHONIC TAEKWANG TANDY TEAC TECHWOOD THETA DIGITAL TOSHIBA VECTOR RESEARCH VICTOR WARDS YAMAHA YORK Setup Code Number 037 038 045 046 171 175 202 203 020 036 056 057 064 065 089 090 091 092 - Harman Kardon AVR 320 | Owners Manual - Page 50
Code Table: Tape Manufacturer/Brand Setup Code Number HARMAN KARDON 001 Setup Code Table: Audio Manufacturer/Brand Setup Code Number HARMAN KARDON 001 Setup Code Table: DVD Manufacturer/Brand APEX DIGITAL CALIFORNIA AUDIO DENON GE GOLDSTAR HARMAN KARDON JVC KENWOOD LG LOTTE MAGNAVOX MARANTZ - Harman Kardon AVR 320 | Owners Manual - Page 51
OPTIMUS PANASONIC PANASONIC DBS PANSAT PERSONAL CABLE PHILIPS PICO PRESIDENT PRIMESTAR RCA REALISTIC SAMSUNG SATELLITE SERVICE CO SCIENTIFIC ATLANTA SONY STAR CHOICE DBS STARCAST SUPER GUIDE TEECOM TOSHIBA UNIDEN ZENITH Setup Code Number 472 450 422 442 356 414 425 359 359 320 321 322 325 361 315 - Harman Kardon AVR 320 | Owners Manual - Page 52
Setup Code Table: CBL Manufacturer/Brand ABC ALLEGRO AMERICAST ANTRONIX ARCHER BELCOR CABLE STAR CENTURION CENTURY CITIZEN COLOUR VOICE COMBANO COMTRONICS DIAMOND DIGI EAGLE EASTERN ELECTRICORD EMERSON FOCUS G.I. GC ELECTRONICS GE GEMINI GENERAL GENERAL INSTRUMENT GOLDEN CHANNEL GOODMIND HAMLIN - Harman Kardon AVR 320 | Owners Manual - Page 53
ATLANTA SEAM SHERITECH SIGNAL SIGNATURE SL MARX SPRUCER STARCOM STARGATE SYLVANIA TADIRAN TANDY TELECAPATION TEXSCAN TFC TIMELESS TOCOM TOSHIBA UNIKA UNITED CABLE UNIVERSAL VIDEOWAY VIEWSTAR ZENITH ZENTEK Setup Code Number 058 111 112 213 053 214 116 055 056 061 099 100 101 207 063 115 032 037 072 - Harman Kardon AVR 320 | Owners Manual - Page 54
Mute button • Turn up volume control • Follow the instructions in the Display Brightness section on page 35 so that the display is set to VFD FULL • Check speaker wire connections for shorts at receiver and speaker ends • Contact your local Harman Kardon service depot • Select a mode other than - Harman Kardon AVR 320 | Owners Manual - Page 55
includes knobs, buttons and terminal connections. Height measurement includes feet and chassis. All features and specifications are subject to change without notice. Harman Kardon is a registered trademark, and Power for the Digital Revolution is a trademark, of Harman Kardon, Inc. TM is a trademark - Harman Kardon AVR 320 | Owners Manual - Page 56
250 Crossways Park Drive, Woodbury, New York 11797 www.harmankardon.com © 2002 Harman Kardon, Incorporated Part No.: J90200022000 Rev. 1 (02/2002)
-
 1
1 -
 2
2 -
 3
3 -
 4
4 -
 5
5 -
 6
6 -
 7
7 -
8
-
9
-
10
-
11
-
12
-
13
-
14
-
15
-
16
-
17
-
18
-
19
-
20
-
21
-
22
-
23
-
24
-
25
-
26
-
27
-
28
-
29
-
30
-
31
-
32
-
33
-
34
-
35
-
36
-
37
-
38
-
39
-
40
-
41
-
42
-
43
-
44
-
45
-
46
-
47
-
48
-
49
-
50
-
51
-
52
-
53
-
54
-
55
-
56
 |
 |
AVR 320
Audio/ Video Receiver
OWNER’S MANUAL
Power for the Digital Revolution.
®
®