Harman Kardon AVR 7200 Owners Manual
Harman Kardon AVR 7200 Manual
 |
View all Harman Kardon AVR 7200 manuals
Add to My Manuals
Save this manual to your list of manuals |
Harman Kardon AVR 7200 manual content summary:
- Harman Kardon AVR 7200 | Owners Manual - Page 1
® Power for the Digital Revolution.® AVR 7200 AUDIO/VIDEO RECEIVER OWNER'S MANUAL - Harman Kardon AVR 7200 | Owners Manual - Page 2
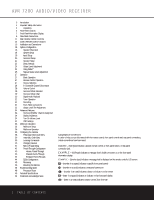
Configuration 45 Renaming 46 Resetting the Remote 48 Troubleshooting Guide 48 Processor Reset 49 Technical Specifications 49 Trademark Acknowledgements Typographical Conventions In order to help you use this manual with the remote control, front-panel controls and rear-panel connections - Harman Kardon AVR 7200 | Owners Manual - Page 3
directly from compatible computers or playback devices with the power and fidelity you expect from Harman Kardon. In addition to providing a wide range of listening options, the AVR 7200 is easy to configure so that it provides the best results with your speakers and specific listening-room - Harman Kardon AVR 7200 | Owners Manual - Page 4
power cords should be replaced immediately by an authorized service center with a cord meeting factory specifications. Handle the AC Power Cord Gently When disconnecting the power the weight of the AVR 7200 and the heat generated by the amplifiers, there is the remote possibility that the rubber - Harman Kardon AVR 7200 | Owners Manual - Page 5
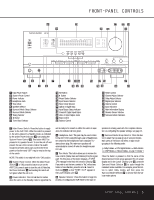
Adjust Selector Û Delay Adjust Selector Ù Digital Input Selector ı Volume Control ˆ Input Indicators ˜ Main Information Display ¯ Remote Sensor Window ˘ Surround Mode Indicators 1 Main Power Switch: Press this button to apply power to the AVR 7200. When the switch is pressed in, the unit is placed - Harman Kardon AVR 7200 | Owners Manual - Page 6
AVR 7200. ˜ Main Information Display: This display delivers messages and status indications to help you operate the receiver. (See page 7 for a complete explanation of the Information Display.) ¯ Remote Sensor Window: The sensor behind this window receives infrared signals from the remote control - Harman Kardon AVR 7200 | Owners Manual - Page 7
inputs, only the L and R will light, indicating a stereo input. When a digital source is playing, the indicators will light to display the channels being received at the digital input. When the letters flash, the digital input has been interrupted. (See page 31 for more information on the Channel - Harman Kardon AVR 7200 | Owners Manual - Page 8
IR Output § Remote IR Input ¶ Multiroom IR Input • FM Antenna Terminal ª Video 2 Inputs , AM Antenna Terminals ⁄ Video 1 Outputs 12 DVD Inputs ‹ Preamp Outputs › Subwoofer Output fi DVD Component Video Inputs fl Video 2 Component Video Inputs ‡ Component Video Monitor Outputs ° AC Power color-coded in - Harman Kardon AVR 7200 | Owners Manual - Page 9
PVR to these jacks. ∞ Remote IR Output: This connection permits the IR sensor in the receiver to serve other remote controlled devices. Connect this jack to the "IR IN" jack on Harman Kardon (or other compatible) equipment. § Remote IR Input: If the AVR 7200's front-panel IR sensor is blocked due to - Harman Kardon AVR 7200 | Owners Manual - Page 10
coax digital audio output from a DVD player, HDTV receiver, the S/P-DIF output of a compatible computer sound card playing MP3 files or streams, LD Port: This jack is used to enable the AVR 7200 to be controlled by an external computer or programmable remote system that uses RS-232 commands. Due to - Harman Kardon AVR 7200 | Owners Manual - Page 11
MAIN REMOTE CONTROL FUNCTIONS 0 Power Off Button 1 Power On Button 2 LCD Information Display 3 Input Selectors 4 AVR Selector 5 Test Button 6 function names shown here are each button's feature when used with the AVR 7200. Most buttons have additional functions when used with other devices. When - Harman Kardon AVR 7200 | Owners Manual - Page 12
factory to operate the AVR 7200 and most Harman Kardon CD or DVD players and cassette decks. The remote is also capable of operating a wide variety of other products using the control codes that are part of the remote. Before using the remote with other products, follow the instructions on pages 38 - Harman Kardon AVR 7200 | Owners Manual - Page 13
the remote codes to the AVR 7200. Be certain that the lens is not covered when using the remote, and point the lens toward the AVR for best results. In learning mode, the remote receives IR codes to be learned through a sensor behind the lens. NOTE: DO NOT remove the rubber plug that is supplied to - Harman Kardon AVR 7200 | Owners Manual - Page 14
When it is used in the same room as the AVR 7200, it will control the functions of the AVR 7200 or any compatible Harman Kardon products in that room. When it is used in a separate room via a sensor connected to the Multiroom IR Input ¶ jack, the buttons for Power, Input Source, Volume and Mute will - Harman Kardon AVR 7200 | Owners Manual - Page 15
supplied FM antenna to the FM (75ohm) Connection •. The FM antenna may be an external roof antenna, an inside powered compatible video device may be connected to any video input, to simplify programming device codes into the remote control AVR 7200 and your TV or projector. Consult the instructions - Harman Kardon AVR 7200 | Owners Manual - Page 16
the Remote IR Output ∞ jack to the Remote IR Input jack on Harman Kardon or other compatible equipment. Multiroom IR Link The remote room IR receiver should be connected to the AVR 7200 via standard coaxial cable. Plug the IR connection cable into the Multiroom IR Input ¶ jack on the AVR 7200's rear - Harman Kardon AVR 7200 | Owners Manual - Page 17
cannot be fully turned on using the outlet alone without a remote control command. The Unswitched AC Accessory Outlet · will receive power as long as the unit is plugged into a powered AC outlet. The AVR 7200 features a removable power cord that allows wires to be run to a complex installation so - Harman Kardon AVR 7200 | Owners Manual - Page 18
panel. Note that the Power Indicator 3 will turn amber, indicating that the unit is in the Standby mode. 3. Remove the protective plastic film from the front panel lens. If left in place, the film may affect the performance of your remote control. 4. Install the four supplied AAA batteries in the - Harman Kardon AVR 7200 | Owners Manual - Page 19
AVR 7200 on either by pressing the System Power Control 2 on the front panel, or via the remote by pressing the Power On Button b, the AVR Selector e or any of the Input Selectors df on the remote. The Power buttons on the front panel or remote control for the specific parameter to be adjusted. For - Harman Kardon AVR 7200 | Owners Manual - Page 20
since the program sources and channels received by these devices often switch between analog and digital audio. To simplify operation, the AVR 7200 will automatically select whichever output is active and change the AVR's input setting. An exclusive Harman Kardon feature is the ability to switch - Harman Kardon AVR 7200 | Owners Manual - Page 21
the instructions needed for front-panel or remote controls as shown on remote are determined by whether the 5.1 or 6.1/7.1 channel configuration is in use. In either case, the selection of a Logic 7 mode enables Harman Kardon This menu tells the AVR 7200 which type of speakers speakers receive low - Harman Kardon AVR 7200 | Owners Manual - Page 22
the specifications in the speakers' owner's manual, or ask your dealer. This menu screen also allows you to enter the settings for the AVR 7200's channel pair for use in powering a second set of speakers that have their source selected by the AVR 7200's multiroom control system. See page 34 for - Harman Kardon AVR 7200 | Owners Manual - Page 23
no subwoofer is connected to the AVR 7200, press the ‹/› Navigation Button n on the remote so that SUB NONE appears in specifications page of the speaker's owner's manual, by getting that information from the manufacturer's Web site, or by contacting your dealer or the manufacturer's customer service - Harman Kardon AVR 7200 | Owners Manual - Page 24
directly from the remote control by pressing the receiver such as the AVR 7200 sound mixer specifically places sound there Harman Kardon's exclusive EzSet remote makes it possible to quickly and accurately set the AVR 7200's output levels without the use of a sound-pressure meter, although manual - Harman Kardon AVR 7200 | Owners Manual - Page 25
instructions on page 33. Manual Output Level Adjustment Output levels may also be adjusted manually, either to set them to a specific AVR 7200 off using the Main Power Switch 1 and check the speaker wiring or connections to external power n on the remote only, NOT the main volume controls. If you are - Harman Kardon AVR 7200 | Owners Manual - Page 26
. The output levels may also be adjusted at any time using the remote control and semi-OSD system. To adjust the output levels in this fashion, instructions for changing the settings for that parameter as shown in this section. Having completed the setup and configuration process for your AVR 7200 - Harman Kardon AVR 7200 | Owners Manual - Page 27
setup and configuration of the AVR 7200, it is simple to operate and enjoy. The following instructions will help you maximize the enjoyment of your new receiver: Turning the AVR 7200 On or Off • When using the AVR 7200 for the first time, you must press the Main Power Switch 1 on the front panel - Harman Kardon AVR 7200 | Owners Manual - Page 28
the AVR 7200. pictures remote control. To select a new surround mode from the front panel, first press the Surround Mode Group Selector Button 7 until the desired major surround mode group such as Dolby, DTS or Logic 7 is selected. Next, press the Surround Mode Selector Button 8 to choose the specific - Harman Kardon AVR 7200 | Owners Manual - Page 29
receiver is set for 6.1/7.1 operation and a Dolby Digital signal is present, the EX mode is automatically selected. Even if specific . Exclusive to Harman Kardon for A/V receivers, Logic 7 is and back of a room. Depending on whether the AVR has been configured for either 5.1 or 6.1/7.1 operation, one - Harman Kardon AVR 7200 | Owners Manual - Page 30
problem with the AVR 7200, as some players cannot pass the DTS signal through to the digital outputs. If you are in doubt as to the capability of your DVD player to handle DTS discs, consult the player's owner's manual received. Depending on the settings on the source player and specific surround - Harman Kardon AVR 7200 | Owners Manual - Page 31
in response to the specific signal being received. It is important to Code Modulation) is the noncompressed digital audio system used for compact discs and laser discs. It is also the format used as an output by audio transcoders such as the Harman Kardon DAL 150. The digital circuits in the AVR 7200 - Harman Kardon AVR 7200 | Owners Manual - Page 32
, check with the device's owner's manual or contact the manufacturer's technical support area. • If your computer or sound card's digital output is not capable of direct connection to the AVR 7200, you may use an optional, external transcoder, available from Harman Kardon, to convert the USB output - Harman Kardon AVR 7200 | Owners Manual - Page 33
Control ırî. If you are using a disc with test signals or an external signal generator as the source from which to trim the output levels, you may use the EzSet feature of the remote as an SPL meter to guide you to the correct SPL level. To use the remote for this purpose, follow the instructions - Harman Kardon AVR 7200 | Owners Manual - Page 34
as well as for the Power Indicator 3, will always remain receivers, when the AVR 7200 is turned on, it will always return to the volume setting in effect when the unit was turned off. However, you may prefer to always have the AVR 7200 turn on at a specific any control changes or remote commands - Harman Kardon AVR 7200 | Owners Manual - Page 35
U to exit the menu system. Full-OSD Time-Out Adjustment The FULL OSD menu system is used to simplify the setup and adjustment of the AVR 7200, using a series of on-screen menus. The factory default setting for these menus leaves them on the screen for 20 seconds after a period of inactivity - Harman Kardon AVR 7200 | Owners Manual - Page 36
A-BUS modules are used, follow the instructions provided with the A-BUS remote modules or keypads. Additional information will also be made available through the Harman Kardon Web site at www.harmankardon.com. RS-232 Control The AVR 7200 is rare among A/V receivers in that it provides the capability - Harman Kardon AVR 7200 | Owners Manual - Page 37
be adjusted using an optional IR sensor and the Zone II remote in the remote location, or the A-BUS keypad, or on the optional audio power amplifier connected to the Multiroom Audio Outputs g. Once the multiroom system is turned on, it will remain on even if the AVR 7200 is placed in the Standby - Harman Kardon AVR 7200 | Owners Manual - Page 38
code for this specific device is not in the AVR remote library under that brand name. If that is the case, press the Clear Button j to exit the manual programming mode. Remember that the codes may still be stored in the AVR remote's library under another brand, and you can have the remote control - Harman Kardon AVR 7200 | Owners Manual - Page 39
remote manually. To automatically search through the codes that are available for a specific device type (e.g., DVD, VCR), follow these steps: 1. Turn on the power to the device you wish to program into the AVR remote Commands instructions below to enter the codes for this device into the AVR remote. - Harman Kardon AVR 7200 | Owners Manual - Page 40
the remote control for the device to be programmed within five seconds, as instructed on the next menu screen (Figure 28). PRESS KEY ON ORIGINAL REMOTE Figure 28 6. Continue to hold the button on the original remote until the menu on the AVR remote's LCD screen changes. If the code is successfully - Harman Kardon AVR 7200 | Owners Manual - Page 41
example of replacing the TV codes with those for a VCR. Macro Programming Macros enable you to easily repeat frequently used combinations of multiple remote control commands with the touch of a single button. Once a macro is programmed you may send up to 20 commands with one press of the Power On or - Harman Kardon AVR 7200 | Owners Manual - Page 42
steps available of 20 possible steps. Following the instructions on the remote's LCD screen, press the first key you wish to be transmitted in the macro. In our example, we first want the AVR 7200 to turn on, so the Power Button 1 should be pressed. POWER ON 00/20 SELECT KEY PRESS Figure 42 - Harman Kardon AVR 7200 | Owners Manual - Page 43
programming the remote for Volume punch-through. PUNCH-THROUGH VOLUME Figure 49 4. The next display screen (Figure 50) is where you select the device that will receive the punchthrough commands. In our example, that is the VID 2/TV button, as that is where we want the AVR 7200's volume controls to - Harman Kardon AVR 7200 | Owners Manual - Page 44
PUNCH-THROUGH TV - Harman Kardon AVR 7200 | Owners Manual - Page 45
easier if the displays shown in the remote's LCD screen are customized to reflect the specific characteristics of a playback source's brand name or the new function given to a specific button when one remote's controls are programmed into the AVR remote. The AVR remote allows you to change the name - Harman Kardon AVR 7200 | Owners Manual - Page 46
a new code into the remote. See page 39 for more information. • When a key is renamed it will only apply to the specific device selected in USER RESET appears on the bottom line of the LCD screen, as shown in Figure 74. MAIN MENU USER RESET Figure 74 3. Press the Set Button F to reset the remote - Harman Kardon AVR 7200 | Owners Manual - Page 47
the remote may consume significantly more battery power than normal remote replacing the batteries as soon as this message appears to avoid the loss of programming and configuration settings. These settings are not lost when the batteries are changed quickly. AVR LOW BATTERY Figure 78 • The remote - Harman Kardon AVR 7200 | Owners Manual - Page 48
Mute Button 32 • Turn up volume control • Follow the instructions in the Display Brightness section on page 34 so that the display is set to VFD FULL • Check speaker wire connections for shorts at receiver and speaker ends • Contact your local Harman Kardon service center • Select a mode other than - Harman Kardon AVR 7200 | Owners Manual - Page 49
feet and chassis. All features and specifications are subject to change without notice. Harman Kardon and Power for the Digital Revolution are registered trademarks of Harman International Industries, Incorporated. TM is a trademark of Harman International Industries, Incorporated (patent no. 5,386 - Harman Kardon AVR 7200 | Owners Manual - Page 50
NOTES 50 NOTES - Harman Kardon AVR 7200 | Owners Manual - Page 51
STAPLE BILL OF SALE HERE 51 - Harman Kardon AVR 7200 | Owners Manual - Page 52
® 250 Crossways Park Drive, Woodbury, New York 11797 www.harmankardon.com © 2003 Harman International Industries, Incorporated Part No. 55577310
-
 1
1 -
 2
2 -
 3
3 -
 4
4 -
 5
5 -
 6
6 -
 7
7 -
8
-
9
-
10
-
11
-
12
-
13
-
14
-
15
-
16
-
17
-
18
-
19
-
20
-
21
-
22
-
23
-
24
-
25
-
26
-
27
-
28
-
29
-
30
-
31
-
32
-
33
-
34
-
35
-
36
-
37
-
38
-
39
-
40
-
41
-
42
-
43
-
44
-
45
-
46
-
47
-
48
-
49
-
50
-
51
-
52
 |
 |

AVR 7200
AUDIO/VIDEO RECEIVER
OWNER’S MANUAL
Power for the Digital Revolution
.
®
®