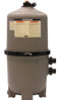
Hayward SwimClear™ Models: C2025 C3025 C4025 C5025 C7000 - Page 5
Starting The Pump And Filter System, Operation - swimclear cartridge filter parts
 |
View all Hayward SwimClear™ manuals
Add to My Manuals
Save this manual to your list of manuals |
Page 5 highlights
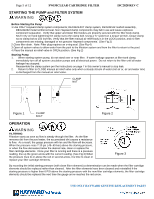
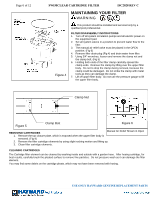
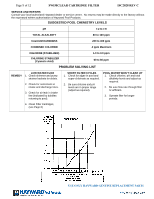
Page 5 of 12 SWIMCLEAR CARTRIDGE FILTER ISC2028 REV C STARTING THE PUMP and FILTER SYSTEM WARNING Before Starting the Pump 1.Use ONLY Hayward clamp system components; DEX2421JKIT clamp system, DEX2421J2 nut/bolt assembly, DEX2422Z2 metal reinforced seal. Non-Hayward clamp components may fail in use and cause explosive component separation. Verify that upper and lower filter bodies are properly secured with the filter body clamp. Never rely on hand tightening the clamp nut to the clamp bolt. Using a ¾" socket on a torque wrench, torque clamp nut to clamp bolt to 150 inch-lbs. Verify that the filter manual air relief body is in the LOCK position, and no filter components are missing, damaged or not genuine Hayward components. (See Fig 2) 2.Close filter drain. Note: Filter plug requires an o-ring seal. (See Fig 4) 3.Open all system valves to allow water from the pool to the filtration system and from the filter to return to the pool. 4.Place the manual air relief valve in OPEN position. (See Fig 2) Starting Pump 1. When starting system pump, do not stand over or near filter. If water leakage appears at filter tank clamp, immediately turn off all system circulation pumps and all electrical power. Do not return to the filter until all water leakage has stopped. Reassemble the clamp system per the instructions on page 7 in this owner's manual to stop leak. 2. Return to filter to CLOSE manual air relief valve only when a steady stream of water (not air or, air and water mix) is discharged from the manual air relief valve. CLAMP NUT Figure 1 CLAMP BOLT Figure 2 OPERATION WARNING FILTERING Filtration starts as soon as flow is steady through the filter. As the filter removes dirt from the pool water, the accumulated dirt causes a resistance to flow. As a result, the gauge pressure will rise and the flow will decrease. When the pressure rises 7-10 psi (.49-.69 bar) above the starting pressure, or when the flow decreases below the desired rate, clean or replace the filter cartridge elements. Once your filter is running and there is a pressure reading, line up the green arrow with the current reading. (See Fig 3) When the pressure rises to or above the red or second arrow, it is time to clean or replace your filter cartridge elements. Manual Air Relief Shown Open In Locked Position Figure 3 By recording the initial starting pressure (with clean filter elements) a determination can be made when the filter cartridge elements should be replaced rather than cleaned. After the filter elements have been cleaned and reinstalled if the starting pressure is higher than 6 PSI above the starting pressure with the new filter cartridge elements, the filter cartridge elements should be replaced the next time the gauge arrow reaches the red arrow. USE ONLY HAYWARD GENUINE REPLACEMENT PARTS
-
 1
1 -
 2
2 -
 3
3 -
 4
4 -
 5
5 -
 6
6 -
 7
7 -
 8
8 -
 9
9 -
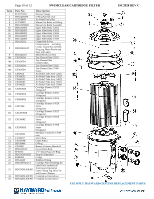 10
10 -
 11
11 -
12
 |
 |
