HealthRider 875 P Instruction Manual
HealthRider 875 P Manual
 |
View all HealthRider 875 P manuals
Add to My Manuals
Save this manual to your list of manuals |
HealthRider 875 P manual content summary:
- HealthRider 875 P | Instruction Manual - Page 1
complete satisfaction through our Customer Service Department. Please call: 08457 089 009 Or write: ICON Health & Fitness, Ltd. Unit 4 Revie Road Industrial Estate Revie Road Beeston Leeds LS11 8JG CAUTION Read all precautions and instructions in this manual before using this equipment. Save - HealthRider 875 P | Instruction Manual - Page 2
YOU BEGIN 5 ASSEMBLY 6 HOW TO USE THE CHEST PULSE SENSOR 10 OPERATION AND ADJUSTMENT 11 HOW TO FOLD AND MOVE THE TREADMILL 23 TROUBLESHOOTING 25 CONDITIONING GUIDELINES 28 ORDERING REPLACEMENT PARTS Back Cover Note: A n EXPLODED DRAWING and a PART LIST are attached in the centre of this - HealthRider 875 P | Instruction Manual - Page 3
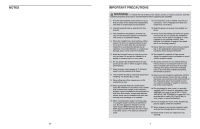
longer than 1.5 m (5 ft.). 2. Use the treadmill only as described in this manual. 13. Keep the power cord away from heated surfaces. 3. This treadmill is intended loose clothes that could become caught in the treadmill. Athletic support clothes are recommended for both men and women. Always wear - HealthRider 875 P | Instruction Manual - Page 4
and adjustment procedures de- scribed in this manual. Never remove the motor hood unless instructed to do so by an authorised service representative. Servicing other than the procedures in this manual should be performed by an authorised service representative only. 25. Always remove iFIT.com - HealthRider 875 P | Instruction Manual - Page 5
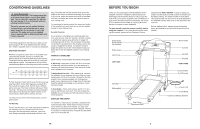
found by using your heart rate as a guide. The chart below shows recommended heart rates and will help prevent post-exercise problems. EXERCISE FREQUENCY To maintain or manual carefully before using the treadmill. If you have questions after reading this manual, please call our Customer Service - HealthRider 875 P | Instruction Manual - Page 6
the hardware in that parts bag. Do not open the parts bags until instructed to do so. If a part is not found in the parts bags, 6 PROBLEM: The chest pulse sensor does not function properly SOLUTION: a. If the chest pulse sensor does not function properly, see CHEST PULSE SENSOR TROUBLESHOOTING on - HealthRider 875 P | Instruction Manual - Page 7
belt is properly tightened. b 3"-4" Rear Roller Adjustment Bolts c. If the walking belt still slows when walked on, please call our Customer Service Department. PROBLEM: The walking belt is off-centre or slips when walked on SOLUTION: a. If the walking belt is off-centre, first remove the key - HealthRider 875 P | Instruction Manual - Page 8
Post 34 9 64 Holes 31 43 3 58 116 56 8 TROUBLESHOOTING Most treadmill problems can be solved by following the steps below. Find the symptom the treadmill still will not run, please call our Customer Service Department. PROBLEM: The speed display on the console does not function properly - HealthRider 875 P | Instruction Manual - Page 9
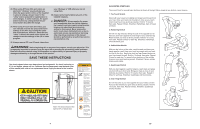
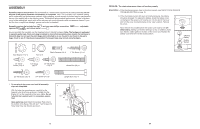
HOW TO LOWER THE TREADMILL FOR USE 1. Hold the upper end of the treadmill with your right hand as shown. Using your left hand, pull the latch knob to the left and hold it. Pivot the treadmill down until the frame is past the latch pin. Slowly release the latch knob. 2. Hold the treadmill firmly with - HealthRider 875 P | Instruction Manual - Page 10
washed and air dried. CHEST PULSE SENSOR TROUBLESHOOTING Sensor Unit Sensor Buckle Unit The instructions on the following pages explain how the chest power lines or other sources. If it is suspected that this is a problem, try relocating the treadmill. • The CR2032 battery may need to be replaced - HealthRider 875 P | Instruction Manual - Page 11
THE INFORMATION MODE/DEMO MODE The console features an information mode that keeps track of the total number of hours that the treadmill has been operated and the total distance that the walking belt has moved. The information mode also allows you to select the metric system or the standard system. - HealthRider 875 P | Instruction Manual - Page 12
personal trainer guides you through from your exercise. When the manual mode of the console is selected have an internet connection and an internet service provider. A list of specific system requirements the on-line instructions for using a program. 6 Follow the on-line instructions to start the - HealthRider 875 P | Instruction Manual - Page 13
is pressed, your personal trainer will begin guiding you through your workout. Simply follow your personal trainer's instructions. Note: If the Time/Incline display speed or incline settings are too high or too low, you can manually override the settings at any time by pressing the Speed or Incline - HealthRider 875 P | Instruction Manual - Page 14
+ button to select a different system. When the desired system is selected, remove the key and then reinsert it. Note: For simplicity, all instructions in this manual refer to the metric system. To reset the displays, press the Stop button, remove the key, and then reinsert the key. 6 Measure your - HealthRider 875 P | Instruction Manual - Page 15
instruction A below. If the LINE OUT jack is being used, see instruction B. Note: If your computer has a 3.5 mm LINE OUT jack, see instruction A. If your computer has only a PHONES jack, see instruction is too high or too low, you can manually override the setting by pressing the Speed or Incline - HealthRider 875 P | Instruction Manual - Page 16
TO CONNECT YOUR PORTABLE CD PLAYER Note: If your CD player has separate LINE OUT and PHONES jacks, see instruction A below. If your CD player has only one jack, see instruction B. A. Plug one end of the audio cable into the jack on the front of the treadmill near the power cord. Plug - HealthRider 875 P | Instruction Manual - Page 17
Audio Wire Frame Pivot Bolt Base Endcap Isolator Belt Guide Isolator Assembly Platform Screw Foot Rail Walking Belt Front Ring 8" Green Wire, M/Ring 4" Green Wire, M/Ring 4" Black Wire, 2F User's Manual # These parts are not illustrated * Includes all parts shown in the box REMOVE THIS EXPLODED - HealthRider 875 P | Instruction Manual - Page 18
EXPLODED DRAWING-Model No. HETL42140 R0804A 37 40 118 90 36 109 74* 2 110 67 105 99 98 97 115 96 57 91 92 33 94 35 93 95 57 92 91 33 1 37 89 106 8 3 4 11 39 108 33 72 73 107 86 76 86 76 80 45 87 115 51 35 88 24 18 22 21 20 25 35 128 23 24 127 17 16 15 130 5* 14 3 126
-
 1
1 -
 2
2 -
 3
3 -
 4
4 -
 5
5 -
 6
6 -
 7
7 -
8
-
9
-
10
-
11
-
12
-
13
-
14
-
15
-
16
-
17
-
18
 |
 |

USER'S MANUAL
Serial
Number
Decal
Model No. HETL42140
Serial No.
CAUTION
Read all precautions and instruc-
tions in this manual before using
this equipment. Save this manual
for future reference.
Part No. 212989 R0804B
Printed in USA © 2004 ICON IP, Inc.
ORDERING REPLACEMENT PARTS
To order replacement parts, contact the ICON Health & Fitness, Ltd. office, or write:
ICON Health & Fitness, Ltd.
Unit 4
Revie Road Industrial Estate
Revie Road
Beeston
Leeds
LS11 8JG
Tel: Country Code:
Outside the UK: 0 (044) 113 387 7133
Fax: 0 (044) 113 387 7125
When ordering parts, please be prepared to give the following information:
•
The MODEL NUMBER OF THE PRODUCT (HETL42140)
•
The NAME OF THE PRODUCT (HealthRider
®
875 P treadmill)
•
The SERIAL NUMBER OF THE PRODUCT (see the front cover of this manual)
•
The KEY NUMBER AND DESCRIPTION OF THE PART(S) (see the PART LIST and the EXPLODED DRAWING
attached in the centre of this manual)
08457 089 009
QUESTIONS?
As a manufacturer, we are
committed to providing
complete customer satisfaction.
If you have questions, or if
there are missing parts, we will
guarantee complete satisfaction
through our Customer Service
Department.
Please call:
08457 089 009
Or write:
ICON Health & Fitness, Ltd.
Unit 4
Revie Road Industrial Estate
Revie Road
Beeston
Leeds
LS11 8JG
www.iconeurope.com
Visit our website at