HealthRider 875 P Instruction Manual - Page 11
Danger, Operation And Adjustment
 |
View all HealthRider 875 P manuals
Add to My Manuals
Save this manual to your list of manuals |
Page 11 highlights
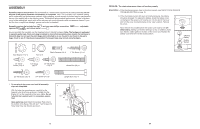
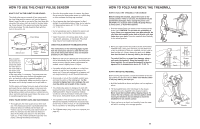
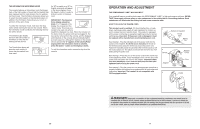
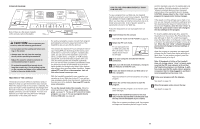
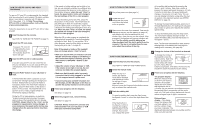
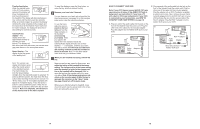
THE INFORMATION MODE/DEMO MODE The console features an information mode that keeps track of the total number of hours that the treadmill has been operated and the total distance that the walking belt has moved. The information mode also allows you to select the metric system or the standard system. In addition, the information mode allows you to turn on and turn off the demo mode. To select the information mode, hold down the Stop button whilst inserting the key into the console. When the information mode is selected, the following information will be shown: The Distance/Laps display will show the total number of kilometers or miles that the walking belt has moved. The Time/Incline display will show the total number of hours that the treadmill has been used. An "M" for metric or an "E" for English (standard) will appear in the Speed display. Press the Speed + button to select a different system of measurement. IMPORTANT: The Calories/ Pulse display should be blank. If a "d" appears in the display, the console is in the "demo" mode. This mode is intended to be used only when a treadmill is displayed in a store. When the console is in the demo mode, the power cord can be plugged in, the key can be removed from the console, and the displays and indicators on the console will automatically light in a preset sequence, although the buttons on the console will not operate. If a "d" appears in the Calories/Pulse display when the information mode is selected, press the Speed - button so the display is blank. To exit the information mode, remove the key from the console. OPERATION AND ADJUSTMENT THE PERFORMANT LUBETM WALKING BELT Your treadmill features a walking belt coated with PERFORMANT LUBETM, a high-performance lubricant. IMPORTANT: Never apply silicone spray or other substances to the walking belt or the walking platform. Such substances will deteriorate the walking belt and cause excessive wear. HOW TO PLUG IN THE POWER CORD This product must be earthed. If it should malfunction or break down, earthing provides a path of least resistance for electric current to reduce the risk of electric shock. This product is equipped with a power cord having an equipment-earthing conductor and an earthing plug. Important: If the power cord is damaged, it must be replaced with a manufacturer-recommended power cord. See drawing 1. Plug the indicated end of the power cord into the socket on the treadmill. If a ferrite box is included, lift the tab on the ferrite box and clamp the ferrite box around the power cord. Fasten the included plastic tie just behind the ferrite box and cut off the excess plastic tie. The plastic tie will prevent the ferrite box from sliding along the power cord. See drawing 2. Press the pins on the power cord into the metal clips in the adapter as shown. Close the adapter cover over the end of the power cord and tighten the screw in the adapter. Important: Make sure that the adapter cover is secure and the screw has been tightened before using the power cord. See drawing 3. Plug the power cord into an appropriate outlet that is properly installed and earthed in accordance with all local codes and ordinances. Important: The treadmill is not compatible with GFCI-equipped outlets. 1 Socket on treadmill Ferrite Box Plastic Tie Tab 2 Screw Adapter Cover Pins Adapter Metal Clips 3 Outlet DANGER: Improper connection of the equipment-earthing conductor can result in an in- creased risk of electric shock. Check with a qualified electrician or serviceman if you are in doubt as to whether the product is properly earthed. Do not modify the plug provided with the product-if it will not fit the outlet, have a proper outlet installed by a qualified electrician. 22 11
-
 1
1 -
2
-
3
-
4
-
5
-
 6
6 -
 7
7 -
 8
8 -
 9
9 -
 10
10 -
 11
11 -
 12
12 -
 13
13 -
 14
14 -
 15
15 -
 16
16 -
17
-
18
 |
 |
