HealthRider H90t Treadmill English Manual - Page 9
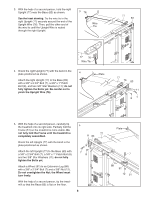
Bolt 10, and a 3/8 Star Washer 11.
 |
View all HealthRider H90t Treadmill manuals
Add to My Manuals
Save this manual to your list of manuals |
Page 9 highlights
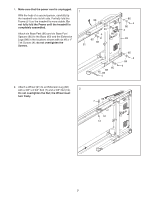
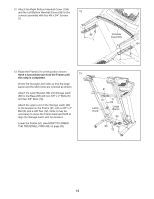
6. Set the console assembly face down on a soft surface to avoid scratching the console assembly. Identify the Right Handrail (102), which is marked with a sticker. Hold the Right Handrail near the console assembly. Next, insert the console wire through the holes in the Right Handrail (102) as shown. 6 Console Assembly Console Wire Hole 102 7. Attach the Left Handrail (94) to the console assembly with two #8 x 1/2" Screws (2), a 3/8" x 3/4" Bolt (10), and a 3/8" Star Washer (11). Do not fully tighten the Screws or Bolts yet. Make sure no wires are pinched. Attach the Right Handrail (102) to the console assembly in the same way. 7 10 94 11 102 2 10 11 2 Console Assembly 9
-
 1
1 -
2
-
3
-
 4
4 -
 5
5 -
 6
6 -
 7
7 -
 8
8 -
 9
9 -
 10
10 -
 11
11 -
 12
12 -
 13
13 -
 14
14 -
15
-
16
-
17
-
18
-
19
-
20
-
21
-
22
-
23
-
24
-
25
-
26
-
27
-
28
-
29
-
30
-
31
-
32
-
33
-
34
-
35
-
36
 |
 |
9
6.
Set the console assembly face down on a soft
surface to avoid scratching the console assem-
bly. Identify the Right Handrail (102), which is
marked with a sticker. Hold the Right Handrail
near the console assembly.
Next, insert the console wire through the holes
in the Right Handrail (102) as shown.
6
102
Console Wire
Hole
Console
Assembly
7.
Attach the Left Handrail (94) to the console as-
sembly with two #8 x 1/2" Screws (2), a 3/8" x
3/4" Bolt (10), and a 3/8" Star Washer (11).
Do
not fully tighten the Screws or Bolts yet.
Make sure no wires are pinched.
Attach the Right Handrail (102) to the con-
sole assembly in the same way.
7
2
11
10
94
Console
Assembly
2
10
11
102