HP 10842 Baying Rack Option Kit Installation Instructions
HP 10842 Manual
 |
View all HP 10842 manuals
Add to My Manuals
Save this manual to your list of manuals |
HP 10842 manual content summary:
- HP 10842 | Baying Rack Option Kit Installation Instructions - Page 1
statements accompanying such products and services. Nothing herein should be construed as constituting an additional warranty. HP shall not be liable for technical or editorial errors or omissions contained herein. HP Baying Rack Option Kit Installation Instructions Third Edition (January 2004) Part - HP 10842 | Baying Rack Option Kit Installation Instructions - Page 2
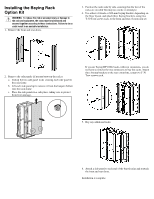
the racks). a. Unlock the two side panel locks securing each side panel to the rack frame. b. Lift each side panel up to remove it from the hangers bolted onto the rack frame. c. Place the side panels in a safe place, taking care to protect them from damage. If you are baying HP 10642 racks with
-
 1
1 -
 2
2
 |
 |

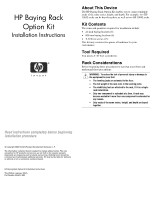
HP Baying Rack
Option Kit
Installation Instructions
Read instructions completely before beginning
installation procedure.
© Copyright 2004 Hewlett-Packard Development Company, L.P.
The information contained herein is subject to change without notice. The only
warranties for HP products and services are set forth in the express warranty
statements accompanying such products and services. Nothing herein should be
construed as constituting an additional warranty. HP shall not be liable for technical
or editorial errors or omissions contained herein.
HP Baying Rack Option Kit Installation Instructions
Third Edition (January 2004)
Part Number 246615-023
About This Device
The HP Baying Rack Option Kit enables you to connect multiple
racks of the same series, height, and depth. For example, two HP
10622 racks can be bayed together, as well as two HP 10842 racks.
Kit Contents
The items and quantities required for installation include:
•
24-inch baying brackets (6)
•
600-mm baying brackets (6)
•
T-30 Torx screws (15)
This kit may contain extra pieces of hardware for your
convenience.
Tool Required
You need a T-30 Torx screwdriver.
Rack Considerations
Before beginning these procedures be sure that you follow and
understand these precautions:
WARNING:
To reduce the risk of personal injury or damage to
the equipment be sure that:
•
The leveling jacks are extended to the floor.
•
The full weight of the rack rests in the leveling jacks.
•
The stabilizing feet are attached to the rack, if it is a single-
rack installation.
•
Only one component is extended at a time. A rack may
become unstable if more than one component is extended for
any reason.
•
Only racks of the same series, height, and depth are bayed
together.