HP 10842 Baying Rack Option Kit Installation Instructions - Page 2
Installing the Baying Rack, Option Kit
 |
View all HP 10842 manuals
Add to My Manuals
Save this manual to your list of manuals |
Page 2 highlights
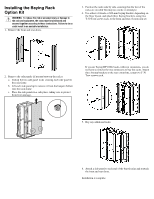
Installing the Baying Rack Option Kit WARNING: To reduce the risk of personal injury or damage to the rack and equipment, the racks must be positioned and secured together according to these instructions. Failure to do so could result in an unstable installation. 1. Remove the front and rear doors. 3. Position the racks side by side, ensuring that the feet of the racks are on solid flooring (no cracks or openings). 4. Use either a 24-inch or 600-mm baying bracket, depending on the floor layout, and attach three baying brackets, using two T-30 Torx screws each, to the front and rear of each rack set. 2. Remove the side panels (if present between the racks). a. Unlock the two side panel locks securing each side panel to the rack frame. b. Lift each side panel up to remove it from the hangers bolted onto the rack frame. c. Place the side panels in a safe place, taking care to protect them from damage. If you are baying HP 10642 racks with rear extensions, you do not have to remove the rear extensions to bay the racks. Attach three baying brackets to the rear extensions, using two T-30 Torx screws each. 5. Bay any additional racks. 6. Attach a side panel to each end of the bayed racks and reattach the front and rear doors. Installation is complete.
-
 1
1 -
 2
2
 |
 |
