HP 1230 HP Fax 1230 series - (English) Reference Guide - Page 27
control resolution and contrast, change resolution, change contrast
 |
View all HP 1230 manuals
Add to My Manuals
Save this manual to your list of manuals |
Page 27 highlights
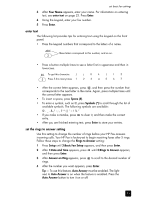
control resolution and contrast control resolution and contrast Use the Resolution and the Lighter/Darker settings to change the resolution and contrast of documents that you are sending. change resolution Resolution affects the transmission speed and quality of faxed documents. The HP Fax only sends faxes at the highest resolution supported by the receiving fax. You can change the resolution between pages only when receiving faxes. Follow these steps to change the resolution: 1 Press Resolution. Tip - You can also press Fax to access the Resolution setting. 2 Press to scroll through the following resolution settings: - Fine: This is the default setting. It provides high-quality text suitable for faxing most documents. - Very Fine: Use this setting when you are faxing documents with very fine detail. Very Fine only works if the receiving fax machine also has the Very Fine setting. If you choose this option, be aware that the faxing process takes longer to complete. - Photo: This setting provides the best quality fax when sending photographs. If you choose Photo, be aware that the faxing process takes longer to complete. When faxing photographs, we recommend that you choose Photo. - Standard: This setting provides the fastest possible transmission with the lowest quality of fax. Note: Very Fine mode is not used when sending documents that are scanned into memory, such as when you are broadcasting to multiple recipients or scheduling a fax for later. If you are sending documents using one of these methods, Very Fine will be changed to Fine even if Very Fine was selected. 3 When the resolution setting you want appears, press Enter. change contrast Change this setting if you want a black-and-white fax to be darker or lighter than the original. Follow these steps to change contrast: 1 Press Fax until Lighter/Darker appears. The range of Lighter/Darker values appears as a circle on a scale on the front-panel display. 2 Press to lighten the fax or to darken it. The circle moves to the left or right, depending on the button you press. Press Enter to select the setting. Note: The Lighter/Darker settings reset to the default two minutes after the fax job is complete. You can change the default setting, see set new defaults on page 20. 21
-
 1
1 -
2
-
3
-
4
-
5
-
6
-
7
-
8
-
9
-
10
-
11
-
12
-
13
-
14
-
15
-
16
-
17
-
18
-
19
-
20
-
21
-
 22
22 -
 23
23 -
 24
24 -
 25
25 -
 26
26 -
 27
27 -
 28
28 -
 29
29 -
 30
30 -
 31
31 -
 32
32 -
33
-
34
-
35
-
36
-
37
-
38
-
39
-
40
-
41
-
42
-
43
-
44
-
45
-
46
-
47
-
48
-
49
-
50
-
51
-
52
-
53
-
54
-
55
-
56
-
57
-
58
-
59
-
60
-
61
-
62
-
63
-
64
-
65
-
66
-
67
-
68
-
69
-
70
-
71
-
72
-
73
-
74
-
75
-
76
-
77
-
78
-
79
-
80
-
81
-
82
-
83
-
84
-
85
-
86
-
87
-
88
 |
 |
