HP 1350 HP PSC 1300 series All-in-One - (English) Setup Poster
HP 1350 - Psc Color Inkjet Manual
 |
UPC - 829160084817
View all HP 1350 manuals
Add to My Manuals
Save this manual to your list of manuals |
HP 1350 manual content summary:
- HP 1350 | HP PSC 1300 series All-in-One - (English) Setup Poster - Page 1
Bureau du PC Windows 4 Begin software installation Commencez l'installation du logiciel a a Insert the Windows HP PSC CD and follow the onscreen instructions. If nothing appears on your computer screen after you insert the CD, see the Troubleshooting chapter in the Reference Guide. b When you - HP 1350 | HP PSC 1300 series All-in-One - (English) Setup Poster - Page 2
white paper Chargez du papier blanc ordinaire b a b 6 Connect the power cords Branchez les cordons d'alimentation c a b 7 Turn on the HP PSC Mettez votre HP PSC sous alignement des cartouches. www.hp.com/support Copyright Hewlett-Packard Company 2003 Printed in U.S. Imprimé aux États-Unis
-
 1
1 -
 2
2
 |
 |
hp
psc 1300 series all-in-one / tout-en-un
1
3
4
2
5
6
7
9
8
10
11
12
www.hp.com/support
Copyright Hewlett-Packard Company 2003
Windows 98,
2000, ME, XP
a
b
c
a
b
c
a
b
c
e
d
a
b
Windows
PC
a
b
a
b
Abaissez la porte
d'accès au chariot
d'impression. Le chariot
d'impression glisse vers
le centre.
Appuyez sur le bouton
Activer/Reprendre
pour mettre votre
HP PSC sous tension.
Attendez la fin de
l'initialisation.
Retirez le support adhésif du cache du panneau avant.
Soulevez le couvercle de votre HP PSC. Placez le cache du panneau avant
dans le renfoncement et assurez-vous qu'il est bien positionné.
L'appareil HP PSC ne fonctionnera que lorsque le cache du panneau avant
sera en place !
/ poster d'installation
Cette face du poster ne s'adresse qu'aux
utilisateurs de Windows.
Suivez les étapes de ce poster dans l'ordre.
Ne branchez pas le câble USB ; attendez que le
logiciel vous y invite.
Mettez votre ordinateur sous tension
et attendez que le bureau du PC
Windows s'affiche.
Fermez tous les programmes ouverts.
Bureau du PC Windows
Utilisateurs Windows COMMENCEZ ICI
Mettez l'ordinateur sous tension
Commencez l'installation du logiciel
Déballez le produit
Fixez le cache du panneau avant
Chargez du papier blanc ordinaire
Branchez les cordons d'alimentation
Mettez l'appareil sous tension
Branchez le câble USB
Ouvrez la porte d'accès au chariot d'impression
Insérez et alignez les cartouches d'encre
Insérez le CD HP PSC Windows et suivez les instructions à l'écran.
Si rien ne s'affiche à l'écran de l'ordinateur après l'insertion du CD, reportez-vous au chapitre
Informations relatives au dépannage du Guide de référence.
Lorsque l'écran Configurez votre périphérique maintenant apparaît, quittez votre ordinateur et passez
à l'étape 5 de ce poster.
Ne branchez pas encore le câble USB.
Vérifiez que l'écran Configurez votre périphérique
maintenant est affiché sur votre ordinateur
, puis
branchez le câble USB. Ne connectez pas le câble
USB à un clavier ou à un concentrateur USB non
alimenté.
Imprimé aux États-Unis
Retirez la bande adhésive rose
fluo des cartouches d'encre. Ne
touchez pas les contacts de
couleur ou ne recollez pas la
bande adhésive.
Tenez la cartouche d'encre noire avec le
grand logo HP et
les repères saillants vers le haut
. Faites glisser la cartouche
sur le côté
droit
du chariot d'impression en l'inclinant
légèrement.
Appuyez fermement jusqu'à ce que la cartouche d'encre se
mette en place.
Fermez la porte d'accès au chariot d'impression. Au bout de
quelques minutes, une page d'alignement des cartouches
d'encre s'imprime.
Placez le haut de la page d'alignement, face imprimée vers
le bas, dans l'angle inférieur gauche de la vitre. Fermez le
couvercle.
Tenez la cartouche d'impression couleur avec le
grand logo HP et les
repères saillants vers le haut
. Faites glisser la cartouche sur le côté
gauche
du chariot d'impression en l'inclinant légèrement.
Appuyez fermement jusqu'à ce que la cartouche d'encre se mette en
place. Assurez-vous que les deux cartouches sont bien en place.
Appuyez sur le bouton
Numériser
.
Lorsque le voyant Activer cesse de
clignoter, l'alignement est terminé.
Jetez ou recyclez la page
d'alignement des cartouches.
Terminez l'installation du logiciel
L'installation matérielle est terminée. Retournez devant votre ordinateur.
Cliquez sur
Suivant
dans la boîte de dialogue affichant la coche verte. En
fonction de votre système, il faudra au minimum 20 minutes pour terminer
l'installation du logiciel.
Une fois que vous avez redémarré votre ordinateur et que l'écran
Félicitations est apparu, votre appareil HP PSC est prêt à fonctionner.
Si vous rencontrez des problèmes pendant l'installation, consultez le
Guide
de référence
.
a
b
Trois couleurs
Noir
a
b
Windows PC desktop
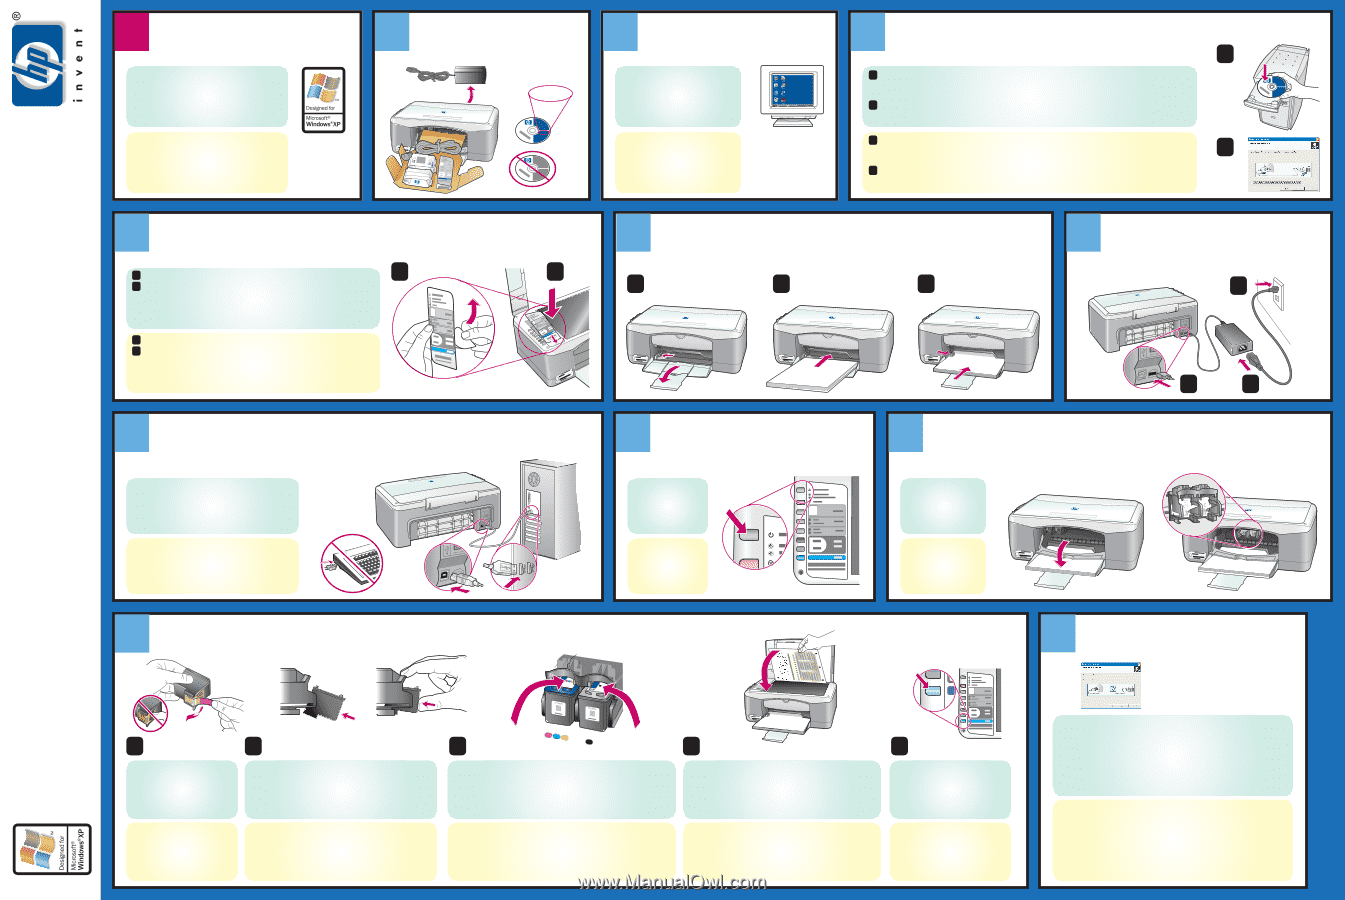
Remove the bright pink tape from
the print cartridges. Do not touch
the gold-colored contacts or
retape the cartridges.
Lower the print-carriage
access door. The print
carriage slides to the
middle.
Hold the black print cartridge with the
large HP label and
the raised markings on top
. Slide the cartridge at a slight
angle into the
right
side of the print carriage.
Press firmly until the print cartridge snaps into place.
Close the print-carriage access door. Within a few minutes, a
print cartridge alignment page prints.
Place the top of the alignment page face down in the left
front corner of the glass. Close the lid.
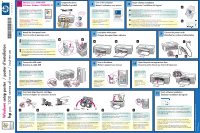
This side of the poster is for Windows users only.
Follow the steps on this poster in order.
Do not connect the USB cable until the software
prompts you to do so.
Turn on your computer and wait for
the Windows PC desktop to appear.
Close any open programs.
Remove the adhesive backing from the front panel cover.
Raise the lid of the HP PSC. Place the front panel cover into the recess and
stick it into place.
The HP PSC will not work until you attach the front panel cover!
Press the
On/Resume
button to turn on the
HP PSC. Wait for it to
finish initializing.
Hold the color print cartridge with the
large HP label and the raised
markings on top
. Slide the cartridge at a slight angle into the
left
side
of the print carriage.
Press firmly until the print cartridge snaps into place. Make sure that
both print cartridges are secure.
Press the
Scan
button.
After the On light stops blinking,
alignment is complete. Discard or
recycle the alignment page.
Windows
setup poster
Windows users START HERE
Turn on the computer
Begin software installation
Unpack the device
Attach the front panel cover
Load plain white paper
Connect the power cords
Turn on the device
Connect the USB cable
Open the print-carriage access door
Insert and align the print cartridges
Insert the Windows HP PSC CD and follow the onscreen instructions.
If nothing appears on your computer screen after you insert the CD, see the Troubleshooting chapter
in the Reference Guide.
When you see the Set Up Your Device Now screen, leave your computer and proceed to step 5 on
this poster.
Do not connect the USB cable yet.
Make sure that you see the Set Up Your Device Now
screen on your computer
, then connect the USB
cable. Do not connect the USB cable to a keyboard
or a non-powered USB hub.
Printed in U.S.
Finish software installation
Hardware setup is now complete. Return to your computer.
Click
Next
on the screen with the green checkmark. Depending on your
system, it may take 20 minutes or more to finish installing the software.
When you restart your computer and the Congratulations screen appears,
you are ready to use your HP PSC. If you encounter problems during setup,
see the
Reference Guide
.
a
b
Tri-color
Black
*Q3500-90190*
*Q3500-90190*
Q3500-90190