HP 2000fc HP StorageWorks 2000 Modular Smart Array racking instructions (49415 - Page 2
Detailed site requirements, Rack warnings, Getting help
 |
View all HP 2000fc manuals
Add to My Manuals
Save this manual to your list of manuals |
Page 2 highlights
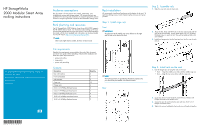
Step 4: Prepare enclosure Attach one side bracket to each side of the enclosure as shown, using 8-32 x 3/16 Phillips flat-head screws. Step 5: Install enclosure CAUTION: Lifting and positioning a disk array enclosure requires two people. You can lighten the enclosure by removing the hard drives and rear components. If you remove components, be sure to observe proper ESD precautions. 1. Slide the enclosure all the way into the rack on the rail ledges (1). 2. Attach the front of the enclosure to the rack with four 10-32 x 3/4 Phillips truss-head screws (2). 3. From the rear of the rack, attach the enclosure side brackets to the rails (3) using two 6-32 x 1/4 Phillips pan-head screws. NOTE: Screw access can be improved by rotating the power supply latch downward, especially on the right side. Be sure to re-latch the power supply when done. The enclosure is now ready for cabling and configuration. See the user guide for further instructions. Step 6: Install ears Detailed site requirements When installing the enclosure in a rack, select a location that meets the environmental standards described in this section. Space and airflow requirements To allow for servicing and adequate airflow, observe the following space and airflow requirements when deciding where to install a rack: • Leave minimum clearance of 63.5 cm (25 in) in front of the rack. • Leave minimum clearance of 76.2 cm (30 in) behind the rack. • Leave minimum clearance of 121.9 cm (48 in) from the back of the rack to the back of another rack or row of racks. HP enclosures draw in cool air through the front door and expel warm air through the rear door. Therefore, the front and rear rack doors must be adequately ventilated to allow ambient room air to enter the cabinet, and the rear door must be adequately ventilated to allow the warm air to escape from the cabinet. CAUTION: To prevent improper cooling and damage to the equipment: • Do not block the ventilation openings. • Always use blanking panels to fill empty spaces in the rack. Temperature requirements To ensure continued safe and reliable equipment operation, install or position the enclosure in a well-ventilated, climate-controlled environment. The maximum recommended ambient operating temperature (TMRA) for most enclosure products is 35°C (95°F). The temperature in the room where the rack is located must not exceed 35°C (95°F). CAUTION: To reduce the risk of damage to the equipment when installing third-party options: • Do not permit optional equipment to impede airflow around the enclosure or to increase the internal rack temperature beyond the maximum allowable limits. • Do not exceed the manufacturer's recommended ambient operating temperature (TMRA). Power requirements Installation of this equipment must comply with local and regional electrical regulations governing the installation of IT equipment by licensed electricians. This equipment is designed to operate in installations covered by NFPA 70, 1999 Edition (National Electric Code) and NFPA-75, 1992 (code for Protection of Electronic Computer/Data Processing Equipment). For electrical power ratings on options, see the product rating label or the user documentation supplied with that option. WARNING! To reduce the risk of personal injury, fire, or damage to the equipment, do not overload the AC supply branch circuit that provides power to the rack. Consult the electrical authority having jurisdiction over wiring and installation requirements of your facility. CAUTION: Protect the enclosure from power fluctuations and temporary interruptions with a regulating UPS. This device protects the hardware from damage caused by power surges and voltage spikes and keeps the enclosure in operation during a power failure. When installing more than one enclosure, you may need to use additional power distribution devices to safely provide power to all devices. Observe the following guidelines: • Balance the enclosure power load between available AC supply branch circuits. • Do not allow the overall system AC current load to exceed 80 percent of the branch circuit AC current rating. • Do not use common power outlet strips for this equipment. • Provide a separate electrical circuit for each power supply in the enclosure. Electrical grounding requirements The enclosure must be grounded properly for proper operation and safety. In the United States, you must install the equipment in accordance with NFPA 70, 1999 Edition (National Electric Code), Article 250, as well as any local and regional building codes. In Canada, you must install the equipment in accordance with Canadian Standards Association, CSA C22.1, Canadian Electrical Code. In all other countries, you must install the equipment in accordance with any regional or national electrical wiring codes, such as the International Electrotechnical Commission (IEC) Code 364, parts 1 through 7. Furthermore, you must be sure that all power distribution devices used in the installation, such as branch wiring and receptacles, are listed or certified grounding-type devices. Because of the high ground-leakage currents associated with multiple enclosures connected to the same power source, HP recommends the use of a power distribution unit (PDU) that is either permanently wired to the building's branch circuit or includes a nondetachable cord that is wired to an industrial-style plug. NEMA locking-style plugs or those complying with IEC 60309 are considered suitable for this purpose. Using common power outlet strips for the enclosure is not recommended. Rack warnings WARNING! To reduce the risk of personal injury or damage to the equipment, be sure that: • The leveling jacks are extended to the floor. • The full weight of the rack rests on the leveling jacks. • The stabilizing feet are attached to the rack if it is a single-rack installation. • The racks are coupled together in multiplerack installations. • Only one component is extended at a time. A rack may become unstable if more than one component is extended for any reason. WARNING! To reduce the risk of personal injury or equipment damage when unloading a rack: • At least two people are needed to safely unload the rack from the pallet. An empty 42U rack can weigh as much as 115 kg (253 lb), can stand more than 2.1 m (7 ft) tall, and may become unstable when being moved on its casters. • Never stand in front of the rack when it is rolling down the ramp from the pallet. Always handle the rack from both sides. Getting help For more information, see: • The HP StorageWorks MSA2000 series of user guides • The HP website: http://www.hp.com • Your nearest HP authorized reseller (locations and telephone numbers of these resellers are given on the HP website) • HP technical support telephone numbers: • In North America, 1-800-633-3600 • For other regions, telephone numbers are given on the HP website Additional information MSA products: http://www.hp.com/go/msa Storage products: http://www.hp.com/storage Servers: http://www.hp.com/go/servers Clustering: http://h18000.www1.hp.com/solutions/enterprise/ highavailability/index.html SAN infrastructure: http://www.hp.com/go/san
-
 1
1 -
 2
2
 |
 |
