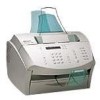
HP 3200se HP LaserJet 3200 All-in-One Product - (English for UK) Getting Start - Page 4
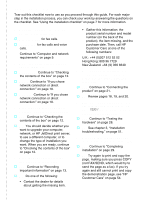
For direct connect installations, or network installations, For standalone installations
 |
View all HP 3200se manuals
Add to My Manuals
Save this manual to your list of manuals |
Page 4 highlights
For direct connect installations or network installations: 8 Did the test page print (page 37 for direct, or page 40 for network)? o Yes. You have finished installing the software and setting the required settings. Continue to "Completing software installation" (on page 37 for direct connect installations, or on page 40 for network installations). o No. Do the following: • See chapter 3, "Installation troubleshooting," on page 51 to check for solutions to messages and common installation issues. • If the troubleshooting section does not resolve the issue, see "HP Customer Care" on page 54. 9 Did the document print (page 41)? o Yes. The new equipment is working correctly with your computer. • If you completed a direct connect installation, and want to allow other computers on your network print to the product, see "Sharing the product (for printing only)" on page 42. (If you do not want to share the product, you have completed installation. Continue to chapter 4, "Now that installation is complete . . .," on page 53.) • If you completed a network installation, Continue to chapter 4, "Now that installation is complete . . .," on page 53. o No. Do the following: • See chapter 3, "Installation troubleshooting," on page 51 to check for solutions to messages and common installation issues. • If the troubleshooting section does not resolve the issue, see "HP Customer Care" on page 54. For standalone installations: 10 After you set the time and date, does the control panel read READY, followed by the date and time you set (page 44)? o Yes. Continue to "To set the fax header" on page 45. o No. Do the following: • If the control panel display does not read READY, or does not show the correct time and date, complete all of the steps under "To set the time and date" again. • If the control panel display contains information about an error, see chapter 3, "Installation troubleshooting," on page 51. When the control panel reads READY, followed by the correct time and date, continue to "To set the fax header" on page 45. 11 Does the control panel display show the answer mode setting that you chose (page 47)? o Yes. If you have ring pattern service, continue to "Enabling answer ring patterns" on page 48; if you do not have ring pattern service, continue to "To print a configuration report" on page 50. o No. Try again to set the answer mode. 12 Do the settings you entered appear correctly? o Yes. You have completed the required settings. Continue to chapter 4, "Now that installation is complete . . ." o No. See "HP Customer Care" on page 54.
-
 1
1 -
 2
2 -
 3
3 -
 4
4 -
 5
5 -
 6
6 -
 7
7 -
 8
8 -
 9
9 -
 10
10 -
11
-
12
-
13
-
14
-
15
-
16
-
17
-
18
-
19
-
20
-
21
-
22
-
23
-
24
-
25
-
26
-
27
-
28
-
29
-
30
-
31
-
32
-
33
-
34
-
35
-
36
-
37
-
38
-
39
-
40
-
41
-
42
-
43
-
44
-
45
-
46
-
47
-
48
-
49
-
50
-
51
-
52
-
53
-
54
-
55
-
56
-
57
-
58
-
59
-
60
-
61
-
62
-
63
-
64
 |
 |