HP 353803-B22 HP StorageWorks Disk Enclosure Power Supply/Blower Replacement I - Page 3
Installing a power supply, Verifying proper operation, Returning the failed component
 |
UPC - 808736781619
View all HP 353803-B22 manuals
Add to My Manuals
Save this manual to your list of manuals |
Page 3 highlights
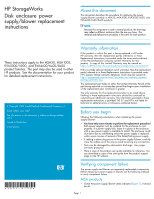
2. Lift up on the wine-colored mounting latch (2), then grasp the blower (3) and pull the power supply out of the enclosure. 3. Remove the blower from the defective power supply and install it on the replacement power supply. Returning the failed component Follow the return instructions provided with the new component. 2 1 3 0009a Figure 4 Removing a power supply Installing a power supply 1. Lift up on the module latch (1, Figure 5) and slide the power supply into the enclosure until it is fully seated. 2. Connect the power cord to the power supply and engage the cord lock. 1 2 0010a Figure 5 Installing a power supply Verifying proper operation After replacing the power supply or blower, check the following to verify that the component is operating properly: NOTE: It may take up to 10 minutes for the component to display good status. • Ensure the blower begins operating immediately. • Verify that he status indicator is on. • On an MSA1000, the controller LCD panel should no longer indicate a power supply/blower failure. • From HP Command View EVA on an EVA product: • Navigate to the component and check the status. It should be . • Turn off the locate function by clicking Locate > Locate Off. Page 3
-
 1
1 -
 2
2 -
 3
3
 |
 |
