HP 3PAR StoreServ 7400 2-node HP 3PAR StoreServ 7000 Storage Service Guide (QR - Page 10
Replacing an Interconnect Link Cable, Repairing a Disk Drive
 |
View all HP 3PAR StoreServ 7400 2-node manuals
Add to My Manuals
Save this manual to your list of manuals |
Page 10 highlights
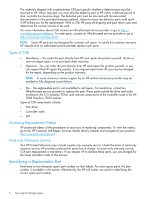
3. Ensure the PDUs are in a fully lowered position before accessing. Figure 4 Disengaging the PDU Pivot Brackets Replacing an Interconnect Link Cable Before replacing an Interconnect Link cable, verify with the system administrator before powering off the system. 1. Shutdown all the controller nodes in the system. 2. Turn off power to the controller node PCMs. 3. Turn off power to the drive enclosure PCMs. 4. Turn off power to all PDUs in the rack. 5. Replace the damaged cable. Verify the direction of the cable connectors matches with the ports before connecting. 6. Set the circuit breakers on the PDUs to the ON position. 7. Set the switches on the power strips to the ON position. 8. Power on the drive enclosure PCMs. 9. Power on the node enclosure PCMs. 10. Verify the status of the LEDs, see "Understanding LED Indicator Status" (page 26). Repairing a Disk Drive Use the following instructions for replacing failed disk drives or solid-state drives (SSD). WARNING! If the StoreServ is enabled with HP 3PAR Data Encryption feature, only use the self-encrypting drives (SED). Using a non-self-encrypting drive may cause errors during the upgrade process. CAUTION: • If you require more than 10 minutes to replace a disk drive, install a blank disk drive to prevent overheating while you are working. • To avoid damage to hardware and the loss of data, never remove a disk drive without confirming that the disk fault LED is lit. 10 Servicing the Storage System
-
 1
1 -
2
-
3
-
4
-
 5
5 -
 6
6 -
 7
7 -
 8
8 -
 9
9 -
 10
10 -
 11
11 -
 12
12 -
 13
13 -
 14
14 -
 15
15 -
16
-
17
-
18
-
19
-
20
-
21
-
22
-
23
-
24
-
25
-
26
-
27
-
28
-
29
-
30
-
31
-
32
-
33
-
34
-
35
-
36
-
37
-
38
-
39
-
40
-
41
-
42
-
43
-
44
-
45
-
46
-
47
-
48
-
49
-
50
-
51
-
52
-
53
-
54
-
55
-
56
-
57
-
58
-
59
-
60
-
61
-
62
-
63
-
64
-
65
-
66
 |
 |
