HP 4300tn HP LaserJet 4200 and 4300 printers - Software Technical Reference Ma - Page 165
Setting a default printer, Windows 3.1x, Printer support
 |
View all HP 4300tn manuals
Add to My Manuals
Save this manual to your list of manuals |
Page 165 highlights
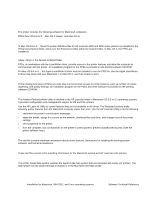
Computer function Steps Client only 9. You can install the driver using Point and Print in one of the following four ways: • In Network Neighborhood, locate the server and double-click the printer share name. • In Network Neighborhood, locate the server, and then drag and drop the icon for the shared printer into your Printers folder. • In the Printers folder, open the Add Printer Wizard. The next action depends on the operating system: • For Windows 95, Windows 98, and Windows Me, click Network Printer. Client only Client only Client only • For Windows NT 4.0, Windows 2000, and Windows XP, click Network printer server. 10. Click Next. Type the network path or queue name, or select Browse to search the network to locate the appropriate path. 11. In Network Neighborhood, locate the server and double-click. Then locate the printer share name and right-click. 12. Click Install to complete the installation through the Add Printer Wizard. Setting a default printer This section applies to the Windows 95, Windows 98, Windows Me, Windows NT 4.0, Windows 2000, and Windows XP operating systems. 1 From the Start menu, click Settings, and then click Printers. 2 Select the printer you want to set as the default printer. 3 From the File menu, click Set As Default. A check mark appears next to the menu option. 4 Click Close. Windows 3.1x Printer support • The HP LaserJet 4200 series and HP LaserJet 4300 series printers have not been tested with and are not supported with Windows 3.1x. Software Technical Reference Installing Windows printing system components 163
-
 1
1 -
2
-
3
-
4
-
5
-
6
-
7
-
8
-
9
-
10
-
11
-
12
-
13
-
14
-
15
-
16
-
17
-
18
-
19
-
20
-
21
-
22
-
23
-
24
-
25
-
26
-
27
-
28
-
29
-
30
-
31
-
32
-
33
-
34
-
35
-
36
-
37
-
38
-
39
-
40
-
41
-
42
-
43
-
44
-
45
-
46
-
47
-
48
-
49
-
50
-
51
-
52
-
53
-
54
-
55
-
56
-
57
-
58
-
59
-
60
-
61
-
62
-
63
-
64
-
65
-
66
-
67
-
68
-
69
-
70
-
71
-
72
-
73
-
74
-
75
-
76
-
77
-
78
-
79
-
80
-
81
-
82
-
83
-
84
-
85
-
86
-
87
-
88
-
89
-
90
-
91
-
92
-
93
-
94
-
95
-
96
-
97
-
98
-
99
-
100
-
101
-
102
-
103
-
104
-
105
-
106
-
107
-
108
-
109
-
110
-
111
-
112
-
113
-
114
-
115
-
116
-
117
-
118
-
119
-
120
-
121
-
122
-
123
-
124
-
125
-
126
-
127
-
128
-
129
-
130
-
131
-
132
-
133
-
134
-
135
-
136
-
137
-
138
-
139
-
140
-
141
-
142
-
143
-
144
-
145
-
146
-
147
-
148
-
149
-
150
-
151
-
152
-
153
-
154
-
155
-
156
-
157
-
158
-
159
-
 160
160 -
 161
161 -
 162
162 -
 163
163 -
 164
164 -
 165
165 -
 166
166 -
 167
167 -
 168
168 -
 169
169 -
 170
170 -
171
-
172
-
173
-
174
-
175
-
176
-
177
-
178
-
179
-
180
-
181
-
182
-
183
-
184
-
185
-
186
-
187
-
188
-
189
-
190
-
191
-
192
-
193
-
194
-
195
-
196
-
197
-
198
-
199
-
200
-
201
-
202
-
203
-
204
 |
 |
