HP 500B Hardware Reference Guide - Compaq 500B/505B
HP 500B - Microtower PC Manual
 |
View all HP 500B manuals
Add to My Manuals
Save this manual to your list of manuals |
HP 500B manual content summary:
- HP 500B | Hardware Reference Guide - Compaq 500B/505B - Page 1
580407-001 Upgrading and Servicing Guide - HP 500B | Hardware Reference Guide - Compaq 500B/505B - Page 2
- HP 500B | Hardware Reference Guide - Compaq 500B/505B - Page 3
Removing and Replacing the Front Bezel - HP 500B | Hardware Reference Guide - Compaq 500B/505B - Page 4
Removing and Replacing the Front Bezel 10-15 MINUTES Before you begin Tools Needed: z Flathead screwdriver z Phillips screwdriver Flathead screwdrivers A flathead screwdriver can be used with the screw seen in the following illustration. CAUTION: Static electricity can damage the electronic - HP 500B | Hardware Reference Guide - Compaq 500B/505B - Page 5
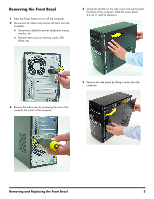
Removing the Front Bezel 1 Press the Power button to turn off the computer. 2 Disconnect all cables and remove all items from the computer: z Disconnect cables for power, keyboard, mouse, monitor, etc. z Remove items such as memory cards, USB drives, etc. 4 Grasp the handle on the side cover and - HP 500B | Hardware Reference Guide - Compaq 500B/505B - Page 6
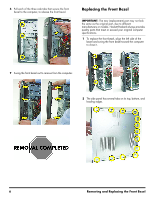
the same as the original part, due to different manufacturers or models. Hewlett-Packard always provides quality parts that meet or exceed your original computer specifications. 1 To replace the front bezel, align the left side of the bezel and swing the front bezel toward the computer to close it - HP 500B | Hardware Reference Guide - Compaq 500B/505B - Page 7
3 The tabs fit into slots and over the front lip of the computer. 5 Reattach the thumb screw at the back of the computer. 4 To reattach the panel, align the tabs on the panel over the corresponding slots on the computer and lay the panel into place. Slide the side cover forward. 6 Connect the - HP 500B | Hardware Reference Guide - Compaq 500B/505B - Page 8
8 Removing and Replacing the Front Bezel - HP 500B | Hardware Reference Guide - Compaq 500B/505B - Page 9
Removing and Replacing Memory - HP 500B | Hardware Reference Guide - Compaq 500B/505B - Page 10
Removing and Replacing Memory 25-30 MINUTES Before You Begin Tools Needed: z Flathead screwdriver z Phillips screwdriver Flathead screwdrivers A flathead screwdriver can be used with the screw seen in the following illustration. Removing Memory 1 Press the Power button to turn off the computer. 2 - HP 500B | Hardware Reference Guide - Compaq 500B/505B - Page 11
side. 5 Remove the side panel by lifting it away from the computer. 7 Locate the memory sockets on your computer motherboard. NOTE: The location and number of memory sockets may vary with the motherboard model in your computer. 8 Push down the retaining clip on each end of the memory socket to - HP 500B | Hardware Reference Guide - Compaq 500B/505B - Page 12
as the original part, due to different manufacturers or models. Hewlett-Packard always provides quality parts that meet or exceed your original computer specifications. 1 Touching only the top edge of the memory module, locate the notch at the bottom edge. NOTE: Each type of memory has a different - HP 500B | Hardware Reference Guide - Compaq 500B/505B - Page 13
3 Position the memory module over the socket, aligning the notch with the tab in the socket, and then firmly press the module down into the socket. 5 The side panel has several tabs on its top, bottom, and leading edges. ...until the retaining clips at the ends of the socket lock the module into - HP 500B | Hardware Reference Guide - Compaq 500B/505B - Page 14
7 To reattach the panel, align the tabs on the panel over the corresponding slots on the computer. Slide the side cover forward. 8 Reattach the screw at the back of the computer. 9 Connect the cables, such as the keyboard, mouse, Ethernet, and monitor cables. 10 Reconnect the power cord. 11 Turn - HP 500B | Hardware Reference Guide - Compaq 500B/505B - Page 15
Removing and Replacing an Optical Disc Drive - HP 500B | Hardware Reference Guide - Compaq 500B/505B - Page 16
Removing and Replacing an Optical Disc Drive 15-20 MINUTES Before you begin Tools Needed: z Flathead screwdriver z Phillips screwdriver Flathead screwdrivers A flathead screwdriver can be used with the screw seen in the following illustration. CAUTION: Static electricity can damage the electronic - HP 500B | Hardware Reference Guide - Compaq 500B/505B - Page 17
Removing an Optical Disc Drive 1 Press the Power button to turn off the computer. 2 Disconnect all cables and remove all items from the computer: z Disconnect cables for power, keyboard, mouse, monitor, etc. z Remove items such as memory cards, USB drives, etc. 4 Remove the side cover by loosening - HP 500B | Hardware Reference Guide - Compaq 500B/505B - Page 18
6 Remove the side panel by lifting it away from the computer. 8 Swing the front bezel out to remove from the computer. 7 Pull each of the three side tabs that secure the front bezel to the computer, to release the front bezel. 9 Locate the optical disc drives at the top front of the computer. 10 - HP 500B | Hardware Reference Guide - Compaq 500B/505B - Page 19
11 Push the drive slightly forward. 13 Pull the disc drive out through the front of the computer. 12 Disconnect the power (1) and data (2) cables by squeezing the latch on the connector and pulling to remove. Removing and Replacing an Optical Disc Drive 19 - HP 500B | Hardware Reference Guide - Compaq 500B/505B - Page 20
as the original part, due to different manufacturers or models. Hewlett-Packard always provides quality parts that meet or exceed your original computer specifications. 1 Push the replacement disc drive partially into the drive bay in the computer. 4 Replace the drive screws. 5 To replace the front - HP 500B | Hardware Reference Guide - Compaq 500B/505B - Page 21
7 The tabs fit into slots and over the front lip of the computer. 9 Reattach the screw at the back of the computer. 8 To reattach the panel, align the tabs on the panel over the corresponding slots on the computer. Slide the side cover forward. 10 Connect the cables, such as the keyboard, mouse, - HP 500B | Hardware Reference Guide - Compaq 500B/505B - Page 22
22 Removing and Replacing an Optical Disc Drive - HP 500B | Hardware Reference Guide - Compaq 500B/505B - Page 23
Removing and Replacing a Hard Disk Drive - HP 500B | Hardware Reference Guide - Compaq 500B/505B - Page 24
Removing and Replacing a Hard Disk Drive 25-30 MINUTES Before You Begin Observe the following requirements before removing and replacing a hard disk drive. IMPORTANT: A hard disk drive is extremely sensitive to shock impact. Do not bang or drop it. Do not touch the circuit board. Static electricity - HP 500B | Hardware Reference Guide - Compaq 500B/505B - Page 25
Removing a Hard Disk Drive 1 Press the Power button to turn off the computer. 2 Disconnect all cables and remove all items from the computer: z Disconnect cables for power, keyboard, mouse, monitor, etc. z Remove items such as memory cards, USB drives, etc. 4 Grasp the handle on the side cover and - HP 500B | Hardware Reference Guide - Compaq 500B/505B - Page 26
6 Pull each of the three side tabs that secure the front bezel to the computer, to release the front bezel. 8 Locate the external drive bay at the front of the computer, below the optical drive bays. 7 Swing the front bezel out to remove from the computer. 9 Disconnect the power (1) and data (2) - HP 500B | Hardware Reference Guide - Compaq 500B/505B - Page 27
10 Remove the two screws that secure the hard disk drive to the computer. 12 Remove the hard drive from the computer. 11 Pull the hard drive out of the front of the computer. 13 Carefully remove the replacement hard disk drive from the electrostatic bag and place the failed hard disk drive into - HP 500B | Hardware Reference Guide - Compaq 500B/505B - Page 28
as the original drive due to different manufacturers or models. Hewlett-Packard always provides quality parts that meet or exceed your original computer specifications. 1 Slide the replacement hard disk drive into the bay. 3 Attach the two screws to secure the hard disk drive to the bay. 2 Align - HP 500B | Hardware Reference Guide - Compaq 500B/505B - Page 29
5 To replace the front bezel, align the left side of the bezel and swing the front bezel toward the computer to close it. 7 The tabs fit into slots and over the front lip of the computer. 6 The side panel has several tabs on its top, bottom, and leading edges. 8 To reattach the panel, align the - HP 500B | Hardware Reference Guide - Compaq 500B/505B - Page 30
9 Reattach the screw at the back of the computer. 12 Turn on the computer and all peripherals, such as the monitor. 13 Verify that the replacement hard disk drive works properly. 10 Connect the cables, such as the keyboard, mouse, Ethernet, and monitor cables. 11 Reconnect the power cord. 30 - HP 500B | Hardware Reference Guide - Compaq 500B/505B - Page 31
Removing and Replacing an Add-In Card - HP 500B | Hardware Reference Guide - Compaq 500B/505B - Page 32
Removing and Replacing an Add-In Card 15-20 MINUTES Before you begin Tools Needed: z Flathead screwdriver z Phillips screwdriver Flathead screwdrivers A flathead screwdriver can be used with the screw seen in the following illustration. CAUTION: Static electricity can damage the electronic - HP 500B | Hardware Reference Guide - Compaq 500B/505B - Page 33
Removing an Add-In Card 1 Press the Power button to turn off the computer. 2 Disconnect all cables and remove all items from the computer: z Disconnect cables for power, keyboard, mouse, monitor, etc. z Remove items such as memory cards, USB drives, etc. 4 Grasp the handle on the side cover and - HP 500B | Hardware Reference Guide - Compaq 500B/505B - Page 34
6 Locate the add-in cards at the back of the computer. 8 On the back of the computer, remove the screw from the bracket cover for the add-in cards. 7 Lay the computer on its side. 9 Remove the bracket cover. 34 Removing and Replacing an Add-In Card - HP 500B | Hardware Reference Guide - Compaq 500B/505B - Page 35
10 If you are removing a graphics card, press on the latch to release it. 13 Lift the card out of the computer. 11 Remove the graphics card from the card slot. 14 If present, remove any cables connected to the add-in card. 12 For other add-in cards, move the card back and forth gently to free it - HP 500B | Hardware Reference Guide - Compaq 500B/505B - Page 36
the original part, due to different manufacturers or models. Hewlett-Packard always provides quality parts that meet or exceed your original computer specifications. 1 Replace any cables previously removed from the card. 3 If you are replacing a graphics card, verify that the latch in the computer - HP 500B | Hardware Reference Guide - Compaq 500B/505B - Page 37
5 Replace the bracket cover on the back of the computer. 7 The side panel has several tabs on its top, bottom, and leading edges. 6 Replace the screw to secure the bracket to the back of the computer. 8 The tabs fit into slots and over the front lip of the computer. Removing and Replacing an Add - HP 500B | Hardware Reference Guide - Compaq 500B/505B - Page 38
9 To reattach the panel, align the tabs on the panel over the corresponding slots on the computer. Slide the side cover forward. 11 Reconnect all attached cables, such as the keyboard, mouse, Ethernet, and monitor cables. 12 Reconnect the power cord. 13 Turn on the computer and all peripherals, - HP 500B | Hardware Reference Guide - Compaq 500B/505B - Page 39
Removing and Replacing a Power Supply - HP 500B | Hardware Reference Guide - Compaq 500B/505B - Page 40
Removing and Replacing a Power Supply 20-25 MINUTES Before you begin Tools Needed: z Flathead screwdriver z Phillips screwdriver Flathead screwdrivers A flathead screwdriver can be used with the screw seen in the following illustration. CAUTION: Static electricity can damage the electronic - HP 500B | Hardware Reference Guide - Compaq 500B/505B - Page 41
Removing a Power Supply 1 Press the power button to turn off the computer. 2 Disconnect all cables and remove all items from the computer: z Disconnect cables for power, keyboard, mouse, monitor, etc. z Remove items such as memory cards, USB drives, etc. 4 Grasp the handle on the side cover and - HP 500B | Hardware Reference Guide - Compaq 500B/505B - Page 42
6 Before removing the power supply carefully note its orientation in the computer. IMPORTANT: The replacement power supply will need to be placed in the same position. 7 Place the computer on its side. IMPORTANT: Noting the location, type and orientation of the power connectors is extremely - HP 500B | Hardware Reference Guide - Compaq 500B/505B - Page 43
11 The motherboard power connector has a latch that must be pressed to detach the connector from the motherboard. 13 Some connectors may have latches that must be pressed to remove them. 12 Detach the motherboard power connector from the motherboard. 14 Remove all other power connectors from the - HP 500B | Hardware Reference Guide - Compaq 500B/505B - Page 44
15 Set the computer upright. 18 Pull the power supply back and tilt it out of the computer. 16 Detach the four screws that connect the power supply to the computer. 17 Use a screwdriver to press the latch at the bottom of the power supply to release it. 44 Removing and Replacing a Power Supply - HP 500B | Hardware Reference Guide - Compaq 500B/505B - Page 45
models. Hewlett-Packard always provides quality parts that meet or exceed your original computer specification. 2 Make sure the replacement power supply is oriented the same way as the original power supply. Align it towards the guide and the ledge, then slide it back until it locks into place next - HP 500B | Hardware Reference Guide - Compaq 500B/505B - Page 46
5 The side panel has several tabs on its top, bottom, and leading edges. 7 To reattach the panel, align the tabs on the panel over the corresponding slots on the computer. Slide the side cover forward. 6 The tabs fit into slots and over the front lip of the computer. 8 Reattach the screw at the
-
 1
1 -
 2
2 -
 3
3 -
 4
4 -
 5
5 -
 6
6 -
 7
7 -
8
-
9
-
10
-
11
-
12
-
13
-
14
-
15
-
16
-
17
-
18
-
19
-
20
-
21
-
22
-
23
-
24
-
25
-
26
-
27
-
28
-
29
-
30
-
31
-
32
-
33
-
34
-
35
-
36
-
37
-
38
-
39
-
40
-
41
-
42
-
43
-
44
-
45
-
46
 |
 |
Upgrading and Servicing Guide
580407-001