HP 60 MSA6X/7X Series Enclosure 7-segment Display Board Replacement Instructio - Page 2
Installing the 7-segment display, board, Verifying component replacement
 |
View all HP 60 manuals
Add to My Manuals
Save this manual to your list of manuals |
Page 2 highlights
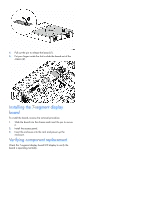
4. Pull out the pin to release the board (1). 5. Put your finger inside the slot to slide the board out of the chassis (2). Installing the 7-segment display board To install the board, reverse the removal procedure: 1. Slide the board into the chassis and insert the pin to secure it. 2. Install the access panel. 3. Insert the enclosure into the rack and power up the enclosure. Verifying component replacement Check the 7-segment display board LED display to verify the board is operating normally.
-
 1
1 -
 2
2
 |
 |

4.
Pull out the pin to release the board (1).
5.
Put your finger inside the slot to slide the board out of the
chassis (2).
Installing the 7-segment display
board
To install the board, reverse the removal procedure:
1.
Slide the board into the chassis and insert the pin to secure
it.
2.
Install the access panel.
3.
Insert the enclosure into the rack and power up the
enclosure.
Verifying component replacement
Check the 7-segment display board LED display to verify the
board is operating normally.