HP 70 HP StorageWorks 70 Modular Smart Array Enclosure maintenance and service - Page 37
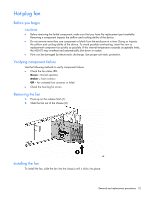
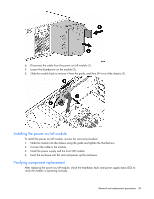
Remove the plastic bezel 1.
 |
View all HP 70 manuals
Add to My Manuals
Save this manual to your list of manuals |
Page 37 highlights
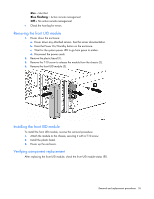
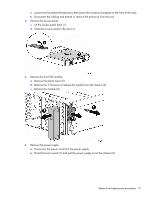
a. Loosen the front panel thumbscrews that secure the enclosure faceplate to the front of the rack. b. Disconnect the cabling and extend or remove the enclosure from the rack. 3. Remove the access panel: c. Lift the access panel latch (1). d. Slide the access panel to the rear (2). 4. Remove the front UID module: a. Remove the plastic bezel (1). b. Remove the T-10 screw to release the module from the chassis (2). c. Remove the module (3). 5. Remove the power supply: a. Disconnect the power cord from the power supply. b. Press the lever inward (1) and pull the power supply out of the chassis (2). Removal and replacement procedures 37
-
 1
1 -
2
-
3
-
4
-
5
-
6
-
7
-
8
-
9
-
10
-
11
-
12
-
13
-
14
-
15
-
16
-
17
-
18
-
19
-
20
-
21
-
22
-
23
-
24
-
25
-
26
-
27
-
28
-
29
-
30
-
31
-
 32
32 -
 33
33 -
 34
34 -
 35
35 -
 36
36 -
 37
37 -
 38
38 -
 39
39 -
 40
40 -
 41
41 -
 42
42 -
43
-
44
-
45
-
46
-
47
-
48
-
49
-
50
-
51
-
52
-
53
-
54
-
55
-
56
-
57
-
58
-
59
-
60
-
61
-
62
-
63
 |
 |

Removal and replacement procedures
37
a.
Loosen the front panel thumbscrews that secure the enclosure faceplate to the front of the rack.
b.
Disconnect the cabling and extend or remove the enclosure from the rack.
3.
Remove the access panel:
c.
Lift the access panel latch (1).
d.
Slide the access panel to the rear (2).
4.
Remove the front UID module:
a.
Remove the plastic bezel (1).
b.
Remove the T-10 screw to release the module from the chassis (2).
c.
Remove the module (3).
5.
Remove the power supply:
a.
Disconnect the power cord from the power supply.
b.
Press the lever inward (1) and pull the power supply out of the chassis (2).