HP 8/8 Brocade Web Tools Administrator's Guide v6.3.0 (53-1001343-01, July 200 - Page 164
Saving graphs to a canvas, Adding graphs to an existing canvas
 |
View all HP 8/8 manuals
Add to My Manuals
Save this manual to your list of manuals |
Page 164 highlights
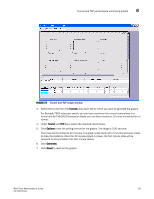
8 Saving graphs to a canvas Saving graphs to a canvas Saving graphs is useful when you create customized graphs and do not want to recreate them each time you access the Performance Monitoring window. When you save graphs, you must save them to a canvas. The following procedure describes how to save graphs to a new canvas. 1. Open the Performance Monitoring window. 2. Create basic or advanced Performance Monitor graphs, as described in "Creating basic performance monitor graphs" on page 124 and "Advanced performance monitoring graphs" on page 127. The graphs are displayed in the Performance Monitor window. 3. Click File > Save Current Canvas Configuration. The Save Canvas Configuration dialog box opens. 4. Type a name and description for the configuration and click Save Canvas. A message displays, confirming that the configuration was successfully saved to the switch. Adding graphs to an existing canvas The following procedure assumes that a canvas is already created. To create a new canvas, you must first create graphs, as described in "Creating basic performance monitor graphs" on page 124 and "Advanced performance monitoring graphs" on page 127, and then save those graphs to a canvas, as described in "Saving graphs to a canvas" on page 132. 1. Click File > Display Canvas Configurations. The Canvas Configuration List displays. A message "No Canvas configuration to display" will display if there are no saved canvas configurations. 2. Click a canvas in the list. 3. Click Edit. The Edit Canvas dialog box displays. 4. Click Add. A list of graphs displays. 5. Click a graph to add it to the canvas, and click Save. 132 Web Tools Administrator's Guide 53-1001343-01
-
 1
1 -
2
-
3
-
4
-
5
-
6
-
7
-
8
-
9
-
10
-
11
-
12
-
13
-
14
-
15
-
16
-
17
-
18
-
19
-
20
-
21
-
22
-
23
-
24
-
25
-
26
-
27
-
28
-
29
-
30
-
31
-
32
-
33
-
34
-
35
-
36
-
37
-
38
-
39
-
40
-
41
-
42
-
43
-
44
-
45
-
46
-
47
-
48
-
49
-
50
-
51
-
52
-
53
-
54
-
55
-
56
-
57
-
58
-
59
-
60
-
61
-
62
-
63
-
64
-
65
-
66
-
67
-
68
-
69
-
70
-
71
-
72
-
73
-
74
-
75
-
76
-
77
-
78
-
79
-
80
-
81
-
82
-
83
-
84
-
85
-
86
-
87
-
88
-
89
-
90
-
91
-
92
-
93
-
94
-
95
-
96
-
97
-
98
-
99
-
100
-
101
-
102
-
103
-
104
-
105
-
106
-
107
-
108
-
109
-
110
-
111
-
112
-
113
-
114
-
115
-
116
-
117
-
118
-
119
-
120
-
121
-
122
-
123
-
124
-
125
-
126
-
127
-
128
-
129
-
130
-
131
-
132
-
133
-
134
-
135
-
136
-
137
-
138
-
139
-
140
-
141
-
142
-
143
-
144
-
145
-
146
-
147
-
148
-
149
-
150
-
151
-
152
-
153
-
154
-
155
-
156
-
157
-
158
-
 159
159 -
 160
160 -
 161
161 -
 162
162 -
 163
163 -
 164
164 -
 165
165 -
 166
166 -
 167
167 -
 168
168 -
 169
169 -
170
-
171
-
172
-
173
-
174
-
175
-
176
-
177
-
178
-
179
-
180
-
181
-
182
-
183
-
184
-
185
-
186
-
187
-
188
-
189
-
190
-
191
-
192
-
193
-
194
-
195
-
196
-
197
-
198
-
199
-
200
-
201
-
202
-
203
-
204
-
205
-
206
-
207
-
208
-
209
-
210
-
211
-
212
-
213
-
214
-
215
-
216
-
217
-
218
-
219
-
220
-
221
-
222
-
223
-
224
-
225
-
226
-
227
-
228
-
229
-
230
-
231
-
232
-
233
-
234
-
235
-
236
-
237
-
238
-
239
-
240
-
241
-
242
-
243
-
244
-
245
-
246
-
247
-
248
-
249
-
250
-
251
-
252
-
253
-
254
-
255
-
256
-
257
-
258
-
259
-
260
-
261
-
262
-
263
-
264
-
265
-
266
-
267
-
268
-
269
-
270
-
271
-
272
-
273
-
274
-
275
-
276
-
277
-
278
-
279
-
280
-
281
-
282
-
283
-
284
-
285
-
286
-
287
-
288
-
289
-
290
-
291
-
292
-
293
-
294
-
295
-
296
-
297
-
298
-
299
-
300
-
301
-
302
-
303
-
304
-
305
-
306
-
307
-
308
-
309
-
310
-
311
-
312
-
313
-
314
-
315
-
316
-
317
-
318
-
319
-
320
-
321
-
322
-
323
-
324
-
325
-
326
-
327
-
328
-
329
-
330
-
331
-
332
-
333
-
334
-
335
-
336
-
337
-
338
-
339
-
340
-
341
-
342
-
343
-
344
-
345
-
346
-
347
-
348
-
349
-
350
-
351
-
352
-
353
-
354
-
355
-
356
-
357
-
358
-
359
-
360
-
361
-
362
-
363
-
364
-
365
-
366
-
367
-
368
-
369
-
370
 |
 |
