HP 8150 HP LaserJet 8150 Series Printers - Software Technical Reference - Page 97
State, Drop-down, menu contents, Button, label, Action, Width and height controls
 |
UPC - 725184622984
View all HP 8150 manuals
Add to My Manuals
Save this manual to your list of manuals |
Page 97 highlights
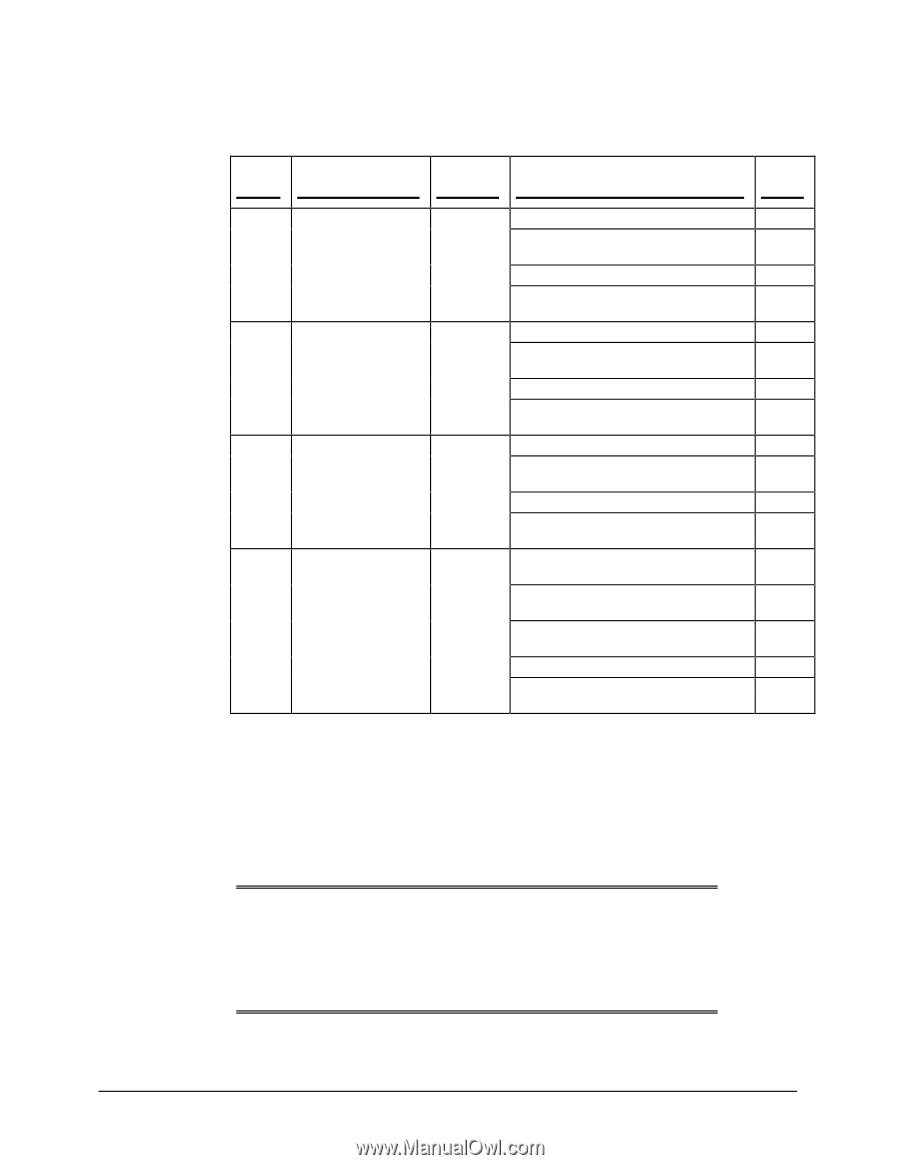
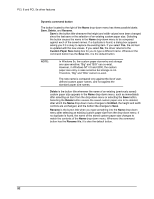
PCL 6 and PCL 5e driver features The following state table illustrates the relationships between the Name drop-down menu, the command button, and the actions that take users from one state to another. Drop-down State menu contents Button label Action Next State 1 Untitled Save Click Save. 3 Type something into Name drop-down 2 menu. Change the width or height values. 1 Select a saved item from the drop- 3 down menu. 2 Save Click Save. 3 Type something into Name drop-down 2 menu. Change the width or height values. 2 Select a saved item from the drop- 3 down menu. 3 Type something into Name drop-down 4 menu. Change the width or height values. 1 Select a saved item from the drop- 3 down menu. 4 Rename Click Rename (when the name is 3 unique). Click Rename (when the name is a 4 duplicate). Type something into the Name drop- 4 down menu. Change the width or height values. 2 Select a saved item from the drop- 3 down menu. Width and height controls The width and height values can be changed either by typing numeric strings into the edit boxes, or by selecting the up and down arrows. Any entry that is greater than the width and height control maximum limits (see below) will round down to the maximum valid entry, while any entry that is smaller than the width and height control minimum limits (see below) will round up to the minimum valid entry. NOTE: If units are in millimeters, the custom paper size range minimum is the limit rounded up to the nearest whole millimeter. Custom paper size range maximum is the limit rounded down to the nearest whole millimeter. Any non-numerical entry will revert to the last valid entry. Width and height entries are validated when the focus has changed. 93
-
 1
1 -
2
-
3
-
4
-
5
-
6
-
7
-
8
-
9
-
10
-
11
-
12
-
13
-
14
-
15
-
16
-
17
-
18
-
19
-
20
-
21
-
22
-
23
-
24
-
25
-
26
-
27
-
28
-
29
-
30
-
31
-
32
-
33
-
34
-
35
-
36
-
37
-
38
-
39
-
40
-
41
-
42
-
43
-
44
-
45
-
46
-
47
-
48
-
49
-
50
-
51
-
52
-
53
-
54
-
55
-
56
-
57
-
58
-
59
-
60
-
61
-
62
-
63
-
64
-
65
-
66
-
67
-
68
-
69
-
70
-
71
-
72
-
73
-
74
-
75
-
76
-
77
-
78
-
79
-
80
-
81
-
82
-
83
-
84
-
85
-
86
-
87
-
88
-
89
-
90
-
91
-
 92
92 -
 93
93 -
 94
94 -
 95
95 -
 96
96 -
 97
97 -
 98
98 -
 99
99 -
 100
100 -
 101
101 -
 102
102 -
103
-
104
-
105
-
106
-
107
-
108
-
109
-
110
-
111
-
112
-
113
-
114
-
115
-
116
-
117
-
118
-
119
-
120
-
121
-
122
-
123
-
124
-
125
-
126
-
127
-
128
-
129
-
130
-
131
-
132
-
133
-
134
-
135
-
136
-
137
-
138
-
139
-
140
-
141
-
142
-
143
-
144
-
145
-
146
-
147
-
148
-
149
-
150
-
151
-
152
-
153
-
154
-
155
-
156
-
157
-
158
-
159
-
160
-
161
-
162
-
163
-
164
-
165
-
166
-
167
-
168
-
169
-
170
-
171
-
172
-
173
-
174
-
175
-
176
-
177
-
178
-
179
-
180
-
181
-
182
-
183
-
184
-
185
-
186
-
187
-
188
 |
 |