HP A10 Setup Guide - Page 2
Need Help? - ink
 |
View all HP A10 manuals
Add to My Manuals
Save this manual to your list of manuals |
Page 2 highlights
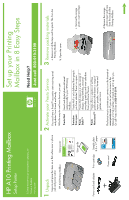
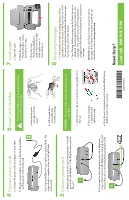
4 Connect power cords a. Connect the power cord and adapter to each other. b. Plug the power adapter cord into the Printing Mailbox and the power cord into the wall. 6 Insert print cartridge The Printing Mailbox must be plugged in before inserting the print cartridge. a. Remove the print cartridge from the pouch. The Printing Mailbox will now perform a system check. The system check is complete when the Ink light blinks continuously. 5 Connect phone cord a. Plug the phone cord into the Printing Mailbox. It should go into the jack labeled 1-LINE. Plug the other end into the wall. b. Pull the pink tab to remove the tape from the cartridge. CAUTION: Do not touch the copper-colored area on the cartridge. c. Open the cover. Be sure to push the cover gently until it stays up. b. If you need to share the phone jack with a telephone, plug a phone cord into the telephone, and plug the other end into the jack in the Printing Mailbox labeled 2-EXT. d. The print cartridge is inserted on the right hand side. e. Push the print cartridge toward the back of the Printing Mailbox until it clicks into place. Q6030-90001 7 Load paper a. Open the cover. b. Place the paper in the Printing Mailbox. Slide it forward until it stops. c. Close the cover. The Printing Mailbox is ready when the blue light at the right corner is continuously on. 8 Receiving messages In the next few minutes the Printing Mailbox will use your phone line to connect to the Presto Service. It will then print out important information about how to get the most from your Presto Service. Your Printing Mailbox connects to the Presto Service at scheduled times throughout the day to check for new messages. You need to have your Printing Mailbox plugged in to the phone line and power to receive your messages. Reminder: You must have a Presto account to receive messages. If you haven't set up your account yet, you should do so now at www.presto.com. Need Help? Just call 800-919-3199
-
 1
1 -
 2
2
 |
 |
