HP A1730n Upgrading and Servicing Guide - Page 7
Replacing the Front Panel, Locating Components Inside the PC, Removing and Replacing Drives - memory upgrade
 |
View all HP A1730n manuals
Add to My Manuals
Save this manual to your list of manuals |
Page 7 highlights
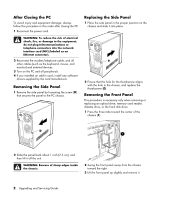
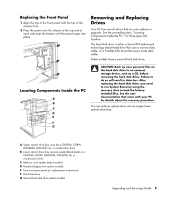
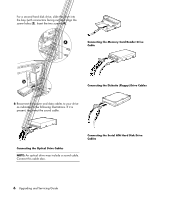
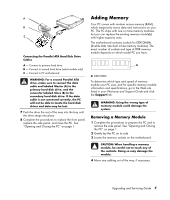
Replacing the Front Panel 1 Align the top of the front panel with the top of the chassis front. 2 Press the panel onto the chassis at the top and at each side near the bottom until the panel snaps into place. Removing and Replacing Drives Your PC has several drives that you can replace or upgrade. See the preceding topic, "Locating Components Inside the PC," for drive type and location. The hard disk drive is either a Serial ATA (advanced technology attachment) drive that uses a narrow data cable, or a Parallel ATA drive that uses a wide data cable. Select models have a second hard disk drive. Locating Components Inside the PC A B C D E R L F G CAUTION: Back up your personal files on the hard disk drive to an external storage device, such as a CD, before removing the hard disk drive. Failure to do so will result in data loss. After replacing the hard disk drive, you need to run System Recovery using the recovery discs to load the factoryinstalled files. See the user documentation that came with your PC for details about the recovery procedure. You can add an optical drive into an empty lower optical drive bay. A Upper optical drive bay, may be a CD-ROM, CD-RW, DVD-ROM, DVD+RW/+R, or combination drive B Lower optical drive bay, may be empty (blank plate) or a CD-ROM, CD-RW, DVD-ROM, DVD+RW/+R, or combination drive C Memory card reader (select models) D Diskette (floppy) drive (select models) E Front connector panel (no replacement instructions) F Hard disk drive G Second hard disk drive (select models) Upgrading and Servicing Guide 3
-
 1
1 -
 2
2 -
 3
3 -
 4
4 -
 5
5 -
 6
6 -
 7
7 -
 8
8 -
 9
9 -
 10
10 -
 11
11 -
 12
12 -
13
-
14
-
15
-
16
 |
 |
