HP AJ765A HP StorageWorks RDX DL Server Module getting started guide (5697-788 - Page 2
Returning the unit
 |
UPC - 883585922024
View all HP AJ765A manuals
Add to My Manuals
Save this manual to your list of manuals |
Page 2 highlights
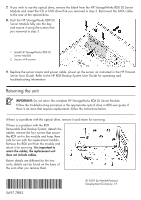
7. If you wish to use the optical drive, remove the blank from the HP StorageWorks RDX DL Server Module and insert the CD or DVD drive that you removed in step 2. Reconnect the SATA cable to the rear of the optical drive. 8. Push the HP StorageWorks RDX DL Server Module fully into the bay and secure it using the screws that you removed in step 3. 1 Install HP StorageWorks RDX DL Server Module 2 Secure with screws 9. Replace the server covers and power cable, power up the server, as instructed in the HP ProLiant Server User Guide. Refer to the HP RDX Backup System User Guide for operating and troubleshooting information. Returning the unit IMPORTANT: Do not return the complete HP StorageWorks RDX DL Server Module. Follow the troubleshooting processes in the appropriate optical drive or RDX user guide. If there is an issue that requires replacement, follow the instructions below. If there is a problem with the optical drive, remove it and return for servicing. If there is a problem with the RDX Removable Disk Backup System, detach the cables, remove the four screws that secure the RDX unit to the module and keep them safe for use with the replacement module. Remove the RDX unit from the module and return it for servicing. It is important to retain the cables; the replacement unit does not include cables. Return details are different for the two units; details can be found on the base of the units after you remove them. 5697-7882 © 2009 by Hewlett-Packard Development Company, L.P.
-
 1
1 -
 2
2
 |
 |
