HP B8350 User Guide - Page 47
Loading media in the input tray
 |
UPC - 882780648418
View all HP B8350 manuals
Add to My Manuals
Save this manual to your list of manuals |
Page 47 highlights
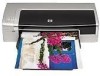
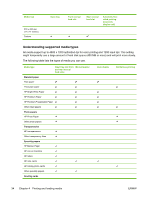
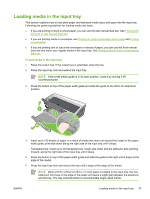
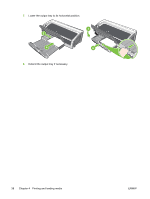
Loading media in the input tray This section explains how to load plain paper and standard media sizes and types into the input tray. Following are general guidelines for loading media into trays: ● If you are printing on thick or photo paper, you can use the rear manual feed slot. See Printing with the front or rear manual feed slot. ● If you are printing cards or envelopes, see Printing on cards and smaller-sized media and Printing on envelopes. ● If you are printing one or just a few envelopes or sheets of paper, you can use the front manual feed slot and leave your regular media in the input tray. See Printing with the front or rear manual feed slot. To load media in the input tray 1. Raise the output tray. If the output tray is extended, close the tray. 2. Press the input tray lock and extend the input tray. NOTE If the small media guide is in its open position, close it by moving it 90˚ counterclockwise. 3. Press the button on top of the paper width guide and slide the guide to the left to its outermost position. HP Deskjet 9800 4. Insert up to 150 sheets of paper or a stack of media that does not exceed the height of the paper width guide, print-side down along the right side of the input tray until it stops. Transparencies: Insert up to 30 transparencies, rough-side down and the adhesive strip pointing forward, along the right side of the input tray until it stops. 5. Press the button on top of the paper width guide and slide the guide to the right until it stops at the edge of the media. 6. Press the input tray lock and retract the tray until it stops at the edge of the media. NOTE When 215.9 x 279.4 mm (8.5 x 11 inch) paper is loaded in the input tray, the tray extension will close to the edge of the paper and leave a slight gap between the extension and the tray. The tray extends further to accommodate larger-sized media. ENWW Loading media in the input tray 37
-
 1
1 -
2
-
3
-
4
-
5
-
6
-
7
-
8
-
9
-
10
-
11
-
12
-
13
-
14
-
15
-
16
-
17
-
18
-
19
-
20
-
21
-
22
-
23
-
24
-
25
-
26
-
27
-
28
-
29
-
30
-
31
-
32
-
33
-
34
-
35
-
36
-
37
-
38
-
39
-
40
-
41
-
 42
42 -
 43
43 -
 44
44 -
 45
45 -
 46
46 -
 47
47 -
 48
48 -
 49
49 -
 50
50 -
 51
51 -
 52
52 -
53
-
54
-
55
-
56
-
57
-
58
-
59
-
60
-
61
-
62
-
63
-
64
-
65
-
66
-
67
-
68
-
69
-
70
-
71
-
72
-
73
-
74
-
75
-
76
-
77
-
78
-
79
-
80
-
81
-
82
-
83
-
84
-
85
-
86
-
87
-
88
-
89
-
90
-
91
-
92
-
93
-
94
-
95
-
96
-
97
-
98
-
99
-
100
-
101
-
102
-
103
-
104
-
105
-
106
-
107
-
108
-
109
-
110
-
111
-
112
-
113
-
114
-
115
-
116
-
117
-
118
-
119
-
120
-
121
-
122
-
123
-
124
-
125
-
126
-
127
-
128
-
129
-
130
-
131
-
132
-
133
-
134
-
135
-
136
-
137
-
138
-
139
-
140
-
141
-
142
-
143
-
144
-
145
-
146
-
147
-
148
-
149
-
150
-
151
-
152
-
153
-
154
 |
 |