HP BL260c Processor Option Installation Instructions for HP ProLiant BL260c Ge - Page 3
Install the heatsink.
 |
UPC - 883585668663
View all HP BL260c manuals
Add to My Manuals
Save this manual to your list of manuals |
Page 3 highlights
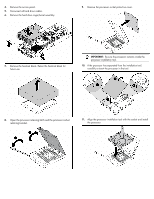
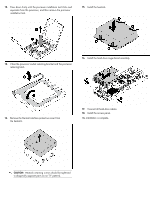
12. Press down firmly until the processor installation tool clicks and separates from the processor, and then remove the processor installation tool. 15. Install the heatsink. 13. Close the processor socket retaining bracket and the processor retaining latch. 16. Install the hard drive cage/bezel assembly. 14. Remove the thermal interface protective cover from the heatsink. 17. Connect all hard drive cables. 18. Install the access panel. The installation is complete. CAUTION: Heatsink retaining screws should be tightened in diagonally opposite pairs (in an "X" pattern).
-
 1
1 -
 2
2 -
 3
3
 |
 |

12.
Press down firmly until the processor installation tool clicks and
separates from the processor, and then remove the processor
installation tool.
13.
Close the processor socket retaining bracket and the processor
retaining latch.
14.
Remove the thermal interface protective cover from
the heatsink.
CAUTION:
Heatsink retaining screws should be tightened
in diagonally opposite pairs (in an "X" pattern).
15.
Install the heatsink.
16.
Install the hard drive cage/bezel assembly.
17.
Connect all hard drive cables.
18.
Install the access panel.
The installation is complete.