HP Brio 80xx hp brio 80xx, upgrade guide - Page 50
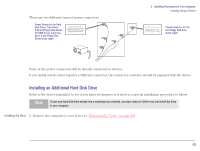
System Board Connectors
 |
View all HP Brio 80xx manuals
Add to My Manuals
Save this manual to your list of manuals |
Page 50 highlights
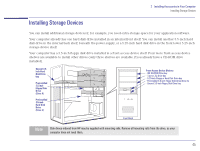
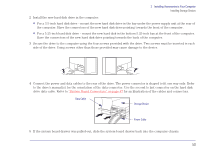
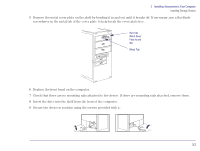
2 Installing Accessories in Your Computer Installing Storage Devices 2 Install the new hard disk drive in the computer: • For a 3.5-inch hard disk drive - mount the new hard disk drive in the bay under the power supply unit at the rear of the computer. Have the connectors of the new hard disk drive pointing towards the front of the computer. • For a 5.25-inch hard disk drive - mount the new hard disk in the bottom 5.25-inch bay at the front of the computer. Have the connectors of the new hard disk drive pointing towards the back of the computer. 3 Secure the drive to the computer using the four screws provided with the drive. Two screws must be inserted in each side of the drive. Using screws other than those provided may cause damage to the device. 4 Connect the power and data cables to the rear of the drive. The power connector is shaped to fit one way only. Refer to the drive's manual(s) for the orientation of the data connector. Use the second to last connector on the hard disk drive data cable. Refer to "System Board Connectors" on page 47 for an illustration of the cables and connectors. Data Cable Storage Device Power Cable 5 If the system board drawer was pulled-out, slide the system board drawer back into the computer chassis. 50
-
 1
1 -
2
-
3
-
4
-
5
-
6
-
7
-
8
-
9
-
10
-
11
-
12
-
13
-
14
-
15
-
16
-
17
-
18
-
19
-
20
-
21
-
22
-
23
-
24
-
25
-
26
-
27
-
28
-
29
-
30
-
31
-
32
-
33
-
34
-
35
-
36
-
37
-
38
-
39
-
40
-
41
-
42
-
43
-
44
-
 45
45 -
 46
46 -
 47
47 -
 48
48 -
 49
49 -
 50
50 -
 51
51 -
 52
52 -
 53
53 -
 54
54 -
 55
55 -
56
-
57
-
58
-
59
-
60
-
61
-
62
-
63
-
64
-
65
-
66
 |
 |