HP Brocade 8/12c Brocade Fabric OS Documentation Updates - Supporting Fabric O - Page 58
Attention
 |
View all HP Brocade 8/12c manuals
Add to My Manuals
Save this manual to your list of manuals |
Page 58 highlights
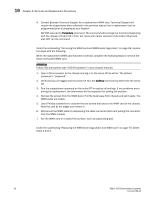
18 Chapter 5, Removal and Replacement Procedures 4. Contact Brocade Technical Support for a replacement WWN card. Technical Support will require the supportsave data collected in the previous step so that a replacement can be programmed prior to shipping to your location. DO NOT execute the frureplace command. The command will no longer be functional beginning with the release of Fabric OS 7.0.0c, but users with earlier versions of the Fabric OS should also NOT run the command. Under the subheading "Removing the WWN card and WWN bezel (logo plate)" on page 82, replace the steps with the following: When the replacement WWN card has been received, complete the following steps to remove the bezel and faulted WWN card. ATTENTION Follow ESD precautions (see "ESD Precautions" in your chassis manual). 1. Open a Telnet session to the chassis and log in to the active CP as admin. The default password is "password". 2. Verify that you are logged into the active CP. Run the haShow command to determine the active CP. 3. Run the supportsave command on the active CP to capture all settings. If any problems occur during the replacement, the information will be important for solving the problem. 4. Remove the screws from the WWN bezel. Pull the bezel away from chassis and set it aside. The WWN cards are visible. 5. Use a Phillips screwdriver to unscrew the two screws that secure the WWN card to the chassis. Hold the card by the edges and remove it. 6. Disconnect the WWN cable by depressing the cable connector latch and pulling the connector from the WWN module. 7. Set the WWN card on a static-free surface, such as a grounding pad. Under the subheading "Replacing the WWN bezel (logo plate) and WWN card" on page 83, delete step 4. 48 Fabric OS Documentation Updates 53-1002165-05
-
 1
1 -
2
-
3
-
4
-
5
-
6
-
7
-
8
-
9
-
10
-
11
-
12
-
13
-
14
-
15
-
16
-
17
-
18
-
19
-
20
-
21
-
22
-
23
-
24
-
25
-
26
-
27
-
28
-
29
-
30
-
31
-
32
-
33
-
34
-
35
-
36
-
37
-
38
-
39
-
40
-
41
-
42
-
43
-
44
-
45
-
46
-
47
-
48
-
49
-
50
-
51
-
52
-
 53
53 -
 54
54 -
 55
55 -
 56
56 -
 57
57 -
 58
58 -
 59
59 -
 60
60
 |
 |