HP CB534A User Manual - Page 144
Include the first of each fax on the fax confirmation, fax error, and last call reports
 |
View all HP CB534A manuals
Add to My Manuals
Save this manual to your list of manuals |
Page 144 highlights
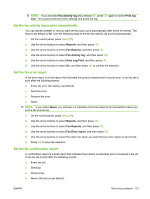
1. On the control panel, press Setup ( ). 2. Use the arrow buttons to select Reports, and then press OK. 3. Use the arrow buttons to select Fax Reports, and then press OK. 4. Use the arrow buttons to select Fax Confirmation, and then press OK. 5. Use the arrow buttons to select the option for when you want the fax error reports to be printed. 6. Press OK to save the selection. Include the first page of each fax on the fax confirmation, fax error, and last call reports If this option is turned on and the page image still exists in the product memory, the fax configuration, fax error, and last call reports include a thumbnail (50% reduction) of the first page of the most recent fax that was sent or received. The factory-set default for this option is On. 1. On the control panel, press Setup ( ). 2. Use the arrow buttons to select Reports, and then press OK. 3. Use the arrow buttons to select Fax Reports, and then press OK. 4. Use the arrow buttons to select Include 1st page, and then press OK. 5. Use the arrow buttons to select On, and then press OK to confirm the selection. Change error correction and fax speed Set the fax-error-correction mode Usually, the product monitors the signals on the telephone line while it is sending or receiving a fax. If the product detects an error during the transmission and the error-correction setting is On, the product can request that the portion of the fax be resent. The factory-set default for error correction is On. You should turn off error correction only if you are having trouble sending or receiving a fax, and you are willing to accept the errors in the transmission. Turning off the setting might be useful when you are trying to send a fax overseas or receive one from overseas, or if you are using a satellite telephone connection. 1. On the control panel, press Setup ( ). 2. Use the arrow buttons to select Fax setup, and then press OK. 3. Use the arrow buttons to select All faxes, and then press OK. 4. Use the arrow buttons to select Error correction, and then press OK. 5. Use the arrow buttons to select On or Off, and then press OK to save the selection. Change the fax speed The fax-speed setting is the modem protocol that the product uses to send faxes. It is the worldwide standard for full-duplex modems that send and receive data across telephone lines at up to 33,600 bits per second (bps). The factory-set default for the fax-speed setting is High (V.34). 132 Chapter 10 Fax ENWW
-
 1
1 -
2
-
3
-
4
-
5
-
6
-
7
-
8
-
9
-
10
-
11
-
12
-
13
-
14
-
15
-
16
-
17
-
18
-
19
-
20
-
21
-
22
-
23
-
24
-
25
-
26
-
27
-
28
-
29
-
30
-
31
-
32
-
33
-
34
-
35
-
36
-
37
-
38
-
39
-
40
-
41
-
42
-
43
-
44
-
45
-
46
-
47
-
48
-
49
-
50
-
51
-
52
-
53
-
54
-
55
-
56
-
57
-
58
-
59
-
60
-
61
-
62
-
63
-
64
-
65
-
66
-
67
-
68
-
69
-
70
-
71
-
72
-
73
-
74
-
75
-
76
-
77
-
78
-
79
-
80
-
81
-
82
-
83
-
84
-
85
-
86
-
87
-
88
-
89
-
90
-
91
-
92
-
93
-
94
-
95
-
96
-
97
-
98
-
99
-
100
-
101
-
102
-
103
-
104
-
105
-
106
-
107
-
108
-
109
-
110
-
111
-
112
-
113
-
114
-
115
-
116
-
117
-
118
-
119
-
120
-
121
-
122
-
123
-
124
-
125
-
126
-
127
-
128
-
129
-
130
-
131
-
132
-
133
-
134
-
135
-
136
-
137
-
138
-
 139
139 -
 140
140 -
 141
141 -
 142
142 -
 143
143 -
 144
144 -
 145
145 -
 146
146 -
 147
147 -
 148
148 -
 149
149 -
150
-
151
-
152
-
153
-
154
-
155
-
156
-
157
-
158
-
159
-
160
-
161
-
162
-
163
-
164
-
165
-
166
-
167
-
168
-
169
-
170
-
171
-
172
-
173
-
174
-
175
-
176
-
177
-
178
-
179
-
180
-
181
-
182
-
183
-
184
-
185
-
186
-
187
-
188
-
189
-
190
-
191
-
192
-
193
-
194
-
195
-
196
-
197
-
198
-
199
-
200
-
201
-
202
-
203
-
204
-
205
-
206
-
207
-
208
-
209
-
210
-
211
-
212
-
213
-
214
-
215
-
216
-
217
-
218
-
219
-
220
-
221
-
222
-
223
-
224
-
225
-
226
-
227
-
228
-
229
-
230
-
231
-
232
-
233
-
234
-
235
-
236
-
237
-
238
-
239
-
240
-
241
-
242
-
243
-
244
-
245
-
246
-
247
-
248
-
249
-
250
-
251
-
252
-
253
-
254
 |
 |
