HP CP6015dn HP Color LaserJet CP6015 Series - Job Aid - Create and Print Store - Page 2
Create and print stored jobs - color laserjet driver
 |
UPC - 883585363018
View all HP CP6015dn manuals
Add to My Manuals
Save this manual to your list of manuals |
Page 2 highlights
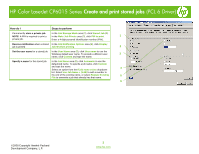
HP Color LaserJet CP6015 Series Create and print stored jobs (PCL 6 Driver) How do I Steps to perform Permanently store a private job In the Job Storage Mode area (1), click Stored Job (2). NOTE: A PIN is required to print a In the Make Job Private area (3), click PIN to print. 1 private job. Enter a 4-digit personal identification number (PIN). Receive notification when a stored In the Job Notification Options area (4), click Display job is printed Job ID when printing. 2 Set the user name for a stored job In the User Name area (5), click User name to use the Windows default user name. To provide a different user 3 name, click Custom and type the name. Specify a name for the stored job In the Job Name area (6), click Automatic to use the default job name. To specify a job name, click Custom and type the name. 4 Select an option from the If job name exists dropdown list. Select Use Job Name + (1-99) to add a number to the end of the existing name, or select Replace Existing 5 File to overwrite a job that already has that name. 6 ©2008 Copyright Hewlett-Packard Development Company, L.P. 2 www.hp.com
-
 1
1 -
 2
2
 |
 |