HP CP6015dn HP Color LaserJet CP6015 Series - Job Aid - Replace Image Drums - Page 1
HP CP6015dn - Color LaserJet Laser Printer Manual
 |
UPC - 883585363018
View all HP CP6015dn manuals
Add to My Manuals
Save this manual to your list of manuals |
Page 1 highlights
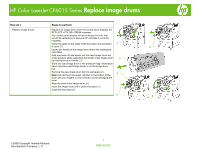
HP Color LaserJet CP6015 Series Replace image drums How do I Steps to perform Replace image drums. Replace an image drum when the control panel displays the REPLACE DRUM message. The control panel display will also indicate the color that should be replaced (if a genuine HP cartridge is currently installed). Grasp the grips on the sides of the front door and pull down 1 to open (1). 2 Locate the handle of the image drum above the rectangular color label. With one hand, lift and slowly pull the used image drum out of the product, while supporting the length of the image drum 3 by holding the blue handle. (2). Store the used image drum in the protective bag. Information about recycling used image drums is on the image drum box. Remove the new image drum from its packaging (3). 4 Note: Do not touch the green cylinder on the bottom of the drum with your fingers or any surface to avoid damaging the drum. Align the slots of the image drum. (4). Insert the image drum until it clicks into place (5). Close the front door (6). 5 6 ©2008 Copyright Hewlett-Packard Development Company, L.P. 1 www.hp.com
-
 1
1
 |
 |
