HP Cisco MDS 9216i Cisco Nexus 5000 Series Hardware Installation Guide (OL-159 - Page 63
Removing and Installing Expansion Modules, Installing an Expansion Module
 |
View all HP Cisco MDS 9216i manuals
Add to My Manuals
Save this manual to your list of manuals |
Page 63 highlights
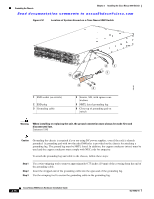
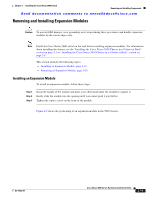
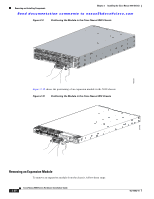
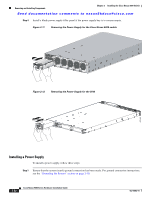
Chapter 2 Installing the Cisco Nexus 5000 Switch Removing and Installing Components Send documentation comments to [email protected] Removing and Installing Expansion Modules Caution To prevent ESD damage, wear grounding wrist straps during these procedures and handle expansion modules by the carrier edges only. Note Install the Cisco Nexus 5000 switch in the rack before installing expansion modules. For information about installing the chassis, see the "Installing the Cisco Nexus 5020 Chassis in a Cabinet or Rack" section on page 2-5 or "Installing the Cisco Nexus 5010 Chassis in a Cabinet or Rack" section on page 2-8 This section includes the following topics: • Installing an Expansion Module, page 2-19 • Removing an Expansion Module, page 2-20 Installing an Expansion Module To install an expansion module, follow these steps: Step 1 Step 2 Step 3 Grasp the handle of the module and place your other hand under the module to support it. Gently slide the module into the opening until you cannot push it any further. Tighten the captive screw on the front of the module. Figure 2-9 shows the positioning of an expansion module in the 5020 chassis. OL-15902-01 Cisco Nexus 5000 Series Hardware Installation Guide 2-19
-
 1
1 -
2
-
3
-
4
-
5
-
6
-
7
-
8
-
9
-
10
-
11
-
12
-
13
-
14
-
15
-
16
-
17
-
18
-
19
-
20
-
21
-
22
-
23
-
24
-
25
-
26
-
27
-
28
-
29
-
30
-
31
-
32
-
33
-
34
-
35
-
36
-
37
-
38
-
39
-
40
-
41
-
42
-
43
-
44
-
45
-
46
-
47
-
48
-
49
-
50
-
51
-
52
-
53
-
54
-
55
-
56
-
57
-
 58
58 -
 59
59 -
 60
60 -
 61
61 -
 62
62 -
 63
63 -
 64
64 -
 65
65 -
 66
66 -
 67
67 -
 68
68 -
69
-
70
-
71
-
72
-
73
-
74
-
75
-
76
-
77
-
78
-
79
-
80
-
81
-
82
-
83
-
84
-
85
-
86
-
87
-
88
-
89
-
90
-
91
-
92
-
93
-
94
-
95
-
96
-
97
-
98
-
99
-
100
-
101
-
102
-
103
-
104
-
105
-
106
-
107
-
108
-
109
-
110
-
111
-
112
 |
 |
