HP Color LaserJet CM4730 HP Color LaserJet CM4730 MFP - Job Aid - PCL Printing
HP Color LaserJet CM4730 - Multifunction Printer Manual
 |
View all HP Color LaserJet CM4730 manuals
Add to My Manuals
Save this manual to your list of manuals |
HP Color LaserJet CM4730 manual content summary:
- HP Color LaserJet CM4730 | HP Color LaserJet CM4730 MFP - Job Aid - PCL Printing - Page 1
HP Color LaserJet CM4730 MFP PCL - Printing How do I Steps to perform 1 1 Access the printer driver. Click on File, Print pages Click the Paper Source drop-down menu, then select a paper tray. Use Manual Feed for printing special media 6 such as transparencies, labels, or envelopes. 7 Click - HP Color LaserJet CM4730 | HP Color LaserJet CM4730 MFP - Job Aid - PCL Printing - Page 2
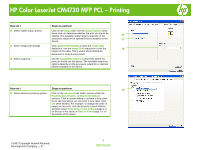
HP Color LaserJet CM4730 MFP PCL - Printing How do I Steps to perform 10 10 Scale a page to fit on a selected paper size. Click on the Effects tab, click on the Print Document On, select a paper size, and then click Scale to Fit. 11 Print a watermark. Click on the Watermarks drop-down menu, - HP Color LaserJet CM4730 | HP Color LaserJet CM4730 MFP - Job Aid - PCL Printing - Page 3
HP Color LaserJet CM4730 MFP PCL - Printing How do I Steps to perform 16 Select staple output Image Shift dialog box to shift the 18 image on the page. This is useful when binding the document or using 3-hole punch. 18 Select output bin. Use the Output Bin Options to determine where the - HP Color LaserJet CM4730 | HP Color LaserJet CM4730 MFP - Job Aid - PCL Printing - Page 4
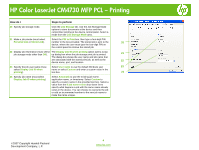
HP Color LaserJet CM4730 MFP PCL - Printing How do I Steps to perform 20 Specify job storage mode. Click the Job Storage tab. Use the Job Storage Mode options to store documents job user name (must Select User name to use the default Windows user 23 select Display Job ID when name or select
-
 1
1 -
 2
2 -
 3
3 -
 4
4
 |
 |
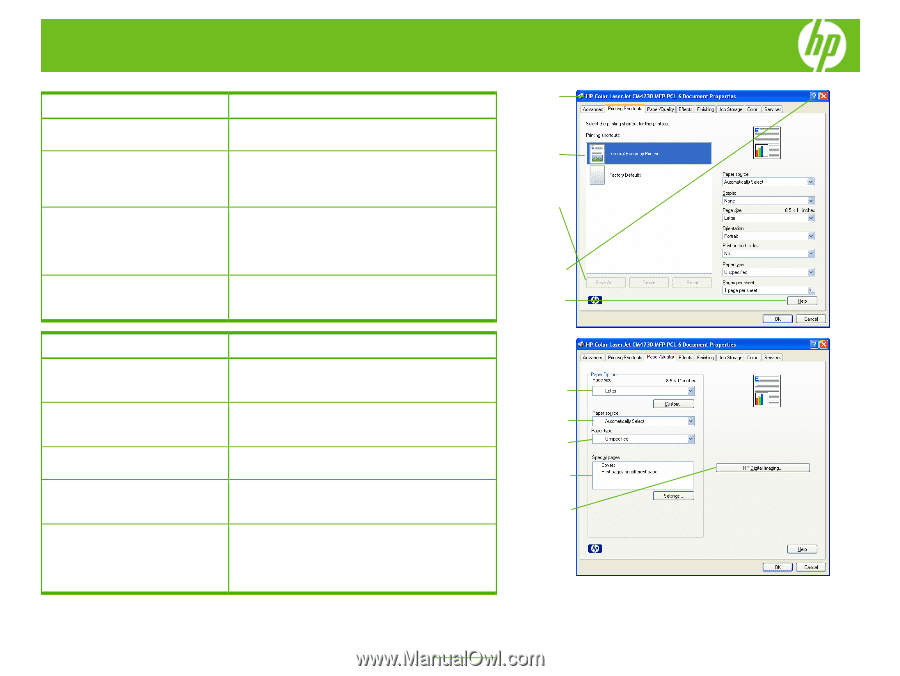
HP Color LaserJet CM4730 MFP PCL – Printing
How do I
Steps to perform
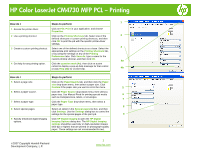
1
Access the printer driver
.
Click on
File
,
Print
in your application, and choose
Properties
.
2
Use a printing shortcut
Click on the
Printing Shortcuts
tab. Select one of the
defined shortcuts or custom printing shortcuts, and then
click
OK
to print the job with the specific printer-driver
settings.
3
Create a custom printing shortcut
Select one of the defined shortcuts as a base. Select the
appropriate print settings on the
Printing Shortcuts
tab,
or by using the settings on any of the
Printing
Preferences
tabs. Click
Save As
, type a name for the
custom printing shortcut, and then click
OK
.
4
Get help for any printing option.
Click the
question mark
(
4a
), then click on a print
control to display a pop-up help message for that control
or click
Help
(
4b
) for on-line help.
How do I
Steps to perform
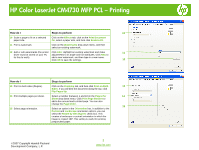
5
Select a page size.
Click on the
Paper/Quality
tab, and then click the
Paper
size
drop-down menu, then select a paper size. Click
Custom
if the paper size you want is not in the menu.
6
Select a paper source.
Click the
Paper Source
drop-down menu, then select a
paper tray. Use Manual Feed for printing special media
such as transparencies, labels, or envelopes.
7
Select a paper type.
Click the
Paper Type
drop-down menu, then select a
paper type.
8
Select special pages
Select an option in the
Special pages
list box, and then
click
Settings
. Use the
Settings
dialog box to control the
settings for the special pages of the print job.
9
Specify enhanced digital imaging
options.
Click
HP Digital Imaging
to open the
HP Digital
Imaging Options
dialog box. The
HP Digital Imaging
settings
should be used only on high-resolution images
(600 dpi or higher) that are printed on photograph-quality
paper. These settings are not recommended for text.
2
3
1
4a
4b
6
8
9
7
5
1
©
2007 Copyright Hewlett-Packard
www.hp.com
Development Company, L.P.