HP Color LaserJet Enterprise Flow MFP X58045z User Guide - Page 73
Sign in and Permission Policies, Enable SMTP SSL Protocol
 |
View all HP Color LaserJet Enterprise Flow MFP X58045z manuals
Add to My Manuals
Save this manual to your list of manuals |
Page 73 highlights
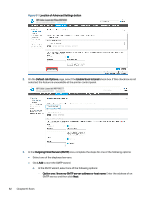
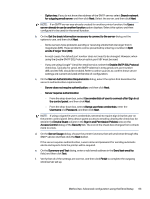
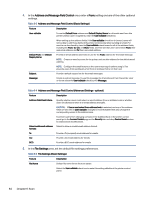
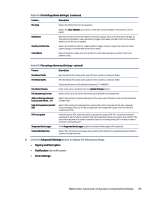
- Option two: If you do not know the address of the SMTP server, select Search network for outgoing email server, and then click Next. Select the server, and then click Next. NOTE: If an SMTP server was already created for another printer function, the Use a server already in use by another function option displays. Select this option, and then configure it to be used for the email function. b. On the Set the basic information necessary to connect to the server dialog, set the options to use, and then click Next. - Some servers have problems sending or receiving emails that are larger than 5 megabytes (MB). These problems can be prevented by entering a number in Split emails if larger than (MB). - In most cases, the default port number does not need to be changed. However, when using the Enable SMTP SSL Protocol option, port 587 must be used. - If you are using Google™ Gmail for email service, select the Enable SMTP SSL Protocol check box. Typically, for gmail, the SMTP address is smtp.gmail.com, port number 465, and the SSL should be enabled. Refer to online sources to confirm these server settings are current and valid at the time of configuration. c. On the Server Authentication Requirements dialog, select the option that describes the server's authentication requirements: - Server does not require authentication, and then click Next. - Server requires authentication ○ From the drop-down box, select Use credentials of user to connect after Sign In at the control panel, and then click Next. ○ From the drop-down box, select Always use these credentials, enter the Username and Password, and then click Next. NOTE: If using a signed-in user's credentials, set email to require sign in by the user on the printer control panel. Deny device guest access to email by clearing the check box for email in the Device Guest column in the Sign in and Permission Policies area on the Access Control dialog of the Security tab. The icon in the check box changes from a check mark to a lock. d. On the Server Usage dialog, choose the printer functions that will send email through this SMTP server, and then click the Next button. If the server requires authentication, a user name and password for sending automatic alerts and reports from the printer will be required. e. On the Summary and Test dialog, enter a valid email address in the Send test email to: field, and then click Test. f. Verify that all of the settings are correct, and then click Finish to complete the outgoing email server set up. Method two: Advanced configuration using the Email Setup 63
-
 1
1 -
2
-
3
-
4
-
5
-
6
-
7
-
8
-
9
-
10
-
11
-
12
-
13
-
14
-
15
-
16
-
17
-
18
-
19
-
20
-
21
-
22
-
23
-
24
-
25
-
26
-
27
-
28
-
29
-
30
-
31
-
32
-
33
-
34
-
35
-
36
-
37
-
38
-
39
-
40
-
41
-
42
-
43
-
44
-
45
-
46
-
47
-
48
-
49
-
50
-
51
-
52
-
53
-
54
-
55
-
56
-
57
-
58
-
59
-
60
-
61
-
62
-
63
-
64
-
65
-
66
-
67
-
 68
68 -
 69
69 -
 70
70 -
 71
71 -
 72
72 -
 73
73 -
 74
74 -
 75
75 -
 76
76 -
 77
77 -
 78
78 -
79
-
80
-
81
-
82
-
83
-
84
-
85
-
86
-
87
-
88
-
89
-
90
-
91
-
92
-
93
-
94
-
95
-
96
-
97
-
98
-
99
-
100
-
101
-
102
-
103
-
104
-
105
-
106
-
107
-
108
-
109
-
110
-
111
-
112
-
113
-
114
-
115
-
116
-
117
-
118
-
119
-
120
-
121
-
122
-
123
-
124
-
125
-
126
-
127
-
128
-
129
-
130
-
131
-
132
-
133
-
134
-
135
-
136
-
137
-
138
-
139
-
140
-
141
-
142
-
143
-
144
-
145
-
146
-
147
-
148
-
149
-
150
-
151
-
152
-
153
-
154
-
155
-
156
-
157
-
158
-
159
-
160
-
161
-
162
-
163
-
164
-
165
-
166
-
167
-
168
-
169
-
170
-
171
-
172
-
173
-
174
-
175
-
176
-
177
-
178
-
179
-
180
-
181
-
182
-
183
-
184
-
185
-
186
-
187
-
188
-
189
-
190
-
191
-
192
-
193
-
194
-
195
-
196
-
197
-
198
-
199
-
200
-
201
-
202
-
203
-
204
-
205
-
206
-
207
-
208
-
209
-
210
-
211
-
212
-
213
-
214
-
215
-
216
-
217
-
218
-
219
-
220
-
221
-
222
-
223
-
224
 |
 |
