HP D5259A HP Pavilion Desktop PCs - (English) MX703 and M703 Monitor Guide
HP D5259A - Pavilion M70 - 17" CRT Display Manual
 |
View all HP D5259A manuals
Add to My Manuals
Save this manual to your list of manuals |
HP D5259A manual content summary:
- HP D5259A | HP Pavilion Desktop PCs - (English) MX703 and M703 Monitor Guide - Page 1
hp pavilion mx703/m703 monitor guide - HP D5259A | HP Pavilion Desktop PCs - (English) MX703 and M703 Monitor Guide - Page 2
to another language without the prior written consent of HP. Hewlett-Packard Company P.O. Box 4010 Cupertino, CA 95015-4010 USA © 2003 Hewlett-Packard Company. All rights reserved. Hewlett-Packard is a registered trademark of Hewlett-Packard Company in the United States of America and other - HP D5259A | HP Pavilion Desktop PCs - (English) MX703 and M703 Monitor Guide - Page 3
/Position Window 20 Using the Advanced Window 23 Choosing the Color Temperature 25 Using Degauss 29 Using the Factory Settings Window 29 Using the Language Window 30 Using the Information Window 31 Technical Information 32 Pre-Set Video Modes 33 HP Pavilion MX703/M703 Monitor Guide iii - HP D5259A | HP Pavilion Desktop PCs - (English) MX703 and M703 Monitor Guide - Page 4
37 Avis Canadien 37 European Union Notice 37 X-Ray Radiation Notice 37 ENERGY STAR Compliance 38 Power Cords 38 Environmental Information 38 Index 39 iv HP Pavilion MX703/M703 Monitor Guide - HP D5259A | HP Pavilion Desktop PCs - (English) MX703 and M703 Monitor Guide - Page 5
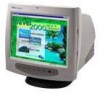
-resolution color monitors designed for use with HP Pavilion home PCs and other PCs. The monitors include brackets for the two supplied speakers. The optional subwoofer is not included with the monitor. The CRT (cathode-ray tube) monitor comes in two styles, mx703 with a flat screen and m703 with - HP D5259A | HP Pavilion Desktop PCs - (English) MX703 and M703 Monitor Guide - Page 6
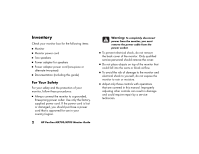
your country/region. 2 HP Pavilion MX703/M703 Monitor Guide Warning: To completely disconnect power from the monitor, you must remove the power cable from the power socket. ■ To prevent electrical shock, do not remove the back cover of the monitor. Only qualified service personnel should remove - HP D5259A | HP Pavilion Desktop PCs - (English) MX703 and M703 Monitor Guide - Page 7
setup and use recommendations for you to follow based on established ergonomic principles. You can consult the onscreen version of "Working in Comfort" in the Help and Support Center, or visit HP's Working in Comfort Web site at: http://www.hp.com/ergo HP Pavilion MX703/M703 Monitor Guide 3 - HP D5259A | HP Pavilion Desktop PCs - (English) MX703 and M703 Monitor Guide - Page 8
Power and Video Cables Before connecting any cables, be sure to read the safety instructions at the beginning of this manual. The PC and monitor must be turned off. To connect the power and video cables: 1 Connect the power cord to the back of the monitor. 4 HP Pavilion MX703/M703 Monitor Guide - HP D5259A | HP Pavilion Desktop PCs - (English) MX703 and M703 Monitor Guide - Page 9
System" on page 10 for installing and connecting the subwoofer. Installing the Two-Speaker System The left and right speakers mount to brackets on each side of the monitor or sit on the desktop. The right speaker has connectors and the On/Volume knob. HP Pavilion MX703/M703 Monitor Guide 5 - HP D5259A | HP Pavilion Desktop PCs - (English) MX703 and M703 Monitor Guide - Page 10
B C F G E D 6 HP Pavilion MX703/M703 Monitor Guide Item A B C D E F G Right speaker On/Volume knob Headphones connector Control cable connector (purple) Speaker audio cable (green) Left speaker audio (hardwired) cable Power adapter cable connector Speaker power adapter Purpose Turns on and - HP D5259A | HP Pavilion Desktop PCs - (English) MX703 and M703 Monitor Guide - Page 11
-L) or right side (circled-R) of monitor Releases bracket from bottom of monitor Is flush with outside of monitor when bracket is installed Holds speaker 2 Locate the slots underneath and on both sides of the monitor. Do not lift or tip the monitor. K J L HP Pavilion MX703/M703 Monitor Guide 7 - HP D5259A | HP Pavilion Desktop PCs - (English) MX703 and M703 Monitor Guide - Page 12
3 Note the correct orientation of the brackets shown in the figure. Slots under monitor 8 HP Pavilion MX703/M703 Monitor Guide - HP D5259A | HP Pavilion Desktop PCs - (English) MX703 and M703 Monitor Guide - Page 13
) D into the PC. Refer to your PC user's guide for instructions on how to connect your speakers to the PC. 3 Turn on the PC, the monitor, and then the right speaker On/Volume knob A. To turn on the monitor, see "Turning the Monitor On and Off" on page 12. HP Pavilion MX703/M703 Monitor Guide 9 - HP D5259A | HP Pavilion Desktop PCs - (English) MX703 and M703 Monitor Guide - Page 14
Installing the Two-Speaker and Subwoofer System This configuration uses an optional subwoofer (not provided) and the two speakers included with the monitor. O A B C F E M Q N R D S P G 10 HP Pavilion MX703/M703 Monitor Guide - HP D5259A | HP Pavilion Desktop PCs - (English) MX703 and M703 Monitor Guide - Page 15
connector (green) Q. 3 Plug the subwoofer control cable (purple) P into the right speaker connector (purple) C. 4 Plug the subwoofer audio cable (green) R into the PC. Refer to your PC user's guide for instructions on how to connect your speakers to the PC. HP Pavilion MX703/M703 Monitor Guide 11 - HP D5259A | HP Pavilion Desktop PCs - (English) MX703 and M703 Monitor Guide - Page 16
of its reduced power modes. Power button OSD buttons The monitor's power-management features reduce power consumption to low levels when your PC has been inactive for a specified period of time. See "Minimizing Energy Use" on page 15 for more information. 12 HP Pavilion MX703/M703 Monitor Guide - HP D5259A | HP Pavilion Desktop PCs - (English) MX703 and M703 Monitor Guide - Page 17
degaussing methods. Each time you turn on the monitor, it is automatically degaussed. You can also use the Degauss option in the On Screen Display (OSD) Main Menu window to degauss the display. See "Using the OSD Main Menu window" on page 18 for instructions. HP Pavilion MX703/M703 Monitor Guide 13 - HP D5259A | HP Pavilion Desktop PCs - (English) MX703 and M703 Monitor Guide - Page 18
select the screen refresh rate" on page 15. To set the screen resolution 1 Right-click an empty part of the desktop. 2 Click Properties. The Display Properties window opens. 3 Click the Settings tab. 4 Adjust the screen resolution. 5 Click Apply. 6 Click OK. 14 HP Pavilion MX703/M703 Monitor Guide - HP D5259A | HP Pavilion Desktop PCs - (English) MX703 and M703 Monitor Guide - Page 19
rate from the available values. 7 Click Apply. 8 Click OK. Minimizing Energy Use HP Pavilion PCs support VESA Display Power Management Signaling (DPMS). Powermanagement features reduce the monitor's power consumption after a period of keyboard inactivity. HP Pavilion MX703/M703 Monitor Guide 15 - HP D5259A | HP Pavilion Desktop PCs - (English) MX703 and M703 Monitor Guide - Page 20
the screen with a soft cotton cloth. 4 Plug in the monitor and turn it on. Adjusting the Viewing Angle The monitor's pedestal mounting enables you to adjust the viewing angle. You can tilt and swivel the monitor to find the most comfortable viewing position. 16 HP Pavilion MX703/M703 Monitor Guide - HP D5259A | HP Pavilion Desktop PCs - (English) MX703 and M703 Monitor Guide - Page 21
In a window, the button moves the pointer upward through the icon menu. With no menu window open, Plus opens the Contrast adjustment. Select button in the OSD Main Menu window opens the adjustment bar for the selected icon, or opens the corresponding window. HP Pavilion MX703/M703 Monitor Guide 17 - HP D5259A | HP Pavilion Desktop PCs - (English) MX703 and M703 Monitor Guide - Page 22
Language Opens a menu to set the language of the OSD. Information Opens a screen showing the current mode and other information, including the monitor serial number. Exit Closes the OSD Main Menu window and saves any changes you have made (except User Color). 18 HP Pavilion MX703/M703 Monitor Guide - HP D5259A | HP Pavilion Desktop PCs - (English) MX703 and M703 Monitor Guide - Page 23
a descriptive text. Using the Brightness/Contrast Window The Brightness/Contrast window allows you to adjust the brightness and contrast of an image. To open the Brightness/Contrast window, select the Brightness/Contrast icon in the OSD Main Menu window. HP Pavilion MX703/M703 Monitor Guide 19 - HP D5259A | HP Pavilion Desktop PCs - (English) MX703 and M703 Monitor Guide - Page 24
20 HP Pavilion MX703/M703 Monitor Guide In the Brightness/Contrast window, the following functions are available: Brightness Adjusts the luminance level in the image. Contrast Adjusts the difference in luminance between light and dark areas of the image. Default settings Adjusts the Brightness and - HP D5259A | HP Pavilion Desktop PCs - (English) MX703 and M703 Monitor Guide - Page 25
icon in the Size/Position window. The example shown below is the V Adjustment window. In the Size/Position window, the following functions are available: H Adjustment Opens the Horizontal Adjustment window. V Adjustment Opens the Vertical Adjustment window. HP Pavilion MX703/M703 Monitor Guide 21 - HP D5259A | HP Pavilion Desktop PCs - (English) MX703 and M703 Monitor Guide - Page 26
any changes you have made, and opens the Size/Position window. In the Zoom window, the following functions are available: Zoom Adjusts the zoom of the image. Exit sub-menu Closes the window, saves any changes you have made, and opens the Size/Position window. 22 HP Pavilion MX703/M703 Monitor Guide - HP D5259A | HP Pavilion Desktop PCs - (English) MX703 and M703 Monitor Guide - Page 27
background of your image. Horizontal and vertical controls are available. OSD settings Adjusts the position of the OSD on the screen and the maximum timeout. Exit sub-menu Closes the window, saves any changes you have made, and opens the OSD Main Menu window. HP Pavilion MX703/M703 Monitor Guide 23 - HP D5259A | HP Pavilion Desktop PCs - (English) MX703 and M703 Monitor Guide - Page 28
To open a window, select the icon in the Advanced window. The example that follows is the Image shape window. To open the Color window, select the Color icon in the Advanced window. 24 HP Pavilion MX703/M703 Monitor Guide - HP D5259A | HP Pavilion Desktop PCs - (English) MX703 and M703 Monitor Guide - Page 29
K. The 9300 K setting is often used for office environments or fluorescent lighting. The 6500 K setting is often used in environments with incandescent lighting. The 5500 K setting is often used for viewing photography or artwork proofs prior to printing. HP Pavilion MX703/M703 Monitor Guide 25 - HP D5259A | HP Pavilion Desktop PCs - (English) MX703 and M703 Monitor Guide - Page 30
the following functions are available: Rotation Adjusts the angle of the image. Default settings Adjusts the Image rotation setting to the factory default values. Exit sub-menu Closes the window, saves any changes you have made, and opens the Advanced window. 26 HP Pavilion MX703/M703 Monitor Guide - HP D5259A | HP Pavilion Desktop PCs - (English) MX703 and M703 Monitor Guide - Page 31
. Default settings Adjusts the Image shape settings to the factory default values. Exit sub-menu Closes the window, saves any changes you have made, and opens the Advanced window. To open the Moiré correction window, select the icon in the Advanced window. HP Pavilion MX703/M703 Monitor Guide 27 - HP D5259A | HP Pavilion Desktop PCs - (English) MX703 and M703 Monitor Guide - Page 32
Moiré Reduces horizontal wavy colored lines or patterns in the background of your image. Exit sub-menu Closes the window, saves any changes you have made, and opens the Advanced window. To open the OSD settings window, select the icon in the Advanced window. 28 HP Pavilion MX703/M703 Monitor Guide - HP D5259A | HP Pavilion Desktop PCs - (English) MX703 and M703 Monitor Guide - Page 33
time you turn on the monitor, it is automatically degaussed. It is not necessary to degauss unless you have moved the monitor. Using the Factory Settings Window To open the Factory settings window, select the Factory settings icon in the OSD Main Menu window. HP Pavilion MX703/M703 Monitor Guide 29 - HP D5259A | HP Pavilion Desktop PCs - (English) MX703 and M703 Monitor Guide - Page 34
) Shows the current mode. Select yes to restore the factory settings for all values. Exit sub-menu Closes the window, saves any changes you have made, and opens the OSD Main Menu window. 30 HP Pavilion MX703/M703 Monitor Guide In the Language window, you select the language for the text in the OSD - HP D5259A | HP Pavilion Desktop PCs - (English) MX703 and M703 Monitor Guide - Page 35
of the monitor, and the monitor working time as Power On hours and Power Saving hours. The resolution and the refresh rate are set in the Windows Control Panel. See "To set the screen resolution" on page 14 or "To select the screen refresh rate" on page 15. HP Pavilion MX703/M703 Monitor Guide 31 - HP D5259A | HP Pavilion Desktop PCs - (English) MX703 and M703 Monitor Guide - Page 36
dot pitch m703 Picture tube 17 in (43.1 cm) curved, 90° deflection, black matrix, phosphor P22 medium short, 0.27 mm dot pitch Maximum viewable area 310 mm (H) x 230 mm (V) 12.9 in (H) x 8.97 in (V) 16 in (406.4 mm) diagonal 32 HP Pavilion MX703/M703 Monitor Guide Monitor Information Raster - HP D5259A | HP Pavilion Desktop PCs - (English) MX703 and M703 Monitor Guide - Page 37
figure illustrates the 15-pin D-sub male video connector used by the monitor. The table shows the pin assignments. 1 5 6 10 15 11 Note: Because of a policy of continuous product improvement, pin assignments are subject to change without notice. HP Pavilion MX703/M703 Monitor Guide 33 - HP D5259A | HP Pavilion Desktop PCs - (English) MX703 and M703 Monitor Guide - Page 38
when the monitor is in a power-saving mode. ■ VESA DPMS video adapters reduce monitor power consumption by setting the horizontal and/or vertical synchronization signals to inactive. The monitor recovers quickly when the synchronization signals are reapplied. 34 HP Pavilion MX703/M703 Monitor Guide - HP D5259A | HP Pavilion Desktop PCs - (English) MX703 and M703 Monitor Guide - Page 39
radiate radio frequency energy and if not installed and used in accordance with the instructions, may cause harmful interference to radio communications. However, there is no guarantee Consult a dealer or an experienced radio or television technician for help. HP Pavilion MX703/M703 Monitor Guide 35 - HP D5259A | HP Pavilion Desktop PCs - (English) MX703 and M703 Monitor Guide - Page 40
P.O. Box 692000, Mail Stop 530113 Houston, Texas 77269-2000 or call (+1) (208) 472-4357 36 HP Pavilion MX703/M703 Monitor Guide For questions regarding this FCC declaration, contact: Hewlett-Packard Company P.O. Box 692000, Mail Stop 510101 Houston, Texas 77269-2000 or call (+1) (281) 514-3333 - HP D5259A | HP Pavilion Desktop PCs - (English) MX703 and M703 Monitor Guide - Page 41
(89/336/EEC) and the Low Voltage Directive (73/23/EEC) issued by the Commission of the European Community and if this product has telecommunication specified in the service manual for this product. Replace the cathode-ray tube with an identical CRT only. HP Pavilion MX703/M703 Monitor Guide 37 - HP D5259A | HP Pavilion Desktop PCs - (English) MX703 and M703 Monitor Guide - Page 42
38 HP Pavilion MX703/M703 Monitor Guide product. In addition, the diameter of the wire must be a minimum of 0.75 mm or 18 AWG, and the length of the cord must be between 6 feet (1.8 m) and 12 feet (3.6 m). If you have questions about the type of power cord to use, contact your HP authorized service - HP D5259A | HP Pavilion Desktop PCs - (English) MX703 and M703 Monitor Guide - Page 43
settings, 17 compatibility with PCs, 32 power-management features, 15 resolution of, 14, 33 technical information, 35 DPMS (Display Power Management Signaling), 15, 34 E eyestrain, minimizing, 15 F Factory settings icon, 18, 30 window, 29 front panel, using, 17 HP Pavilion MX703/M703 Monitor Guide - HP D5259A | HP Pavilion Desktop PCs - (English) MX703 and M703 Monitor Guide - Page 44
management features, 13, 34 safety procedures, 2 40 HP Pavilion MX703/M703 Monitor Guide using, 16 viewing angle of, 16 O OSD (On Screen Display) features, 17 main menu window, 18 OSD settings, 29 OSD settings icon, 23 OSD settings window, 28 P Parallelogram icon, 27 pin assignments, 33 Pincushion - HP D5259A | HP Pavilion Desktop PCs - (English) MX703 and M703 Monitor Guide - Page 45
vertical (V) V adjustment window, 21 V Moiré icon, 28 V Position icon, 22 V Position icon, OSD window, 29 V Size icon, 22 vertical frequency, 15 VESA Display Power Management Signaling (DPMS), 15, 34 video cables, connecting, 4 video modes, 33 Z Zoom icon, 22 HP Pavilion MX703/M703 Monitor Guide 41 - HP D5259A | HP Pavilion Desktop PCs - (English) MX703 and M703 Monitor Guide - Page 46
42 HP Pavilion MX703/M703 Monitor Guide
-
 1
1 -
 2
2 -
 3
3 -
 4
4 -
 5
5 -
 6
6 -
 7
7 -
8
-
9
-
10
-
11
-
12
-
13
-
14
-
15
-
16
-
17
-
18
-
19
-
20
-
21
-
22
-
23
-
24
-
25
-
26
-
27
-
28
-
29
-
30
-
31
-
32
-
33
-
34
-
35
-
36
-
37
-
38
-
39
-
40
-
41
-
42
-
43
-
44
-
45
-
46
 |
 |

hp pavilion
mx703/m703
monitor guide