HP DesignJet T700 HP Designjet T770 & T1200 Printer Series - Assembly Inst
HP DesignJet T700 Manual
 |
View all HP DesignJet T700 manuals
Add to My Manuals
Save this manual to your list of manuals |
HP DesignJet T700 manual content summary:
- HP DesignJet T700 | HP Designjet T770 & T1200 Printer Series - Assembly Inst - Page 1
HP Designjet T1200 & T770 printer series EN Printer Assembly Instructions FR Instructions d'assemblage des imprimantes DE Anleitung zur Druckermontage IT Istruzioni per Remarque : Si votre imprimante est un modèle 24‑in sans support, retirez le carton de l'imprimante et le carton d'accessoires, posez - HP DesignJet T700 | HP Designjet T770 & T1200 Printer Series - Assembly Inst - Page 2
people, one at each end. Retirez le carton du support, c'est-à-dire le grand carton. Pour ce faire la scatola del piedistallo, la più grande. Per eseguire questa operazione, potrebbero essere necessarie due persone de papelão Remove the rear tray from the printer box. Note: If you don't find the - HP DesignJet T700 | HP Designjet T770 & T1200 Printer Series - Assembly Inst - Page 3
caixa PT da impressora e retire-as. RU Dismantle the bottom of the printer box by disengaging each corner and then folding down the sides so that remove the white protective material until instructed to do so. Coupez et retirez les sangles entourant le carton du support. Ne retirez pas le maté - HP DesignJet T700 | HP Designjet T770 & T1200 Printer Series - Assembly Inst - Page 4
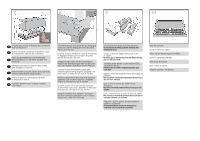
13 14 Remove the cross-brace and the two pieces of EN packaging material from each end of the stand box. Retirez la traverse et les deux éléments d'emballage FR à chaque extrémité du carton du support 4 to attach it to the printer, and 2 are spare. Do viti per assemblare il piedistallo, 4 per - HP DesignJet T700 | HP Designjet T770 & T1200 Printer Series - Assembly Inst - Page 5
jeder Fuß mit vier Schrauben DE befestigt ist. IT Assicurarsi di utilizzare 4 viti per ogni piede. ES Asegúrese de que ha utilizado cuatro tornillos en cada pata. depois aperte-os. Return to the main body of the printer, carefully turn the printer upside down in order to attach the legs. You - HP DesignJet T700 | HP Designjet T770 & T1200 Printer Series - Assembly Inst - Page 6
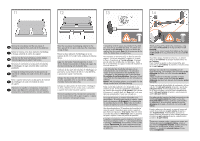
19 20 21 22 Remove the orange tape from the transparent covering EN that protects the printer. Retirez la bande adhésive de couleur parte superior da impressora. Lift the stand, keeping it upside down. Relevez le support, en le laissant à l'envers. Heben Sie den Standfuß verkehrt herum an. - HP DesignJet T700 | HP Designjet T770 & T1200 Printer Series - Assembly Inst - Page 7
EN corresponding holes in the printer. Notice that the printer body is upside down. Placez doucement et avec précaution le support sur l'imprimante, en sono posizionati correttamente sulla stampante, fissarli utilizzando due viti per ogni piede. Cuando las patas estén situadas correctamente en - HP DesignJet T700 | HP Designjet T770 & T1200 Printer Series - Assembly Inst - Page 8
(24-Zoll-Modell) oder 80 kg (44-Zoll-Modell). L'operazione deve essere eseguita in due fasi. Per la prima fase, tenere la stampante per i piedi e ruotarli IT fino a 80 kg (167 lb) (modelo de 44 pol.). RU 60 кг (24 80 кг (44 If the full weight of the printer rests on the wheel lock, it may - HP DesignJet T700 | HP Designjet T770 & T1200 Printer Series - Assembly Inst - Page 9
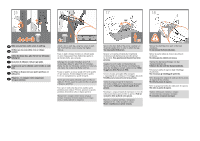
as partes de espuma Remove the transparent covering from the printer. Retirez le couvercle transparent de l'imprimante. Entfernen Sie ihn nach oben drücken. Sollevare la leva freno su ognuna delle quattro ruote per sbloccarle. Desbloquee la palanca de freno de cada una de las cuatro ruedas levantá - HP DesignJet T700 | HP Designjet T770 & T1200 Printer Series - Assembly Inst - Page 10
printer's feet, one on the front of each foot. Each tube should click into place. Fixez les deux petits tubes aux supports de l'imprimante, sur la partie avant de chaque support du bac de réception aux deux petits tubes de chaque support. Schieben Sie die vordere Stange der Ablage auf die beiden - HP DesignJet T700 | HP Designjet T770 & T1200 Printer Series - Assembly Inst - Page 11
tube arrière du bac de réception sur les FR supports que vous venez de fixer à chaque montant du support. Setzen Sie die hintere Stange der Ablage in die DE . A cesta está completa agora Remove the orange tape from the printer window. Retirez la bande adhésive orange de la vitre de l'imprimante. - HP DesignJet T700 | HP Designjet T770 & T1200 Printer Series - Assembly Inst - Page 12
43 44 45 46 Beside the front panel, you will see a cardboard EN support attached to the printer with tape. Remove the tape. Sur le côté du panneau avant, vous verrez un support FR en carton fixé à l'imprimante par de l'adhésif. Retirez l'adhésif. Neben dem Bedienfeld ist eine Transportsicherung - HP DesignJet T700 | HP Designjet T770 & T1200 Printer Series - Assembly Inst - Page 13
. RU Connect the supplied network cable or a certified USB 2.0 cable to the appropriate socket on the rear right of the printer, and secure the . You may find a USB flash driver in a plastic bag, containing the latest firmware. Please follow the instructions in the bag to install the new - HP DesignJet T700 | HP Designjet T770 & T1200 Printer Series - Assembly Inst - Page 14
on power to the printer using the switch just EN above the power socket. Remove the plastic film covering the window and the plastic film covering , the HP logo appears. Please wait a while. You will then be prompted to select the language of the printer. Sur le panneau avant, le logo HP s'affiche - HP DesignJet T700 | HP Designjet T770 & T1200 Printer Series - Assembly Inst - Page 15
encaixe correto no local. T1200 FOR T1200 ONLY: Check that the ink cover is properly placed. UNIQUEMENT POUR T1200 : Vérifiez que le capot de l'encre est correctement inséré. Nur T1200: Überprüfen Sie, ob die Patronenabdeckung richtig angebracht ist. SOLO PER T1200: Controllare che il coperchio - HP DesignJet T700 | HP Designjet T770 & T1200 Printer Series - Assembly Inst - Page 16
Non toccare i pioli, le guide o i circuiti. Inserte los cartuchos inserted all of the ink cartridges correctly, the printer must prepare the ink system for its il sistema di inchiostro per il primo utilizzo. abertura da janela. OK 60 Open the window and grasp the blue handle of the printhead - HP DesignJet T700 | HP Designjet T770 & T1200 Printer Series - Assembly Inst - Page 17
alle Druckköpfe entnommen haben. Sollevare la maniglia per aprire il coperchio della testina di stampa. Sul setup printheads exist only to prevent the escape of ink during ink cartridge installation. The front panel now prompts you to Non toccare i pioli, le guide o i circuiti. Extraiga y deseche - HP DesignJet T700 | HP Designjet T770 & T1200 Printer Series - Assembly Inst - Page 18
eingesetzt werden. Setzen Sie die Druckköpfe so ein, dass der blaue Griff in Ihre Richtung zeigt. Inserire le testine di stampa una per una. Ogni testina di stampa è contrassegnata da un colore e deve essere inserita solo nell'alloggiamento corretto contrassegnato dallo stesso colore. Inserire le - HP DesignJet T700 | HP Designjet T770 & T1200 Printer Series - Assembly Inst - Page 19
HP Designjet T1200 & T770 printer series environment. Close the window. Poussez la poignée printer software on your computer. Be sure to follow the software installation instructions. Connecting your printer before installing the software can lead to printer errors printer will be ready to load paper - HP DesignJet T700 | HP Designjet T770 & T1200 Printer Series - Assembly Inst - Page 20
the paper the first time. Chargement du support pour T770 & rouleau supérieur dans T1200 Lorsque le round: the leading edge of the paper should go into the printer from the top of the roll. del rotolo. Aggiungere il fermo rimovibile al mandrino per mantenere il rotolo in sede. Si el tope extra - HP DesignJet T700 | HP Designjet T770 & T1200 Printer Series - Assembly Inst - Page 21
79 80 81 82 Feed the leading edge of the paper into the printer EN until the printer takes hold of it. Do not insert the roll paper per T1200 Go to the rear of the printer, and remove the orange stoppers from each end of the spindle. Chargement du support pour le rouleau inférieur T1200 - HP DesignJet T700 | HP Designjet T770 & T1200 Printer Series - Assembly Inst - Page 22
on the EN right way round: the leading edge of the paper should go into the printer from the top of the roll. Add the removable stop to nella stampante dalla parte superiore del rotolo. Aggiungere il fermo rimovibile al mandrino per mantenere il rotolo in sede. Si el tope extraíble azul se encuentra - HP DesignJet T700 | HP Designjet T770 & T1200 Printer Series - Assembly Inst - Page 23
panel will display a series of messages showing per ottenere un'accurata stampa del colore. È possibile avviare questa operazione dal programma Printer Printer Utility Image Quality Maintenance 4 56 7 3 1- View ink levels 2- View loaded paper 3- Unload paper (T770) 3- Pause printing key (T1200 - HP DesignJet T700 | HP Designjet T770 & T1200 Printer Series - Assembly Inst - Page 24
the instructions on your screen. NOTE: If the installation failed, reinstall the software from: HP Designjet T1200: http://www.hp.com/go/T1200/drivers or http://www.hp.com/go/T1200PS/drivers HP Designjet T770: http://www.hp.com/go/T770/drivers FR Remarque pour la connexion USB MAC & Windows : Ne - HP DesignJet T700 | HP Designjet T770 & T1200 Printer Series - Assembly Inst - Page 25
un error en la instalación, vuelva a instalar el software en las siguientes direcciones: HP Designjet T1200: http://www.hp.com/go/T1200/drivers o http://www.hp.com/go/T1200PS/drivers HP Designjet T770: http://www.hp.com/go/T770/drivers PT Nota para conexão USB para MAC e Windows: Não conecte - HP DesignJet T700 | HP Designjet T770 & T1200 Printer Series - Assembly Inst - Page 26
statements accompanying such products and services. Nothing herein should be construed as constituting an additional warranty. HP shall not be liable for technical or editorial errors or omissions contained herein. Trademarks Microsoft ®; and Windows ®; are U.S. registered trademarks of Microsoft
-
 1
1 -
 2
2 -
 3
3 -
 4
4 -
 5
5 -
 6
6 -
 7
7 -
8
-
9
-
10
-
11
-
12
-
13
-
14
-
15
-
16
-
17
-
18
-
19
-
20
-
21
-
22
-
23
-
24
-
25
-
26
 |
 |
HP Designjet
T1200 & T770
printer series
Printer Assembly
Instructions
Instructions d’assemblage
des imprimantes
Anleitung zur
Druckermontage
Istruzioni per l’installazione
della
stampante
Instrucciones de montaje
de las impresoras
Instruções de montagem
das impressoras
Инструкции по сборке
принтеров
© 2009 Hewlett-Packard Company
Large Format Division
Camí de Can Graells 1-21 · 08174
Sant Cugat del Vallès
Barcelona · Spain
All rights reserved
Printed in Germany · Imprimé en Allemagne · Stampato in Germania
Read these instructions carefully...
What you will need for this procedure
• Because the printer is heavy, you may need three people to unpack it. When more
than one person is needed, this symbol is displayed.
• To assemble the printer you will need at least 1 x 2 m (40 x 80 in) of empty floor
space.
Lisez ces consignes avec attention...
Conditions requises pour cette procédure
• Trois personnes pour le déballage de l’imprimante, qui est lourde. Symbole indi
-
quant une opération nécessitant plusieurs personnes.
• Pour assembler l’imprimante, vous devez disposer d’un espace libre d’au moins
1 x 2 m.
Lesen Sie diese Anleitung aufmerksam durch...
Was Sie zum Aufstellen des Druckers benötigen
• Der Drucker ist schwer, deshalb werden zum Auspacken drei Personen benötigt.
Wenn mehr als eine Person erforderlich ist, sehen Sie dieses Symbol.
• Zum Aufstellen des Druckers benötigen Sie eine freie Fläche von mindestens
1 x 2 m.
Leggere queste istruzioni attentamente...
Cosa è necessario per questa procedura
• Dato il peso della stampante, potrebbero essere necessarie tre persone per disim
-
ballarla. Quando è necessaria più di una persona, viene visualizzato il seguente
simbolo.
• Per assemblare la stampante è necessario uno spazio di almeno 1 × 2 metri.
Lea atentamente estas instrucciones...
Qué necesitará durante el proceso de instalación
• Debido al elevado peso de la impresora, es posible que se necesiten tres personas
para desembalarla. Si se requiere la intervención de más de una persona, se muestra
este símbolo.
• Para montar la impresora necesitará al menos un espacio libre en el suelo de 1 x
2 m.
Leia estas instruções com atenção...
O que será necessário para esse procedimento
• Como a impressora é pesada, são necessárias três pessoas para retirá-la da em
-
balagem. Quando mais de uma pessoa for necessária, esse símbolo será exibido.
• Para montar a impressora, você precisará de um espaço de pelo menos
1 x 2 m (40 x 80 in) no chão.
Внимательно прочтите эти инструкции.
Что необходимо знать для выполнения этой процедуры
• Ввиду большого веса принтера для его распаковки может потребоваться три
человека. Когда требуется более одного человека, отображается этот символ.
• Для сборки принтера потребуется свободное пространство на полу (не менее
1 на 2 м).
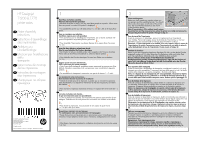
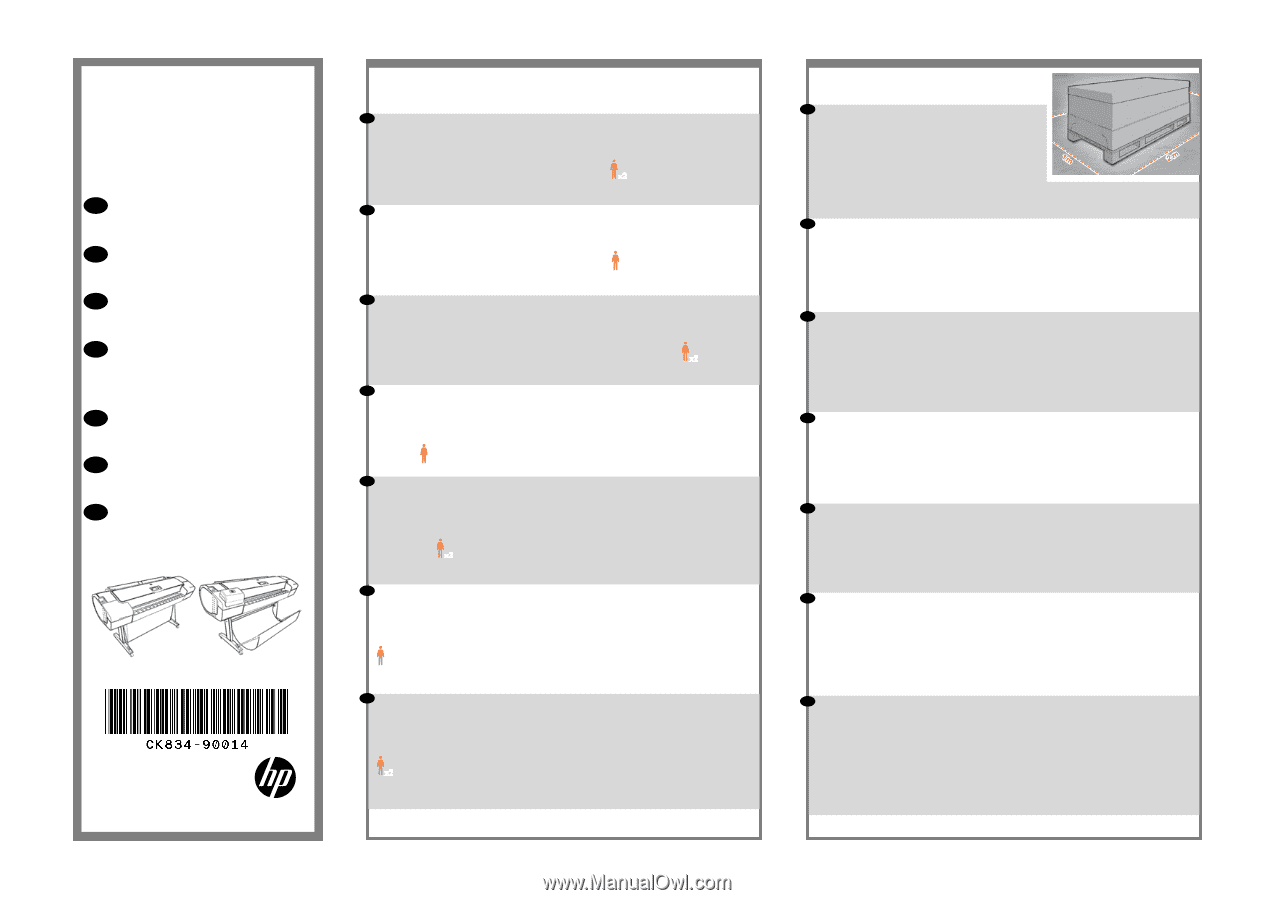
Printer working area
Before you start unpacking, consider where you
are going to put the assembled printer. You should
allow some clear space on all sides of the printer
box. The recommended clearances are shown
in the illustration above.
Note: If your printer is 24-in without stand, remove
the printer box and the accessories box, place the printer on a table and remove the
desiccant bag from below the printer. Then go to step 32.
Zone de travail de l’imprimante
Avant de commencer le déballage, pensez à l’emplacement où l’imprimante
sera installée. Prévoir de l’espace autour de la boîte de l’imprimante, sur tout son
périmètre. L’espace recommandé est indiqué dans l’illustration ci-dessus.
Remarque : Si votre imprimante est un modèle 24-in sans support, retirez le carton de
l’imprimante et le carton d’accessoires, posez l’imprimante sur une table et retirez le
sachet déshydratant du bas de l’imprimante. Passez ensuite à l’étape 32.
Standort des Druckers
Bevor Sie mit dem Auspacken beginnen, überlegen Sie sich, wo der fertige Drucker
aufgestellt werden soll. Zu allen Seiten des Druckerkartons sollte noch freier Platz
sein. Die empfohlenen Abstände sind in der Abbildung oben vermerkt.
Hinweis: Nehmen Sie bei einem 24-Zoll-Modell ohne Standfuß die
Druckerverpackung und die Zubehörverpackung heraus, legen Sie den Drucker auf
einen Tisch, und entfernen Sie den Beutel mit dem Trockenmittel unter dem Drucker.
Fahren Sie danach mit Schritt 32 fort.
Area operativa della stampante
Prima di cominciare a disimballare la stampante, considerare lo spazio in cui verrà
sistemata una volta assemblata. È necessario lasciare dello spazio su tutti i lati della
scatola della stampante. Lo spazio consigliato è illustrato nella figura.
Nota: se si dispone di una stampante da 24” senza piedistallo, rimuovere la relativa
scatola e quella degli accessori, collocarla su un tavolo ed eliminare la bustina di es-
siccante dalla parte inferiore della stampante stessa. Andare quindi al passaggio 32.
Área de trabajo de la impresora
Antes de comenzar el desembalaje, piense dónde va a colocar la impresora una
vez montada. Deberá dejar un espacio libre en todos los lados de la caja de la
impresora. El espacio libre aconsejable se muestra en la ilustración anterior.
Nota: si su impresora es de 24 pulgadas sin soporte, retire la caja de la impresora
y de los accesorios, coloque la impresora en una mesa y retire la bolsa desecante
situada debajo de la impresora. A continuación, continúe con el paso 32.
Área de trabalho da impressora
Antes de começar a desembalar a impressora, defina o local onde você colocará a
impressora depois de montada. É necessário também deixar algum espaço livre nas
laterais da impressora. Esses espaços são mostrados na ilustração acima.
Observação: se sua impressora for de 24 polegadas, sem suporte, remova a caixa
da impressora e dos acessórios, coloque a impressora sobre uma mesa e remova o
absorvente de umidade da parte de baixo da impressora. Depois, vá para a etapa
32.
Рабочая зона принтера.
Прежде чем начать распаковку, определите место для собранного принтера.
С каждой стороны от коробки с принтером должно оставаться свободное
пространство. Рекомендуемая величина свободного пространства приводится
на рисунке выше.
Примечание. Если принтер явля-ется
24-дюймовым принтером без опоры, извлеките коробки с принтером и
принадлежностями, поставьте принтер на стол, а затем извлеките пакет с
влагопоглотите-лем, находящимся внизу. После этого перейдите к шагу 32.
1
2
x2
x2
x2
x2
x2
x2
x2
EN
EN
EN
FR
FR
FR
IT
IT
IT
ES
ES
ES
PT
PT
PT
RU
RU
RU
DE
DE
DE