HP DreamColor Z24x User Guide
HP DreamColor Z24x Manual
 |
View all HP DreamColor Z24x manuals
Add to My Manuals
Save this manual to your list of manuals |
HP DreamColor Z24x manual content summary:
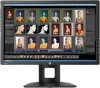
- HP DreamColor Z24x | User Guide - Page 1
HP DreamColor Z24x Display User Guide - HP DreamColor Z24x | User Guide - Page 2
trademarks of Microsoft Corporation. The only warranties for HP products and services are set forth in the express warranty statements accompanying such products and services. Nothing herein should be construed as constituting an additional warranty. HP shall not be liable for technical or editorial - HP DreamColor Z24x | User Guide - Page 3
About This Guide This guide provides information on monitor features, setting up the monitor, and technical specifications. WARNING! Text set off in this manner indicates that failure to follow directions - HP DreamColor Z24x | User Guide - Page 4
iv About This Guide - HP DreamColor Z24x | User Guide - Page 5
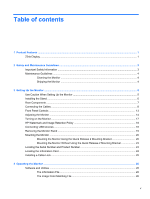
of contents 1 Product Features ...1 Z24x Display ...1 2 Safety and Maintenance Guidelines the Monitor ...14 Turning on the Monitor ...17 HP Watermark and Image Retention Policy 18 Connecting USB Devices Operating the Monitor ...26 Software and Utilities ...26 The Information File ...26 The Image - HP DreamColor Z24x | User Guide - Page 6
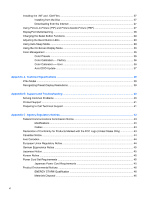
36 Color Calibration - User 36 Auto EDID Update ...37 Appendix A Technical Specifications ...38 Z24x Model ...38 Recognizing Preset Display Resolutions 39 Appendix B Support and Troubleshooting 40 Solving Common Problems ...40 Product Support ...41 Preparing to Call Technical Support 41 Appendix - HP DreamColor Z24x | User Guide - Page 7
Disposal of Waste Equipment by Users in Private Household in the European Union ..... 47 HP Recycling Program ...47 Chemical Substances ...47 Restriction of Hazardous Substances (RoHS 47 Turkey EEE Regulation ...48 Ukraine Restriction of Hazardous Substances 48 Appendix D LCD Monitor - HP DreamColor Z24x | User Guide - Page 8
viii - HP DreamColor Z24x | User Guide - Page 9
space by specifying the color primaries, white point, gamma, and luminance (requires the separately purchased HP DreamColor Calibration Solution kit) ● Option to return to Factory Calibration settings or User Calibration settings to easily restore the monitor to the factory or user settings ● User - HP DreamColor Z24x | User Guide - Page 10
card with the information needed when contacting HP support ● Video signal inputs to support DisplayPort digital (cable provided), DVI digital digital inputs ● Software and documentation disc that includes monitor drivers, product documentation, and Windows-based calibration software 2 Chapter 1 - HP DreamColor Z24x | User Guide - Page 11
reduce the risk of serious injury, read the Safety and Comfort Guide. It describes proper workstation, setup, posture, and health and work . Use the appropriate and correctly sized furniture designed to properly support your HP LCD monitor. WARNING! LCD monitors that are inappropriately situated on - HP DreamColor Z24x | User Guide - Page 12
product yourself. Adjust only those controls that are covered in the operating instructions. If the monitor is not operating properly or has been dropped or damaged, contact an authorized HP dealer, reseller, or service provider. ● Use only a power source and connection appropriate for this monitor - HP DreamColor Z24x | User Guide - Page 13
Monitor To set up the monitor, ensure that the power is turned off to the monitor, computer system, and other attached devices, then follow the instructions below. NOTE: Be sure the master power switch, located on the rear panel of the monitor, is in the off position. The master power switch - HP DreamColor Z24x | User Guide - Page 14
panel may cause nonuniformity of color or disorientation of the liquid crystals. If this occurs the screen will not recover to its normal condition. The display uses the HP Quick Release 2 for easy moving of the monitor. To mount the panel onto the stand: 1. Lay the monitor panel face down on a flat - HP DreamColor Z24x | User Guide - Page 15
OUT Audio Out USB 3.0 Upstream Connector USB 3.0 Downstream Connectors Connects an HDMI cable to the monitor. Connects a second monitor. Connects headphones or optional HP Speaker Bar to the monitor. Connects the USB hub cable to the monitor's USB hub connector and to a host USB port/hub. Connects - HP DreamColor Z24x | User Guide - Page 16
Connecting the Cables 1. Place the monitor in a convenient, well-ventilated location near the computer. 2. Before connecting the cables, route the cables through the cable routing hole in the center of the stand. 8 Chapter 3 Setting Up the Monitor - HP DreamColor Z24x | User Guide - Page 17
by the video cable used. The monitor will automatically determine which inputs have valid video signals. The inputs can be selected through the OnScreen Display (OSD) feature by pressing one of the five front bezel buttons to activate the buttons, and then press the bottom Open Menu button to - HP DreamColor Z24x | User Guide - Page 18
● For DVI digital operation, connect the DVI-D signal cable to the DVI connector on the rear of the monitor and the other end to the DVI connector on the computer (cable provided). ● For HDMI digital operation, connect the HDMI signal cable to the HDMI connector on the rear of the monitor and the - HP DreamColor Z24x | User Guide - Page 19
USB hub connector on the rear panel of the computer, and the other end to the upstream USB connector on the monitor. NOTE: The monitor supports USB 3.0. For optimal performance, connect the USB cable to a USB 3.0 port on the computer, if available. Connecting the Cables 11 - HP DreamColor Z24x | User Guide - Page 20
5. Connect one end of the power cord to the AC power connector on the back of the monitor, and the other end to an electrical wall outlet. NOTE: The master power switch on the rear of the monitor must be in the On position before pressing the power button on the front of the monitor. WARNING! To - HP DreamColor Z24x | User Guide - Page 21
the monitor is in the ON position to turn on the monitor. NOTE: To view an OSD menu simulator, visit the HP Customer Self Repair Services Media Library at http://www.hp.com/go/sml. NOTE: You can adjust the bezel button brightness and change the function of the buttons in the OSD - HP DreamColor Z24x | User Guide - Page 22
Adjusting the Monitor 1. Tilt the monitor's panel forward or backward to set it to a comfortable eye level. 2. Swivel the monitor to the left or right for the best viewing angle. 14 Chapter 3 Setting Up the Monitor - HP DreamColor Z24x | User Guide - Page 23
3. Adjust the monitor's height to a comfortable position for your individual workstation. The monitor's top bezel edge should not exceed a height that is parallel to your eye height. A monitor that is positioned low and reclined may be more comfortable for users with corrective lenses. The monitor - HP DreamColor Z24x | User Guide - Page 24
NOTE: The monitor includes an auto-rotation sensor that automatically changes the displayed OSD from landscape to portrait when rotated. Use the operating system's display settings to rotate the image on the screen from portrait to landscape. 16 Chapter 3 Setting Up the Monitor - HP DreamColor Z24x | User Guide - Page 25
turn it on. CAUTION: Burn-in image damage may occur on monitors that display the same static image on screen for a prolonged period of time.* To all LCD screens. Monitors with a "burned-in image" are not covered under the HP warranty. * A prolonged period of time is 12 consecutive hours of a static - HP DreamColor Z24x | User Guide - Page 26
result in image retention damage are not covered under the HP warranty. To avoid image retention damage, always turn off the monitor when it is not in use or use the power management setting, if supported on your system, to turn off the display when the system is idle. Connecting USB Devices There - HP DreamColor Z24x | User Guide - Page 27
face down on a flat surface covered by a clean, dry cloth. 3. Press down on the latch near the bottom center of the monitor to unlock the HP Quick Release 2 (1). 4. Swing the bottom of the stand up until the mounting plate clears the recess in the panel (2). 5. Slide the stand out of the - HP DreamColor Z24x | User Guide - Page 28
HP Quick Release 2 mounting bracket. NOTE: This apparatus is intended to be supported by UL or CSA Listed wall mount bracket. CAUTION: This monitor supports compliant with the VESA standard and is rated to support the weight of the monitor display panel. For best performance, it is important to use - HP DreamColor Z24x | User Guide - Page 29
2. Remove the four screws from the mounting plate to separate the mounting plate from its cover. 3. Remove the four screws from the VESA holes located on the rear of the monitor panel. Mounting the Monitor 21 - HP DreamColor Z24x | User Guide - Page 30
4. Install the mounting plate to the wall or swing arm of your choice using the four screws that were removed from the VESA holes on the rear of the monitor panel. 5. Place the monitor panel on the mounting bracket you've installed by aligning its recess with the mounting bracket, then sliding it - HP DreamColor Z24x | User Guide - Page 31
Mounting the Monitor Without Using the Quick Release 2 Mounting Bracket To mount the monitor panel directly to a mounting fixture without using the HP Quick Release 2 mounting bracket, use the four screws removed from the VESA holes on the rear of the monitor panel and install them to attach - HP DreamColor Z24x | User Guide - Page 32
number and product number are located on a label on the rear panel of the display head. You may need these numbers when contacting HP about the monitor model. NOTE: You may need to partially pivot the display head to read the label. Locating the Information Card Identifying information is located on - HP DreamColor Z24x | User Guide - Page 33
Installing a Cable Lock You can secure the monitor to a fixed object with an optional cable lock available from HP. Installing a Cable Lock 25 - HP DreamColor Z24x | User Guide - Page 34
.INF (Information) file ● ICM (Image Color Matching) files (one for each calibrated color space) ● color calibration software NOTE: If the monitor does not include a disc, the .INF and .ICM files can be downloaded from the HP monitors support Web site. See Downloading from the Internet on page 27 in - HP DreamColor Z24x | User Guide - Page 35
to http://www.hp.com/support and select the country region. 2. Select the Drivers & Downloads link then enter Z24x in the search box and click the Go button. 3. Select your model then select your language and operating system. 4. Download the software by following the instructions. Using Picture-in - HP DreamColor Z24x | User Guide - Page 36
mirror the image of the primary display or extend the second display for a different image from the primary display. If you wish to connect additional monitors downstream (up to four maximum), all but the final monitor in the chain must support DisplayPort multstreaming. 28 Chapter 4 Operating the - HP DreamColor Z24x | User Guide - Page 37
the capabilities of your GPU or embedded graphics system. Check the manual that came with your graphics card for further information on its to the desired brightness. Using Auto-Sleep Mode The display supports an OSD (On-Screen Display) option called Auto-Sleep Mode that allows you to enable - HP DreamColor Z24x | User Guide - Page 38
depending on the menu or sub-menu that is active. NOTE: OSD menu items that are grayed out are not supported with the selected video input and settings. The following table lists the On-Screen Display (OSD) menu selections and their functional descriptions. 30 Chapter 4 Operating the Monitor - HP DreamColor Z24x | User Guide - Page 39
Calibration Back Level 3 Warm Neutral Cool Custom (RGB) Set Luminance Value Back Current Color Primaries (u'v' / xy) ● Red: x.xxx x.xxx ● Blue: x.xxx x.xxx ● Green: x.xxx x.xxx White Point (u'v' / xy) ● x.xxx x.xxx ● Name of White Point (ex. D65) Gamma (x.x or sRGB) Switch coordinate display - HP DreamColor Z24x | User Guide - Page 40
Level 1 Video Input Image Adjustment Level 2 DisplayPort DVI HDMI Auto-Switch Source Back Aspect Ratio Display Sharpness Dynamic Contrast Back Display Mode Information Level 3 Enable Disable Back Fill to Source Aspect Ratio (Proportional) Fill to Entire Screen (Non-Proportional) Pixel-for-Pixel - HP DreamColor Z24x | User Guide - Page 41
Back Large Small Back Top Left Top Right Bottom Left Bottom Right Back DisplayPort DVI HDMI Back Primary / PIP Source Information Using the On-Screen Display Menu 33 - HP DreamColor Z24x | User Guide - Page 42
Level 1 Management Level 2 Auto-Sleep Mode Power On Recall DDC/CI Communications Auto EDID Update Hot Plug Initiate DisplayPort Compatibility Back Level 3 Enable Disable Back Enable Disable Back Enable Disable Back Enable Disable Back Enable Disable Back DisplayPort 1.1 Compatibility Mode - HP DreamColor Z24x | User Guide - Page 43
Configure Function Buttons Bezel Button Brightness Bezel Button Auto-Fade Back Current Display Mode: Display Mode Color Space: Color Space Serial Number: Serial Number Firmware Revision: Firmware Revision IDs Last Calibration: xxxxx Hours Backlight Hours: xxxxx Hours Back Level 3 Use the buttons to - HP DreamColor Z24x | User Guide - Page 44
Display. Color Calibration - User With the exception of the native panel color space, each color space can be calibrated by the end user with the user calibration software that comes with the product and with a colorimeter device (the colorimeter is included in the DreamColor Calibration Solution - HP DreamColor Z24x | User Guide - Page 45
into the host computer's CD/DVD player. 2. Install the user calibration program on the host computer. 3. Place the colorimeter from the DreamColor Calibration Solutions kit in front of the monitor panel as directed. 4. Run the calibration software and follow the on-screen steps. One color space can - HP DreamColor Z24x | User Guide - Page 46
A Technical Specifications NOTE: All specifications represent the typical specifications provided by HP's component manufacturers; actual performance may vary either higher or lower. Z24x Model Display Type Viewable Image Size Maximum Weight (Unpacked) Dimensions (include base) Height (highest - HP DreamColor Z24x | User Guide - Page 47
Recognizing Preset Display Resolutions The display resolutions listed below are the most commonly used modes and are set as factory defaults. This monitor progressive scan modes are indicated by (p). If no indication is given, the mode is progressive scan. Recognizing Preset Display Resolutions 39 - HP DreamColor Z24x | User Guide - Page 48
Support and Troubleshooting Solving Common Problems The following table lists possible problems, the possible cause of each problem, and the recommended solutions. Problem Auto-Switch Source to Disable and manually select the input. Monitor will Check Video Cable is displayed on screen. Monitor - HP DreamColor Z24x | User Guide - Page 49
, it is available in English. ● Find support telephone numbers ● Locate an HP service center Preparing to Call Technical Support If you cannot solve a problem using the troubleshooting tips in this section, you may need to call technical support. Have the following information available when you - HP DreamColor Z24x | User Guide - Page 50
● Purchase date on invoice ● Conditions under which the problem occurred ● Error messages received ● Hardware configuration ● Name and version of the hardware and software you are using 42 Appendix B Support and Troubleshooting - HP DreamColor Z24x | User Guide - Page 51
. This equipment generates, uses, and can radiate radio frequency energy and, if not installed and used in accordance with the instructions, may cause harmful interference to radio communications. However, there is no guarantee that interference will not occur in a particular installation - HP DreamColor Z24x | User Guide - Page 52
directives is assessed using applicable European Harmonised Standards. ● The full Declaration of Conformity can be found at the following web site: http://www.hp.eu/ certificates. ● (Search with the product model name or its Regulatory Model Number (RMN), which may be found on the regulatory label - HP DreamColor Z24x | User Guide - Page 53
HP brand computers, keyboards and monitors that bear the "GS" approval mark, meet the applicable ergonomic requirements. The installation guides you have questions about the type of power cord to use, contact an authorized HP service provider. A power cord should be routed so that it is not likely to - HP DreamColor Z24x | User Guide - Page 54
external ENERGY STAR® qualified display, this feature also supports similar power management features for the display. To take advantage of these Web site at http://www.energystar.gov/powermanagement. Materials Disposal Some HP LCD monitors contain mercury in the fluorescent lamps that might require - HP DreamColor Z24x | User Guide - Page 55
service or the shop where you purchased the product. HP Recycling Program HP encourages customers to recycle used electronic hardware, HP A chemical information report for this product can be found at http://www.hp.com/go/reach. Restriction of Hazardous Substances (RoHS) A Japanese regulatory - HP DreamColor Z24x | User Guide - Page 56
11363-2006 11363-2006 Turkey EEE Regulation In Conformity with the EEE Regulation EEE Yönetmeliğine Uygundur Ukraine Restriction of Hazardous Substances The equipment complies with requirements of the Technical Regulation, approved by the Resolution of Cabinet of Ministry of Ukraine as of December - HP DreamColor Z24x | User Guide - Page 57
precision technology, manufactured according to HP standards, to guarantee trouble-free performance. Nevertheless, the display may have cosmetic imperfections that operating mode at a supported resolution and refresh rate, from a distance of approximately 50 cm (20 in). HP expects that, over time
-
 1
1 -
 2
2 -
 3
3 -
 4
4 -
 5
5 -
 6
6 -
 7
7 -
8
-
9
-
10
-
11
-
12
-
13
-
14
-
15
-
16
-
17
-
18
-
19
-
20
-
21
-
22
-
23
-
24
-
25
-
26
-
27
-
28
-
29
-
30
-
31
-
32
-
33
-
34
-
35
-
36
-
37
-
38
-
39
-
40
-
41
-
42
-
43
-
44
-
45
-
46
-
47
-
48
-
49
-
50
-
51
-
52
-
53
-
54
-
55
-
56
-
57
 |
 |

HP DreamColor Z24x Display
User Guide