HP Dx5150 RAID Installation & Setup Guide - Page 19
Rebuilding RAID 1 Set, Resolving Conflicts, Select 'Rebuild RAID 1 Set.
 |
UPC - 882780485433
View all HP Dx5150 manuals
Add to My Manuals
Save this manual to your list of manuals |
Page 19 highlights
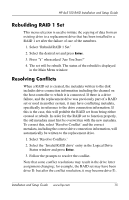
HP dx5150 RAID Installation and Setup Guide Rebuilding RAID 1 Set This menu selection is used to initiate the copying of data from an existing drive to a replacement drive that has been installed in a RAID 1 set after the failure of one of the members. 1. Select 'Rebuild RAID 1 Set.' 2. Select the desired set and press Enter. 3. Press 'Y' when asked 'Are You Sure?' 4. The set will be rebuilt. The status of the rebuild is displayed in the Main Menu window. Resolving Conflicts When a RAID set is created, the metadata written to the disk includes drive connection information including the channel on the host controller to which it is connected. If there is a drive failure, and the replacement drive was previously part of a RAID set or used in another system, it may have conflicting metadata, specifically in reference to the drive connection information. If this is the case, this will prohibit the RAID set from being either created or rebuilt. In order for the RAID set to function properly, the old metadata must first be overwritten with the new metadata. To correct this, select 'Resolve Conflict' and the correct metadata, including the correct drive connection information, will automatically be written to the replacement drive. 1. Select 'Resolve Conflicts.' 2. Select the 'Invalid RAID drive' entry in the Logical Drive Status window and press Enter. 3. Follow the prompts to resolve the conflict. Note that some conflict resolutions may result in the drive letter assignment changing; for example, the RAID set may have been drive D: but after the conflict resolution, it may become drive E:. Installation and Setup Guide www.hp.com 15
-
 1
1 -
2
-
3
-
4
-
5
-
6
-
7
-
8
-
9
-
10
-
11
-
12
-
13
-
 14
14 -
 15
15 -
 16
16 -
 17
17 -
 18
18 -
 19
19 -
 20
20
 |
 |