HP EliteBook 1040 Maintenance and Service Guide - Page 80
Statement of memory volatility, Current BIOS steps
 |
View all HP EliteBook 1040 manuals
Add to My Manuals
Save this manual to your list of manuals |
Page 80 highlights
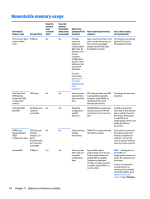
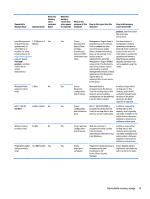
11 Statement of memory volatility The purpose of this chapter is to provide general information regarding nonvolatile memory in HP Business computers. This chapter also provides general instructions for restoring nonvolatile memory that can contain personal data after the system has been powered off and the hard drive has been removed. HP Business computer products that use Intel®-based or AMD®-based system boards contain volatile DDR memory. The amount of nonvolatile memory present in the system depends upon the system configuration. Intel-based and AMD-based system boards contain nonvolatile memory subcomponents as originally shipped from HP, assuming that no subsequent modifications have been made to the system and assuming that no applications, features, or functionality have been added to or installed on the system. Following system shutdown and removal of all power sources from an HP Business computer system, personal data can remain on volatile system memory (DIMMs) for a finite period of time and will also remain in nonvolatile memory. Use the steps below to remove personal data from the computer, including the nonvolatile memory found in Intel-based and AMD-based system boards. NOTE: If your tablet has a keyboard base, connect to the keyboard base before beginning steps in this chapter. Current BIOS steps 1. Follow steps (a) through (l) below to restore the nonvolatile memory that can contain personal data. Restoring or reprogramming nonvolatile memory that does not store personal data is neither necessary nor recommended. a. Turn on or restart the computer, and then quickly press esc. NOTE: If the system has a BIOS administrator password, enter the password at the prompt. b. Select Main, select Apply Factory Defaults and Exit, and then select Yes to load defaults. The computer will reboot. c. During the reboot, press esc while the "Press the ESC key for Startup Menu" message is displayed at the bottom of the screen. NOTE: If the system has a BIOS administrator password, enter the password at the prompt. d. Select the Security menu, select Restore Security Settings to Factory Defaults, and then select Yes to restore security level defaults. The computer will reboot. e. During the reboot, press esc while the "Press the ESC key for Startup Menu" message is displayed at the bottom of the screen. NOTE: If the system has a BIOS administrator password, enter the password at the prompt. f. If an asset or ownership tag is set, select the Security menu and scroll down to the Utilities menu. Select System IDs, and then select Asset Tracking Number. Clear the tag, and then make the selection to return to the prior menu. g. If a DriveLock password is set, select the Security menu, and scroll down to Hard Drive Utilities under the Utilities menu. Select Hard Drive Utilities, select DriveLock, then uncheck the checkbox for DriveLock password on restart. Select OK to proceed. 72 Chapter 11 Statement of memory volatility
-
 1
1 -
2
-
3
-
4
-
5
-
6
-
7
-
8
-
9
-
10
-
11
-
12
-
13
-
14
-
15
-
16
-
17
-
18
-
19
-
20
-
21
-
22
-
23
-
24
-
25
-
26
-
27
-
28
-
29
-
30
-
31
-
32
-
33
-
34
-
35
-
36
-
37
-
38
-
39
-
40
-
41
-
42
-
43
-
44
-
45
-
46
-
47
-
48
-
49
-
50
-
51
-
52
-
53
-
54
-
55
-
56
-
57
-
58
-
59
-
60
-
61
-
62
-
63
-
64
-
65
-
66
-
67
-
68
-
69
-
70
-
71
-
72
-
73
-
74
-
 75
75 -
 76
76 -
 77
77 -
 78
78 -
 79
79 -
 80
80 -
 81
81 -
 82
82 -
 83
83 -
 84
84 -
 85
85 -
86
-
87
-
88
-
89
 |
 |
