HP G72-c55DX Notebook PC User Guide - Windows 7 - Page 93
Align the tabs, To install a hard drive
 |
View all HP G72-c55DX manuals
Add to My Manuals
Save this manual to your list of manuals |
Page 93 highlights
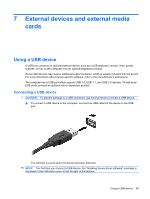
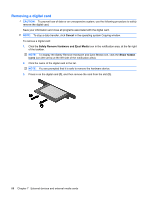
To install a hard drive: 1. Insert the hard drive into the hard drive bay (1), and then press down on the hard drive (2) until it is seated. Secure the hard drive cable beneath the cable clip (3), and then reconnect the hard drive cable to the system board (4). 2. Replace the hard drive screws. 3. Align the tabs (1) on the hard drive cover with the notches on the computer. 4. Close the cover (2). Replacing the hard drive 83
-
 1
1 -
2
-
3
-
4
-
5
-
6
-
7
-
8
-
9
-
10
-
11
-
12
-
13
-
14
-
15
-
16
-
17
-
18
-
19
-
20
-
21
-
22
-
23
-
24
-
25
-
26
-
27
-
28
-
29
-
30
-
31
-
32
-
33
-
34
-
35
-
36
-
37
-
38
-
39
-
40
-
41
-
42
-
43
-
44
-
45
-
46
-
47
-
48
-
49
-
50
-
51
-
52
-
53
-
54
-
55
-
56
-
57
-
58
-
59
-
60
-
61
-
62
-
63
-
64
-
65
-
66
-
67
-
68
-
69
-
70
-
71
-
72
-
73
-
74
-
75
-
76
-
77
-
78
-
79
-
80
-
81
-
82
-
83
-
84
-
85
-
86
-
87
-
 88
88 -
 89
89 -
 90
90 -
 91
91 -
 92
92 -
 93
93 -
 94
94 -
 95
95 -
 96
96 -
 97
97 -
 98
98 -
99
-
100
-
101
-
102
-
103
-
104
-
105
-
106
-
107
-
108
-
109
-
110
-
111
-
112
-
113
-
114
-
115
-
116
-
117
-
118
-
119
-
120
-
121
-
122
-
123
-
124
-
125
-
126
-
127
 |
 |

To install a hard drive:
1.
Insert the hard drive into the hard drive bay
(1)
, and then press down on the hard drive
(2)
until it
is seated. Secure the hard drive cable beneath the cable clip
(3)
, and then reconnect the hard drive
cable to the system board
(4)
.
2.
Replace the hard drive screws.
3.
Align the tabs
(1)
on the hard drive cover with the notches on the computer.
4.
Close the cover
(2)
.
Replacing the hard drive
83