HP HP W19 HP w19 LCD Monitor User's Guide - Page 10
Installing an Optional Wall Mounting Arm (Not supplied) - manual
 |
View all HP HP W19 manuals
Add to My Manuals
Save this manual to your list of manuals |
Page 10 highlights
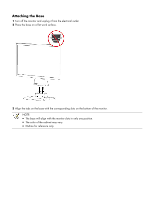
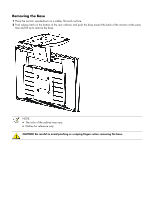
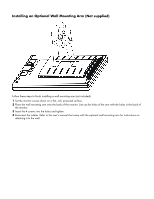
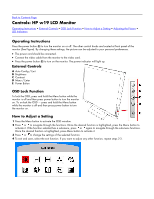
Installing an Optional Wall Mounting Arm (Not supplied) Follow these steps to finish installing a wall mounting arm (not included): 1 Set the monitor screen down on a flat, soft, protected surface. 2 Place the wall mounting arm onto the back of the monitor. Line up the holes of the arm with the holes in the back of the monitor. 3 Insert the 4 screws into the holes and tighten. 4 Reconnect the cables. Refer to the user's manual that came with the optional wall mounting arm for instructions on attaching it to the wall.
-
 1
1 -
2
-
3
-
4
-
 5
5 -
 6
6 -
 7
7 -
 8
8 -
 9
9 -
 10
10 -
 11
11 -
 12
12 -
 13
13 -
 14
14 -
 15
15 -
16
-
17
-
18
-
19
-
20
-
21
-
22
 |
 |
Installing an Optional Wall Mounting Arm (Not supplied)
Follow these steps to finish installing a wall mounting arm (not included):
1
Set the monitor screen down on a flat, soft, protected surface.
2
Place the wall mounting arm onto the back of the monitor. Line up the holes of the arm with the holes in the back of
the monitor.
3
Insert the 4 screws into the holes and tighten.
4
Reconnect the cables. Refer to the user's manual that came with the optional wall mounting arm for instructions on
attaching it to the wall.