HP Integrity Superdome SX2000 FC2143 and FC2243 4Gb PCI-X 2.0 Host Bus Adapter - Page 14
Removing, bracket
 |
View all HP Integrity Superdome SX2000 manuals
Add to My Manuals
Save this manual to your list of manuals |
Page 14 highlights
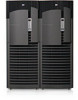
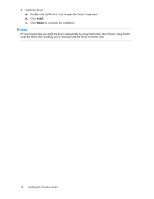
Installing the HBA To install the HBA: 1. Turn off the computer. 2. Open and remove the computer cover. 3. Wearing an anti-static wrist strap, remove the blank panel from an empty PCI-X slot. NOTE: The HBA comes with a standard PCI bracket installed. In addition, HP provides a low-profile mounting bracket in the box with the HBA. This low-profile bracket is shorter than the standard bracket: approximately 7.9 cm (3.11 in.) compared to 12.06 cm (4.75 in.) long. 4. If you require a different mounting bracket follow these steps, otherwise, go to step 5. a. Remove the mounting bracket screws from the top of the HBA. Figure 1 Removing the bracket b. Remove the bracket and store it for future use. c. Align the new mounting bracket tabs with the holes in the HBA. NOTE: Be careful not to push the bracket past the transceiver housing's grounding tabs. Ensure that the light emitting diodes (LEDs) are properly aligned with the holes in the bracket. d. Replace the screws that attach the HBA to the bracket. 5. Inset the HBA into the slot and press firmly until the HBA is seated properly. NOTE: Some HP server models support only PCI-X HBAs inserted in optional PCI-X riser cards or cages. For instructions on installing the riser card or cage, see your server documentation. 6. Secure the HBA to the chassis, following the server manufacturer's instructions. 7. Replace and close the computer cover. Insert and tighten the computer cover screws. 14 Installing the HBAs
-
 1
1 -
2
-
3
-
4
-
5
-
6
-
7
-
8
-
 9
9 -
 10
10 -
 11
11 -
 12
12 -
 13
13 -
 14
14 -
 15
15 -
 16
16 -
 17
17 -
 18
18 -
 19
19 -
20
-
21
-
22
-
23
-
24
-
25
-
26
-
27
-
28
-
29
-
30
 |
 |