HP LaserJet 4100 HP LaserJet 4100mfp -User Guide - Page 81
Clearing jams from the top cover and toner cartridge area, If toner gets on your clothing
 |
View all HP LaserJet 4100 manuals
Add to My Manuals
Save this manual to your list of manuals |
Page 81 highlights
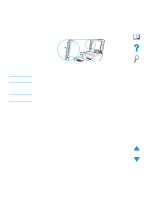
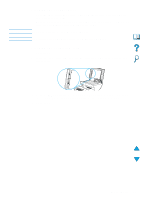
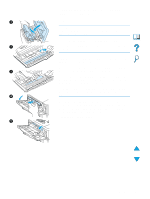
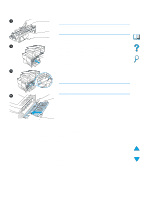
Clearing jams from the top cover and toner cartridge area 1 1 Open the top cover and remove the toner cartridge. CAUTION To prevent damage to the toner cartridge, do not expose it to light for more than a few minutes. 2 Use the green handle to lift the paper-access plate. 2 3 Slowly pull the media out of the product. Do not tear the media. Note If media is difficult to remove, try clearing it from the input tray area (see "Clearing jams from input trays" on page 80). Avoid spilling loose toner. Using a dry, lint-free cloth, clean any 3 loose toner that might have fallen into the product. If loose toner falls into the product, it might cause temporary problems with print quality. Loose toner should clear from the paper path after a few pages are printed. If toner gets on your clothing, wipe it off with a dry cloth and wash the clothing in cold water. (Hot water sets toner into 4 fabric.) 4 Open Tray 1 and remove the entrance cover to check for any additional jammed media. If any is present, remove it. 5 Rotate the paper guide to check for additional jammed media. If any is present, remove it. Continued on the next page. 5 Clearing jams 79
-
 1
1 -
2
-
3
-
4
-
5
-
6
-
7
-
8
-
9
-
10
-
11
-
12
-
13
-
14
-
15
-
16
-
17
-
18
-
19
-
20
-
21
-
22
-
23
-
24
-
25
-
26
-
27
-
28
-
29
-
30
-
31
-
32
-
33
-
34
-
35
-
36
-
37
-
38
-
39
-
40
-
41
-
42
-
43
-
44
-
45
-
46
-
47
-
48
-
49
-
50
-
51
-
52
-
53
-
54
-
55
-
56
-
57
-
58
-
59
-
60
-
61
-
62
-
63
-
64
-
65
-
66
-
67
-
68
-
69
-
70
-
71
-
72
-
73
-
74
-
75
-
 76
76 -
 77
77 -
 78
78 -
 79
79 -
 80
80 -
 81
81 -
 82
82 -
 83
83 -
 84
84 -
 85
85 -
 86
86 -
87
-
88
-
89
-
90
-
91
-
92
-
93
-
94
-
95
-
96
-
97
-
98
-
99
-
100
-
101
-
102
-
103
-
104
-
105
-
106
-
107
-
108
-
109
-
110
-
111
-
112
-
113
-
114
-
115
-
116
-
117
-
118
-
119
-
120
-
121
-
122
-
123
-
124
-
125
-
126
-
127
-
128
-
129
-
130
-
131
-
132
-
133
-
134
-
135
-
136
-
137
-
138
-
139
-
140
-
141
-
142
-
143
-
144
-
145
-
146
-
147
-
148
-
149
-
150
-
151
-
152
-
153
-
154
-
155
-
156
-
157
-
158
-
159
-
160
-
161
-
162
-
163
-
164
 |
 |
