HP LaserJet 9040/9050 HP LaserJet MFP Multifunction Finisher - Administrator G - Page 18
Print a booklet on Macintosh computers, Layout options for printing on both sides of the paper
 |
View all HP LaserJet 9040/9050 manuals
Add to My Manuals
Save this manual to your list of manuals |
Page 18 highlights
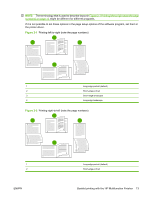
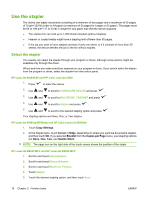
NOTE: The following procedure changes the printer settings temporarily for a print job. After the document prints, the printer settings return to the defaults that are configured in the printer driver. To change the printer default settings, see Change default settings on Windows computers on page 14. 1. In the software program, open the document to be printed. 2. Click File, and then click Print. 3. Select the printer. 4. Click Preferences or Properties. 5. Click the Finishing tab, and select a number from Print on Both Sides. 6. Select Flip Pages Up, if necessary. 7. On the Booklet Layout drop-down menu, select the booklet layout. The image to the right of the menu illustrates the layout. 8. Click OK. Print a booklet on Macintosh computers Use the following steps to print a booklet from a software program on Macintosh computers. Before printing a booklet for the first time, make sure that the HP Manual Duplex and Booklet software has been installed. This software requires a custom installation and is available for Mac OS 9.2.2 and earlier. NOTE: Mac OS X cannot print a booklet, but you can still use the HP Multifunction Finisher as an output device. 1. In the software program, open the document to be printed. 2. Click File, and then click Print. 3. Select Layout. 4. Click Print on Both Sides. 5. On the drop-down menu, select Plug-In Preferences, select Print-Time Filters, and select Booklet. 6. Click Save Settings. 7. Click Booklet Printing. 8. Click Format Booklet. 9. On the drop-down menu, select the paper size. 10. Click Print. Layout options for printing on both sides of the paper The available print layout options are shown in Figure 2-1 Printing left-to-right (note the page numbers) on page 13 and Figure 2-2 Printing right-to-left (note the page numbers) on page 13. Select the binding and orientation options for the print job from the page setup options of the software program, if possible 12 Chapter 2 Finisher tasks ENWW
-
 1
1 -
2
-
3
-
4
-
5
-
6
-
7
-
8
-
9
-
10
-
11
-
12
-
 13
13 -
 14
14 -
 15
15 -
 16
16 -
 17
17 -
 18
18 -
 19
19 -
 20
20 -
 21
21 -
 22
22 -
 23
23 -
24
-
25
-
26
-
27
-
28
-
29
-
30
-
31
-
32
-
33
-
34
-
35
-
36
-
37
-
38
-
39
-
40
-
41
-
42
-
43
-
44
-
45
-
46
-
47
-
48
-
49
-
50
-
51
-
52
-
53
-
54
-
55
-
56
 |
 |