HP LaserJet Enterprise M605 User Guide 1 - Page 115
Rotate the output bin outward to remove it., The fuser is very hot. To avoid burns
 |
View all HP LaserJet Enterprise M605 manuals
Add to My Manuals
Save this manual to your list of manuals |
Page 115 highlights
3. If an optional duplexer is installed, lift it and pull it straight out. Set it aside. 4. Open the rear output bin. 5. Remove the rear output bin. Place a finger near the left-side hinge, and push firmly to the right until the hinge-pin clears the hole inside the product. Rotate the output bin outward to remove it. WARNING! The fuser is very hot. To avoid burns, allow the fuser to cool before continuing. ENWW Clear paper jams 105
-
 1
1 -
2
-
3
-
4
-
5
-
6
-
7
-
8
-
9
-
10
-
11
-
12
-
13
-
14
-
15
-
16
-
17
-
18
-
19
-
20
-
21
-
22
-
23
-
24
-
25
-
26
-
27
-
28
-
29
-
30
-
31
-
32
-
33
-
34
-
35
-
36
-
37
-
38
-
39
-
40
-
41
-
42
-
43
-
44
-
45
-
46
-
47
-
48
-
49
-
50
-
51
-
52
-
53
-
54
-
55
-
56
-
57
-
58
-
59
-
60
-
61
-
62
-
63
-
64
-
65
-
66
-
67
-
68
-
69
-
70
-
71
-
72
-
73
-
74
-
75
-
76
-
77
-
78
-
79
-
80
-
81
-
82
-
83
-
84
-
85
-
86
-
87
-
88
-
89
-
90
-
91
-
92
-
93
-
94
-
95
-
96
-
97
-
98
-
99
-
100
-
101
-
102
-
103
-
104
-
105
-
106
-
107
-
108
-
109
-
 110
110 -
 111
111 -
 112
112 -
 113
113 -
 114
114 -
 115
115 -
 116
116 -
 117
117 -
 118
118 -
 119
119 -
 120
120 -
121
-
122
-
123
-
124
-
125
-
126
-
127
-
128
-
129
-
130
-
131
-
132
-
133
-
134
-
135
-
136
-
137
-
138
-
139
-
140
 |
 |
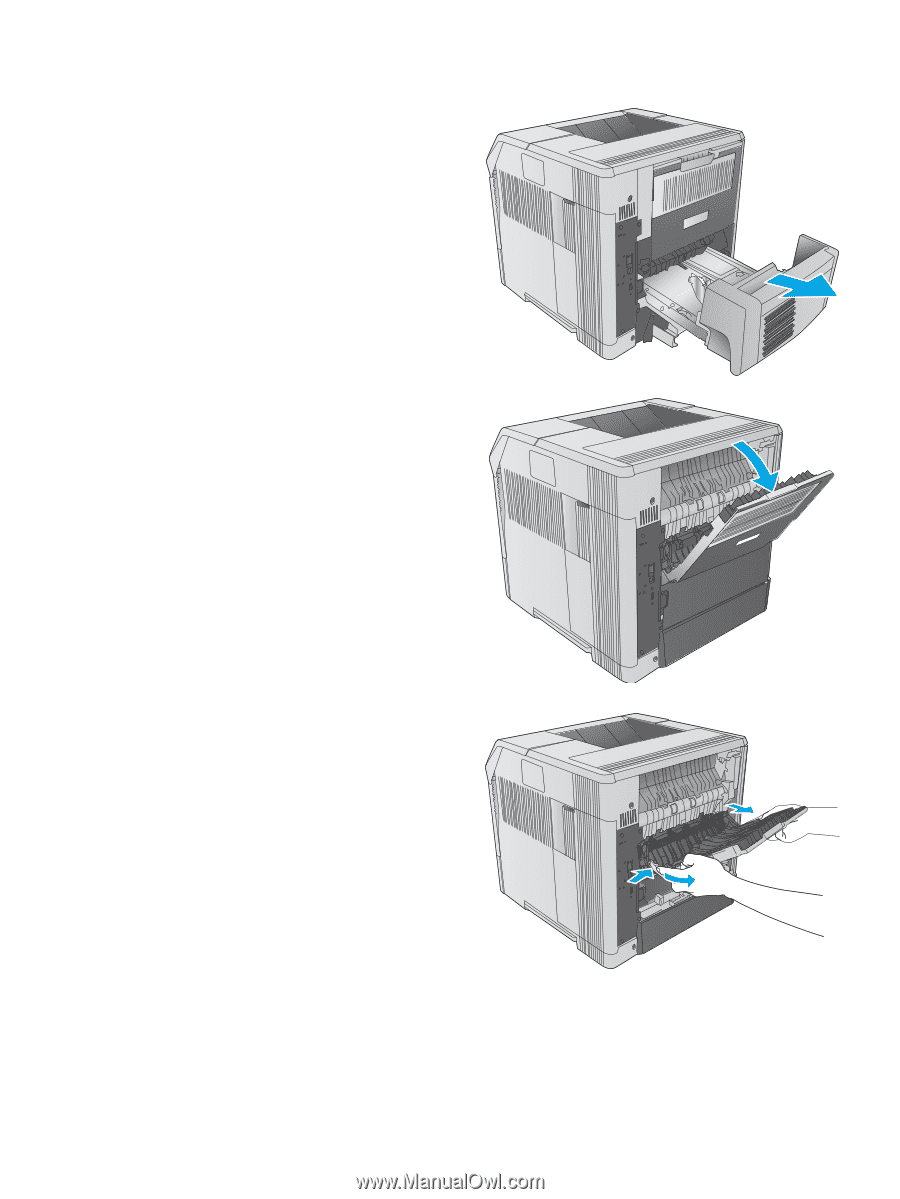
3.
If an optional duplexer is installed, lift it and pull it
straight out. Set it aside.
4.
Open the rear output bin.
5.
Remove the rear output bin. Place a finger near the
left-side hinge, and push firmly to the right until
the hinge-pin clears the hole inside the product.
Rotate the output bin outward to remove it.
WARNING!
The fuser is very hot. To avoid burns,
allow the fuser to cool before continuing.
ENWW
Clear paper jams
105