HP LaserJet M9040/M9050 HP LaserJet M9040/M9050 MFP - (multiple language) Use
HP LaserJet M9040/M9050 - Multifunction Printer Manual
 |
View all HP LaserJet M9040/M9050 manuals
Add to My Manuals
Save this manual to your list of manuals |
HP LaserJet M9040/M9050 manual content summary:
- HP LaserJet M9040/M9050 | HP LaserJet M9040/M9050 MFP - (multiple language) Use - Page 1
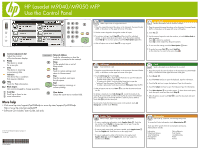
HP LaserJet M9040/M9050 MFP Use the Control Panel HP CM8060 Color MFP with Edgeline printing. C Clear button Clears the active text or number field. More help • Visit www.hp.com/support/ljm9040mfp or www.hp.com/support/ljm9050mfp http://www.hp.com/go/useMyMFP • Software CD includes: User Guide - HP LaserJet M9040/M9050 | HP LaserJet M9040/M9050 MFP - (multiple language) Use - Page 2
MFP HP LaserJet M9040/M9050 Utilisation du panneau de commande HP CM8060 Color MFP with Edgeline Technology .hp.com/support/ljm9040mfp or www.hp.com/support/ljm9050mfp http://www.hp.com/go/useMyMFP • Le CD du logiciel inclut les éléments suivants : Guide impression Dépannage Réinitialisation Service
-
 1
1 -
 2
2
 |
 |
*CC395-90901*
*CC395-90901*
CC395-90901
Copy
Job Storage
Supplies Status
Network Address
Touch for information on how the
product is connected to the network.
Data
The device is receiving
or processing data.
E-mail
Administration
Fax (optional)
Contrast-adjustment dial
Adjust the contrast
of the touchscreen display.
Ready
The device is ready
for a new job.
Attention
The device has a condition
that requires attention.
Help
Touch for Help information.
Black Copies
Use numeric keypad to change quantities.
Scroll bar
Scroll up or down to see
more information.
More help
• Visit www.hp.com/support/ljm9040mfp or www.hp.com/support/ljm9050mfp
• Software CD includes: User Guide, Job aids
HP LaserJet M9040/M9050 MFP
Use the Control Panel
Sleep
Put the product into or out of
Sleep mode.
Reset
Touch to restore settings and
return to Home screen.
Stop
Stop the product, and open
the job queue.
Start
Begin copying, scanning, or
resume printing.
Clear button
Clears the active text or number field.
Send a document to one or more fax numbers
1. Place the original document face-down in the Automatic Document Feeder
(ADF), or face-down on the upper left corner of the glass.
2. Touch
Fax
.
3. Use the numeric keypad to enter fax numbers, or touch
Address Book
to
select recipients.
Touch
to delete fax number(s)
Touch
to enter multiple Fax Recipient numbers
4. To see more fax settings, touch the
More Options
button.
5. To send a fax, press
Start
or touch
Send Fax
on the status bar. To cancel a fax, press Stop
.
Make copies from an original document
1. Place the original document face-down in the Automatic Document Feeder
(ADF), or face-down on the upper left corner of the glass.
2. Use the numeric keypad to change the number of copies.
3. To customize settings, touch
Copy
and then touch the individual
options. To learn more about each option, touch that option and then
touch
Help
. To see more options, touch the
More Options
button.
4. After all options are set touch
Start
to copy original.
Send a document as an attachment to an e-mail
1. Place the original document face-down in the Automatic Document Feeder
(ADF), or face-down on the upper left corner of the glass.
2. Touch
E-mail
.
3. Touch the
From:
text box to open the keyboard. Type the information.
4. Touch the
To:
text box to open the keyboard. Type the information.
5. Touch the
Subject:
text box to open the keyboard. Type the information.
6. Touch
More Options
to set other options. To learn about each option,
touch the option name and then touch
Help
.
7. After all options are set, touch
Start
to scan the document and send
the e-mail.
Scan and store a job
1. Place the original document face-down in the Automatic Document Feeder
(ADF), or face-down on the upper left corner of the glass.
2. Touch
Job Storage
. Touch
Create
.
•
To create a Job Name: Touch the Job Name box to open the keyboard.
Type the name of the job. Touch
OK
.
•
To create a Job Folder: Touch the Folder Name box to open the
keyboard. Type the name of the folder. Touch
OK
.
•
To make a job private: Scroll down and touch
PIN to print
. Enter the PIN
3. After all options are set, touch
Start
to scan the document and save
the file.
To retrieve a stored job, touch
Job Storage
. Locate the stored job by
touching the correct folder and then touching the job name. If the selected
job is a private job you must enter the PIN in order to print or delete it.
Touch Start
to print the stored job.
To print a list of jobs that have been stored on the product, touch
Job
Storage
, and then touch
Print List.
Status of trays, paper size, paper type, supply status
• To view or update tray information, touch
Supplies Status
. Touch the
tray number. Touch
Modify
to change paper size or type. To see the
location of each tray, touch
Details.
• To view a supply name, level, and action needed, touch
Supplies Status
.
Touch the
Supplies
tab. Scroll down to see the supply levels.
• To view a supply part number or the location of a supply, touch
Supplies Status
, touch the
Supplies
tab, touch any supply line,
and then touch
Details
.
Use to set up, customize, and manage the product
To access the Product information, touch
Administration
.
Touch any of the specific items for a description and access.
Administration includes:
Information
Default Job Options
Time/Scheduling
Management
Initial Set-up
Device Behavior
Print Quality
Troubleshooting
Resets
Service
HP CM8060 Color MFP with Edgeline Technology
C
Ready
Data
Attention
C
© 2007 Hewlett-Packard Development Company, L.P.
www.hp.com