HP LaserJet Pro CP1025 Service Manual - Page 54
Fuser delivery assembly, Position the fuser pressure roller for removal, Before proceeding
 |
View all HP LaserJet Pro CP1025 manuals
Add to My Manuals
Save this manual to your list of manuals |
Page 54 highlights
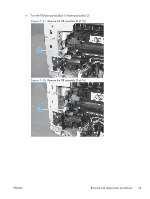
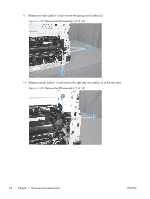
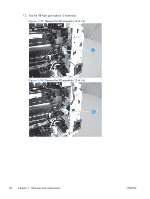
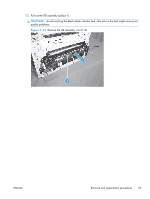
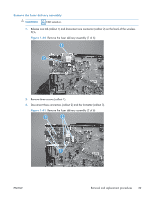
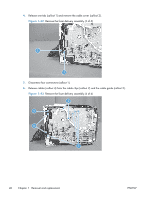
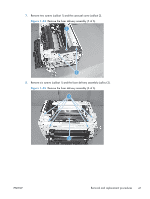
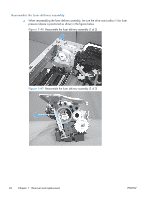
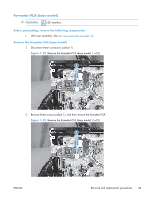
Fuser delivery assembly NOTE: For this product, the fuser and the paper delivery components are one assembly. Position the fuser pressure roller for removal You must rotate the pressure roller to the correct position before removing the fuser delivery assembly. 1. When the product is in the Ready state, press and hold the Auto-On/Auto-Off (power) button for about seven seconds or until you hear subtle movement within the product and the Ready light turns off. 2. Release the Auto-On/Auto-Off (power) button. The product power will be off and the fuser pressure roller is in the removal position. Unplug the product before removing any components. Before proceeding, remove the following components: ● 18 Right cover assembly. See Right cover assembly on page. ● Left cover assembly. See Left cover assembly on page 19. ● Top door assembly. See Top door assembly on page 20. ● Rear top cover assembly. See Rear top cover assembly on page 22. ● Formatter (base model) or formatter and wireless PCA (plus model). See Formatter PCA (base model) on page 43 or Formatter and wireless PCA (plus model) on page 44. 38 Chapter 1 Removal and replacement ENWW
-
 1
1 -
2
-
3
-
4
-
5
-
6
-
7
-
8
-
9
-
10
-
11
-
12
-
13
-
14
-
15
-
16
-
17
-
18
-
19
-
20
-
21
-
22
-
23
-
24
-
25
-
26
-
27
-
28
-
29
-
30
-
31
-
32
-
33
-
34
-
35
-
36
-
37
-
38
-
39
-
40
-
41
-
42
-
43
-
44
-
45
-
46
-
47
-
48
-
 49
49 -
 50
50 -
 51
51 -
 52
52 -
 53
53 -
 54
54 -
 55
55 -
 56
56 -
 57
57 -
 58
58 -
 59
59 -
60
-
61
-
62
-
63
-
64
-
65
-
66
-
67
-
68
-
69
-
70
-
71
-
72
-
73
-
74
-
75
-
76
-
77
-
78
-
79
-
80
-
81
-
82
-
83
-
84
-
85
-
86
-
87
-
88
-
89
-
90
-
91
-
92
-
93
-
94
-
95
-
96
-
97
-
98
-
99
-
100
-
101
-
102
-
103
-
104
-
105
-
106
-
107
-
108
-
109
-
110
-
111
-
112
-
113
-
114
-
115
-
116
-
117
-
118
-
119
-
120
-
121
-
122
-
123
-
124
-
125
-
126
-
127
-
128
-
129
-
130
-
131
-
132
-
133
-
134
-
135
-
136
-
137
-
138
-
139
-
140
-
141
-
142
-
143
-
144
-
145
-
146
-
147
-
148
-
149
-
150
-
151
-
152
-
153
-
154
-
155
-
156
-
157
-
158
-
159
-
160
-
161
-
162
-
163
-
164
-
165
-
166
 |
 |