HP LaserJet Pro M1536 HP LaserJet Pro M1530 - User Guide - Page 141
Set the product to send received faxes to a computer, Use autoreduction for incoming faxes
 |
View all HP LaserJet Pro M1536 manuals
Add to My Manuals
Save this manual to your list of manuals |
Page 141 highlights
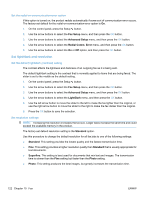
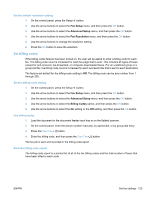
3. Use the arrow buttons to select the Basic Setup menu, and then press the OK button. 4. Use the arrow buttons to select the Answer Ring Type menu, and then press the OK button. 5. Use the arrow buttons to select the ring pattern that you want, and then press the OK button. 6. After product installation is complete, ask someone to send a fax to you in order to verify that the ring-pattern service is working correctly. Set the product to send received faxes to a computer NOTE: Receiving faxes by using a computer is not supported for Macintosh. Receiving faxes to a computer is available only if a full software installation was performed during initial product setup. To receive faxes to your computer, turn on the receive-to-PC setting in the software. 1. Open HP ToolboxFX. 2. Select the product. 3. Click Fax. 4. Click Fax Tasks. 5. Under Fax Receive Mode, select Receive faxes to this computer. 6. To receive notification that a fax has been received to the computer, select the Display a message when a fax is received to this computer option. 7. Click the Apply button. NOTE: The receive to PC feature can be set for one computer only. If this setting has been activated from a computer, the setting disappears from the software and cannot be set from another computer. To receive faxes to a different computer, you first must deactivate the setting from the control panel. Turn off the receive-to-PC setting from the control panel The receive-to-PC setting can be activated only from one computer. If for any reason that computer is no longer available, you can use the following procedure to turn the receive-to-PC setting off from the control panel. 1. On the control panel, press the Setup button. 2. Use the arrow buttons to select the Fax Setup menu, and then press the OK button. 3. Use the arrow buttons to select the Advanced Setup menu, and then press the OK button. 4. Use the arrow buttons to select the Stop Recv to PC item, and then press the OK button. Use autoreduction for incoming faxes If the fit-to-page option is turned on, the product automatically reduces long faxes up to 75% to fit the information on the default paper size (for example, the fax is reduced from legal to letter size). If the fit-to-page option is turned off, long faxes print at full size on multiple pages. The factory-set default for incoming fax autoreduction is On. ENWW Set fax settings 127
-
 1
1 -
2
-
3
-
4
-
5
-
6
-
7
-
8
-
9
-
10
-
11
-
12
-
13
-
14
-
15
-
16
-
17
-
18
-
19
-
20
-
21
-
22
-
23
-
24
-
25
-
26
-
27
-
28
-
29
-
30
-
31
-
32
-
33
-
34
-
35
-
36
-
37
-
38
-
39
-
40
-
41
-
42
-
43
-
44
-
45
-
46
-
47
-
48
-
49
-
50
-
51
-
52
-
53
-
54
-
55
-
56
-
57
-
58
-
59
-
60
-
61
-
62
-
63
-
64
-
65
-
66
-
67
-
68
-
69
-
70
-
71
-
72
-
73
-
74
-
75
-
76
-
77
-
78
-
79
-
80
-
81
-
82
-
83
-
84
-
85
-
86
-
87
-
88
-
89
-
90
-
91
-
92
-
93
-
94
-
95
-
96
-
97
-
98
-
99
-
100
-
101
-
102
-
103
-
104
-
105
-
106
-
107
-
108
-
109
-
110
-
111
-
112
-
113
-
114
-
115
-
116
-
117
-
118
-
119
-
120
-
121
-
122
-
123
-
124
-
125
-
126
-
127
-
128
-
129
-
130
-
131
-
132
-
133
-
134
-
135
-
 136
136 -
 137
137 -
 138
138 -
 139
139 -
 140
140 -
 141
141 -
 142
142 -
 143
143 -
 144
144 -
 145
145 -
 146
146 -
147
-
148
-
149
-
150
-
151
-
152
-
153
-
154
-
155
-
156
-
157
-
158
-
159
-
160
-
161
-
162
-
163
-
164
-
165
-
166
-
167
-
168
-
169
-
170
-
171
-
172
-
173
-
174
-
175
-
176
-
177
-
178
-
179
-
180
-
181
-
182
-
183
-
184
-
185
-
186
-
187
-
188
-
189
-
190
-
191
-
192
-
193
-
194
-
195
-
196
-
197
-
198
-
199
-
200
-
201
-
202
-
203
-
204
-
205
-
206
-
207
-
208
-
209
-
210
-
211
-
212
-
213
-
214
-
215
-
216
-
217
-
218
-
219
-
220
-
221
-
222
-
223
-
224
-
225
-
226
-
227
-
228
-
229
-
230
-
231
-
232
-
233
-
234
-
235
-
236
-
237
-
238
-
239
-
240
-
241
-
242
-
243
-
244
-
245
-
246
-
247
-
248
-
249
-
250
-
251
-
252
-
253
-
254
-
255
-
256
-
257
-
258
-
259
-
260
-
261
-
262
-
263
-
264
-
265
-
266
-
267
-
268
-
269
-
270
-
271
-
272
-
273
-
274
-
275
-
276
-
277
-
278
-
279
-
280
-
281
-
282
-
283
-
284
-
285
-
286
 |
 |
