HP MP6 HP MP6 Digital Signage Player
HP MP6 Manual
 |
View all HP MP6 manuals
Add to My Manuals
Save this manual to your list of manuals |
HP MP6 manual content summary:
- HP MP6 | HP MP6 Digital Signage Player - Page 1
HP MP6 Digital Signage Player - HP MP6 | HP MP6 Digital Signage Player - Page 2
Windows, and Windows Vista are either trademarks or registered trademarks of Microsoft Corporation in the United States and/or other countries. The only warranties for HP products and services Hewlett-Packard Company. HP MP6 Digital Signage Player First Edition (February 2013) Document part number: - HP MP6 | HP MP6 Digital Signage Player - Page 3
About This Book This guide provides basic information for upgrading HP MP6 Digital Signage Players. WARNING! Text set off in this manner indicates that failure to follow directions could result in bodily harm or loss of life. CAUTION: Text set - HP MP6 | HP MP6 Digital Signage Player - Page 4
iv About This Book - HP MP6 | HP MP6 Digital Signage Player - Page 5
Features ...1 MP6 Front Panel Components ...1 MP6 Rear Panel Components ...2 Keyboard ...3 Using the Windows Logo Key 4 Serial Number Location ...5 2 MP6 Hardware Upgrades 6 Serviceability Features ...6 Warnings and Cautions ...6 Connecting the Power Cord ...7 Removing the Computer Access Panel - HP MP6 | HP MP6 Digital Signage Player - Page 6
Appendix C Computer Operating Guidelines, Routine Care and Shipping Preparation ........ 31 Computer Operating Guidelines and Routine Care 31 Shipping Preparation ...32 Index ...33 vi - HP MP6 | HP MP6 Digital Signage Player - Page 7
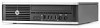
2 Power On Light 6 USB (Universal Serial Bus) Ports 3 SD Media Card Reader (optional) 7 Hard Drive Activity Light 4 Headphone Connector 8 icon in the Windows taskbar. NOTE: The Power On Light is normally green when the power is on. If it is flashing red, there is a problem with the computer - HP MP6 | HP MP6 Digital Signage Player - Page 8
three monitor ports are active. The integrated graphics operate DisplayPort2 (top port). The MXM/ATI drivers operate DisplayPort1 (bottom port) and VGA. If the integrated graphics are disabled in the clicking the Realtek HD Audio Manager icon in the Windows taskbar. 2 Chapter 1 Product Features - HP MP6 | HP MP6 Digital Signage Player - Page 9
of the mouse. 6 Ctrl Keys Used in combination with another key; their effect depends on the application software you are using. 7 Application Key1 8 Windows Logo Keys1 Used (like the right mouse button) to open pop-up menus in a Microsoft Office application. May perform other functions in other - HP MP6 | HP MP6 Digital Signage Player - Page 10
operating system. Refer to Keyboard on page 3 to identify the Windows Logo key. Table 1-4 Windows Logo Key Functions The following Windows Logo Key functions are available in Microsoft Windows XP, Microsoft Windows Vista, and Microsoft Windows 7. Windows Logo Key Displays or hides the Start menu - HP MP6 | HP MP6 Digital Signage Player - Page 11
(on numpad) Zooms in Windows Logo Key + - (on numpad) Zooms out Serial Number Location Each computer has a unique serial number and a product ID number that are located on the top cover of the computer. Keep these numbers available for use when contacting customer service for assistance. Figure - HP MP6 | HP MP6 Digital Signage Player - Page 12
service. No tools are needed for most of the installation procedures described in this chapter. Warnings and Cautions Before performing upgrades be sure to carefully read all of the applicable instructions, cautions, and warnings in this guide This guide is located on the Web at http://www.hp.com/ - HP MP6 | HP MP6 Digital Signage Player - Page 13
Connecting the Power Cord When connecting the power supply, it is important to follow the steps below to ensure the power cord does not pull free from the computer. 1. Connect the round end of the power cord to the power supply connector on the rear of the computer (1). 2. Insert the power cord - HP MP6 | HP MP6 Digital Signage Player - Page 14
internal components, you must remove the access panel: 1. Remove/disengage any security devices that prohibit opening the computer. 2. Remove all removable media, such as compact discs or USB flash drives, from the computer. 3. Turn off the computer properly through the operating system, then turn - HP MP6 | HP MP6 Digital Signage Player - Page 15
Replacing the Computer Access Panel 1. Align the tabs on the panel with the slots on the chassis then slide the panel towards the front of the chassis until it stops (1). 2. Tighten the thumbscrew to secure the access panel (2). Figure 2-3 Replacing the Computer Access Panel Replacing the Computer - HP MP6 | HP MP6 Digital Signage Player - Page 16
Removing the Front Bezel 1. Remove/disengage any security devices that prohibit opening the computer. 2. Remove all removable media, such as compact discs or USB flash drives, from the computer. 3. Turn off the computer properly through the operating system, then turn off any external - HP MP6 | HP MP6 Digital Signage Player - Page 17
Replacing the Front Bezel Insert the three hooks on the bottom side of the bezel into the rectangular holes on the chassis (1) then rotate the top side of the bezel onto the chassis (2) and snap it into place. Figure 2-5 Replacing the Front Bezel Replacing the Front Bezel 11 - HP MP6 | HP MP6 Digital Signage Player - Page 18
orientation with the tower stand included with the computer. 1. Remove/disengage any security devices that prohibit opening the computer. 2. Remove all removable media, such as compact discs or USB flash drives, from the computer. 3. Turn off the computer properly through the operating system, then - HP MP6 | HP MP6 Digital Signage Player - Page 19
Color 1 SATA 3.0 SATA1 light blue 2 Power SATA PWR1 white 3 Mobile PCI Express Module MXM black 4 Hood Sensor HSENSE white 5 USB MEDIA black 6 Mini PCI Express x1 X1PCIEXP1 black 7 Mini-SATA mSATA white Component Optical Drive (not present) Optical Drive (not present - HP MP6 | HP MP6 Digital Signage Player - Page 20
-standard 204-pin ● unbuffered non-ECC PC3-12800 DDR3-1600 MHz-compliant ● 1.5 volt DDR3-SDRAM SODIMMs The DDR3-SDRAM SODIMMs must also: ● support CAS latency 11 DDR3 1600 MHz (11-11-11 timing) ● contain the mandatory Joint Electronic Device Engineering Council (JEDEC) specification In addition, the - HP MP6 | HP MP6 Digital Signage Player - Page 21
Populating SODIMM Sockets There are two SODIMM sockets on the system board, with one socket per channel. The sockets are labeled XMM1 and XMM3. The XMM1 socket operates in memory channel A. The XMM3 socket operates in memory channel B. Figure 2-8 SODIMM Socket Locations Table 2-1 SODIMM Socket - HP MP6 | HP MP6 Digital Signage Player - Page 22
any of the contacts. Doing so may damage the module. 1. Remove/disengage any security devices that prohibit opening the computer. 2. Remove all removable media, such as compact discs or USB flash drives, from the computer. 3. Turn off the computer properly through the operating system, then turn off - HP MP6 | HP MP6 Digital Signage Player - Page 23
8. To remove a SODIMM, press outward on the two latches on each side of the SODIMM (1) then pull the SODIMM out of the socket (2). Figure 2-9 Removing a SODIMM 9. Slide the new SODIMM into the socket at approximately a 30° angle (1) then press the SODIMM down (2) so that the latches lock it in - HP MP6 | HP MP6 Digital Signage Player - Page 24
12. Reconnect the power cord and turn on the computer. 13. Lock any security devices that were disengaged when the computer cover or access panel was removed. The computer automatically recognizes the additional memory when you turn on the computer. 18 Chapter 2 MP6 Hardware Upgrades - HP MP6 | HP MP6 Digital Signage Player - Page 25
Replacing the Hard Drive NOTE: The MP6 supports only 2.5-inch Serial ATA (SATA) internal hard carrier. 1. Remove/disengage any security devices that prohibit opening the computer. 2. Remove all removable media, such as USB flash drives, from the computer. 3. Turn off the computer properly through - HP MP6 | HP MP6 Digital Signage Player - Page 26
carrier straight up and out of the chassis. Figure 2-12 Removing the Hard Drive Carrier 9. Remove the four guide screws from the sides of the hard drive carrier. Figure 2-13 Removing the Guide Screws 10. Lift the hard drive up to the top of the carrier (1) and slide the drive out of - HP MP6 | HP MP6 Digital Signage Player - Page 27
. Figure 2-15 Sliding the Hard Drive into the Carrier 12. Set the hard drive down into the bottom of the carrier (1), then replace the four guide screws on the sides of the carrier to secure the drive in the carrier (2). Figure 2-16 Lowering the Hard Drive and Replacing the - HP MP6 | HP MP6 Digital Signage Player - Page 28
13. To place the hard drive carrier back in the chassis, align the guide screws with the slots on the drive bay, drop the carrier straight down into the drive bay (1), and press the handle on the carrier all - HP MP6 | HP MP6 Digital Signage Player - Page 29
Installing and Removing a Port Cover An optional rear port cover is available for the computer. To install the port cover: 1. Thread the cables through the bottom hole on the port cover (1) and connect the cables to the rear ports on the computer. 2. Insert the hooks on the port cover into the slots - HP MP6 | HP MP6 Digital Signage Player - Page 30
Installing a Security Lock Cable Lock There are two cable lock slots on the rear of the computer. The slot next to the thumbscrew should be used when there is no port cover. The slot on the far right should be used when a port cover is installed. Figure 2-20 Installing a Cable Lock with No Port - HP MP6 | HP MP6 Digital Signage Player - Page 31
The front bezel can be locked in place by installing a security screw provided by HP. To install the security screw: 1. Remove/disengage any security devices that prohibit opening the computer. 2. Remove all removable media, such as compact discs or USB flash drives, from the computer. 3. Turn off - HP MP6 | HP MP6 Digital Signage Player - Page 32
7. Remove the black screw on the front of the chassis behind the bezel. The screw is located next to the optical drive slot and is labeled "BEZEL." Figure 2-23 Retrieving the Front Bezel Security Screw 8. Replace the front bezel. 9. Install the security screw through the middle front bezel release - HP MP6 | HP MP6 Digital Signage Player - Page 33
or dispose of in fire or water. Replace the battery only with the HP spare designated for this product. CAUTION: Before replacing the battery, it is http://www.hp.com/ recycle. 1. Remove/disengage any security devices that prohibit opening the computer. 2. Remove all removable media, such as - HP MP6 | HP MP6 Digital Signage Player - Page 34
7. Depending on the type of battery holder on the system board, complete the following instructions to replace the battery. Type 1 a. Lift the battery out of its holder. Figure A-1 Removing a Coin Cell Battery (Type 1) b. Slide the replacement battery into position, positive - HP MP6 | HP MP6 Digital Signage Player - Page 35
b. Insert the new battery and position the clip back into place. Figure A-3 Removing a Coin Cell Battery (Type 3) NOTE: After the battery has been replaced, use the following steps to complete this procedure. 8. Replace the computer access panel. 9. Plug in the computer and turn on power to the - HP MP6 | HP MP6 Digital Signage Player - Page 36
work mat. If you do not have any of the suggested equipment for proper grounding, contact an HP authorized dealer, reseller, or service provider. NOTE: For more information on static electricity, contact an HP authorized dealer, reseller, or service provider. 30 Appendix B Electrostatic Discharge - HP MP6 | HP MP6 Digital Signage Player - Page 37
C Computer Operating Guidelines, Routine Care and Shipping Preparation Computer Operating Guidelines and Routine Care Follow these guidelines to properly set up and care for the computer and monitor: ● Keep the computer away from excessive moisture, direct sunlight, and extremes of heat and cold. ● - HP MP6 | HP MP6 Digital Signage Player - Page 38
tape cartridges, CDs, or USB flash drives. Be sure that the backup media is not exposed to electrical or magnetic impulses while stored or in transit. NOTE the system power is turned off. 2. Remove and store all removable media. 3. Turn off the computer and external devices. 4. Disconnect the power - HP MP6 | HP MP6 Digital Signage Player - Page 39
19 USDT removal 19 I installation guidelines 6 installing battery 27 USDT hard drive 19 USDT memory 14 USDT port cover 23 K keyboard components 3 Windows Logo key 4 L locks USDT cable lock 24 USDT front bezel 25 USDT padlock 25 M memory USDT installation 14 USDT socket population 15 USDT
-
 1
1 -
 2
2 -
 3
3 -
 4
4 -
 5
5 -
 6
6 -
 7
7 -
8
-
9
-
10
-
11
-
12
-
13
-
14
-
15
-
16
-
17
-
18
-
19
-
20
-
21
-
22
-
23
-
24
-
25
-
26
-
27
-
28
-
29
-
30
-
31
-
32
-
33
-
34
-
35
-
36
-
37
-
38
-
39
 |
 |

HP MP6 Digital Signage Player