HP Media Center m390n Part Replacement Instructions
HP Media Center m390n Manual
 |
View all HP Media Center m390n manuals
Add to My Manuals
Save this manual to your list of manuals |
HP Media Center m390n manual content summary:
- HP Media Center m390n | Part Replacement Instructions - Page 1
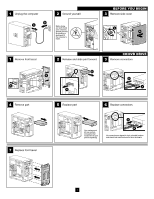
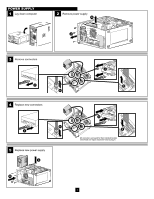
1 Unplug the computer B A 2 Ground yourself Before doing any work inside your computer, ground yourself by touching a metal part of the computer's frame. BEFORE YOU BEGIN 3 Remove side cover A B 1 Remove front bezel 2 Release and slide part forward CD/DVD DRIVE 3 Remove connectors B B A A B A - HP Media Center m390n | Part Replacement Instructions - Page 2
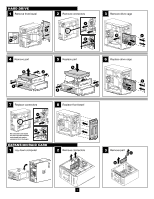
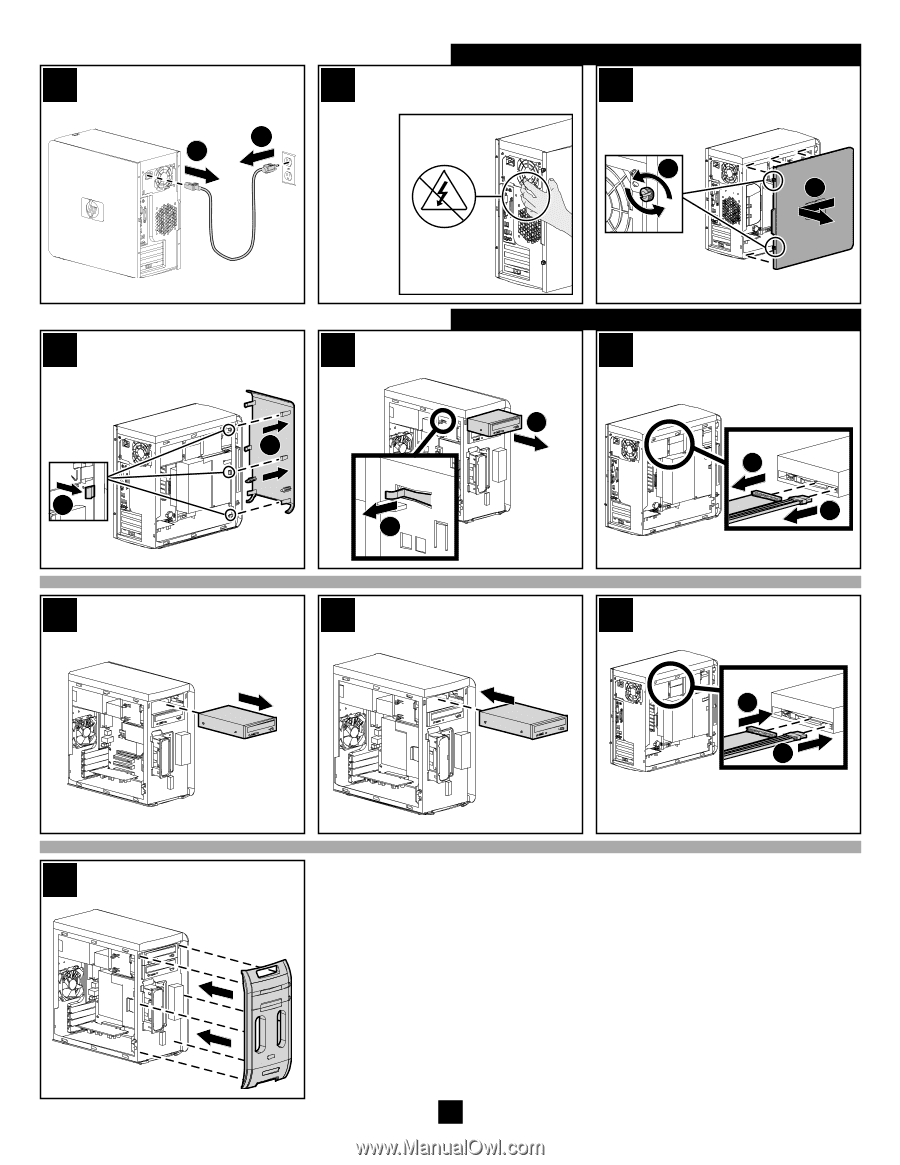
HARD DRIVE 1 Remove front bezel B A 2 Remove connectors A B C 3 Remove drive cage B A C 4 Remove part B A 5 Replace part A A B 6 Replace drive cage B B A 7 Replace connectors A 8 Replace front bezel C B All connectors are keyed for their intended location and should not require excessive - HP Media Center m390n | Part Replacement Instructions - Page 3
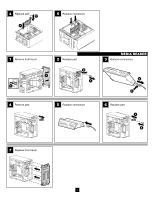
4 Replace part B A 5 Replace connectors 1 Remove front bezel B A 2 Release part B A 4 Remove part 5 Replace connectors MEDIA READER 3 Remove connectors B A 6 Replace part A B 7 Replace front bezel 3 - HP Media Center m390n | Part Replacement Instructions - Page 4
POWER SUPPLY 1 Lay down computer 2 Remove power supply B A 3 Remove connectors C D 4 Replace new connectors D C 5 Replace new power supply A B A B A B All connectors are keyed for their intended location and should not require excessive force to plug in. 4
-
 1
1 -
 2
2 -
 3
3 -
 4
4
 |
 |
1
A
B
A
B
BEFORE YOU BEGIN
CD/DVD DRIVE
1
2
3
1
3
4
5
6
7
Unplug the computer
Ground yourself
Remove side cover
A
B
Remove front bezel
B
A
Remove connectors
Remove part
Replace part
A
B
Replace connectors
Replace front bezel
Before doing
any work inside
your computer,
ground yourself
by touching a
metal part of
the computer’s
frame.
Your replacement
kit may contain
more parts than
needed for the part
you are replacing.
All connectors are keyed for their intended location
and should not require excessive force to plug in.
2
B
A
Release and slide part forward